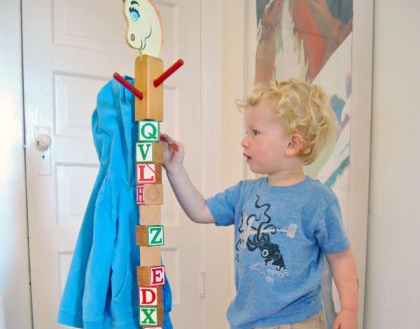
Building blocks are one of the most popular toys available and if you’ve got kids you probably have more than one set of blocks. Instead of storing or giving away your extra set of blocks, you can use them to build this cute hat rack for your growing kids. This unique piece of furniture, which comes to us courtesy of our friends at Built by Kids, can also be educational and if you have enough blocks you can spell out your child’s name or your families initials and use it as a teaching tool for your little one.
Materials:
One set of children’s wood building blocks.
Used lamp or pedestal base
48” long 7/8 dowel for building blocks
20” long 7/16 dowel for hat rack pegs
4” long block of ½” square wood
Paint if desired
Wood screws
Tools:
Cordless drill or drill press
7/8 drill bit
7/16 drill bit
Hand saw
Paint brush
Step by Step Instructions:
1. Select Building Blocks
When selecting your building blocks we suggest going with the standard size which is about 1 ½” on each side. You could go bigger but if you go smaller your hat rack won’t have enough stability. We had some vintage blocks that were painted various colors and we prefer the raw look of unstained blocks as opposed to the shiny blocks you most often see in the stores.
2. Drill Holes
If you’ve got a drill press this makes the job much easier as you need to make sure the hole goes straight down and not at any angle or else your blocks won’t line up correctly. We used a small table vise and our cordless drill, which worked out great.
3. Setup Dowel
We used our drill to also bore out a divot into the wood block for the top of the hat rack and into the base of our lamp legs. We switched out bits and drilled out the holes for the hat rack pegs at about a 45 degree angle. We previously painted the pegs red but it’s your choice. We cut these pegs down to 5” and setup four of them into the wood block. We then glued the dowel into the wood block and had our finished top.
4. Slide Blocks onto Dowel
Now comes the fun part! We slid the blocks onto the dowel and we chose to only use 18 as that seemed like the ideal height. We cut the dowel down to 30” and with the wood top and base the hat rack is about 3 feet tall.
5. Attach Dowel to Base
We drilled a pilot hole into the bottom end of the dowel so our wood screw could be better seated then we drilled another hole through the bottom of the lamp base before attaching the base to the dowel. You should also drop a dab of wood glue onto the end of the dowel to make sure it stays seated on the base.
6. Add Hats and Coats
You’re finished! You can add hats or coats to this rack and your kids now have an easy to reach place to put their favorites instead of on the floor.
Additional Notes
You don’t necessarily need the wood topper. You can drill holes for the hat pegs directly into the side of a block. You could also paint the base or the blocks for a totally different look.
Parents to a little guy who’s two feet tall, Timothy and Laura Dahl founded Built by Kids as an extension of their adventures in raising a capable, confident and independent man. The Dahls are inspired by the Makers of the past and are passionate about introducing the next generation to the skills and creative thinking that will help empower their future.
RELATED STORIES:
Learn How to Build a Storage Step Stool


