You may love butter laden popcorn, but you’ll soon become addicted to this recipe for olive oil popcorn (and feel a whole lot better after eating an entire bowl). Created by Food Network host, Daphne Brogdon, follow this recipe and then tell us in the Comments below what your kids think!

Yield: 4 servings
Active Time: 10 minutes
Total Time: 10 minutes

Ingredients:
6 tablespoons olive oil
1 cup popcorn kernels
Kosher salt

Method:
1. Heat 2 to 3 tablespoons of the olive oil in a large pot over medium heat. Add the popcorn kernels, cover the pot and cook until popped, shaking the pot occasionally, 4 to 5 minutes.

2. Turn off the heat and drizzle the popcorn with the remaining olive oil while stirring. Season with salt and then give one final stir. Transfer to a serving bowl.

What do you think of this recipe? Tell us your additions or substitutions in the Comments below and then hop on over to our Q&A with Daphne where she dishes on raising picky eaters, what’s always in her pantry and more!

Mom, wife, and home cook, Daphne Brogdon, brings a fresh, fun and humorous approach to feeding the family. Whether it is for a PTA meeting or a gals’ night in, Daphne cooks up a storm with simple recipes that will feed a crowd and bring the family together. Learn more about her show by clicking here. 

Crunch into a delicious lettuce cup for lunch or dinner. This scrumptious chicken teriyaki meal by Tiny Oranges is easy to eat with your hands and can be altered with a little Sriracha to give adventurous taste buds a little kick. Grill up moist chicken pieces and top it off with your fave cheeses and veggies. For a carb add-on, serve this dish up with a side of warm jasmine rice! Read on for the recipe below.

Ingredients:

1/2 cup soy sauce, low sodium
1/2 cup water
2 tablespoon Mirin (sweet sake)
1 tablespoon + 2 tsp brown sugar
1/4 cup sugar
1 1/2 tsp minced garlic
1 1/2 tsp minced ginger
1 Tbsp cornstarch + 1 tbsp water

2 packages thin sliced chicken breast
1-2 tsp Chinese Five Spice
kosher salt

1 red bell pepper, julienned
Pineapple (small container of fresh)
Jack Cheese, grated
Fresh cilantro, rinsed and chopped
1 head butter lettuce (sometimes called living lettuce)

Method:

1. In a small saucepan, combine soy sauce with ginger over low heat until thoroughly dissolved.  In a small bowl, whisk together the cornstarch and water to make a slurry.

2. Remove the sauce from heat and gradually whisk the cornstarch slurry into the sauce. Return to low heat and whisk watching until sauce thickens slightly (taste to make sure there’s no chalky flavor).

3. Heat up an indoor grill pan (or your outdoor grill if you prefer) over medium heat. You can also pan fry.

4. Lightly sprinkle the chicken breasts with a dusting of Chinese Five Spice and a sprinkle of salt on each side.

5. Next, grill the chicken, depending on thickness, just about 2-3 minutes on each side, or until firm to the touch (and no longer pink inside). Place on a small platter and cover with foil to rest for about 5 mins.

6. Slice the chicken into thin strips against the grain, and toss with a little bit of sauce to cover.

7. Place some chicken in a lettuce cup and top with bell pepper, pineapple, cheese and cilantro and drizzle with a little additional teriyaki sauce.


One pan, (about) one hour, one meal –  this roasted chicken dish is #1 in our book for taste, texture and time with its juicy tomatoes, crispy chicken skin and minimal prep and clean up. Read on for the delicoius recipe.

Ingredients:
1 lemon
2 pints grape tomatoes
1 head garlic, cloves separated
1 cup pitted kalamata olives, halved
8 sprigs fresh thyme
2 tablespoons olive oil
1 3-pound chicken, cut into 8 pieces
kosher salt and black pepper
1/2 cup dry white wine
1 loaf fresh bread (optional)

Directions:
1. Heat oven to 425° F. Using a vegetable peeler, remove strips of zest from the lemon. (Save the lemon.)

2. In a large roasting pan, toss the tomatoes, garlic, olives, thyme, and lemon zest with 1 tablespoon of the oil.

3. Nestle the chicken, skin-side up, among the vegetables and drizzle with the remaining tablespoon of oil. Season the chicken and vegetables with ¾ teaspoon salt and ½ teaspoon pepper. Roast until the chicken is cooked through, 35 to 40 minutes.

4. Remove the chicken from the hot roasting pan. Squeeze the juice from the lemon into the roasting pan and add the wine. Gently stir, scraping up any bits stuck to the pan. Serve the chicken and vegetables with the pan juices and bread (optional).

recipe courtesy of Kate Merker via real simple

Is your family dinner menu stuck on repeat? A local Bay Area mom-turned-cookbook-author wants to help you get your groove back in the kitchen, and turn your little picky eaters into full-fledged food adventurers. The secret sauce is outlined in her new book, The 52 New Foods Challenge: A Family Cooking Adventure for Each Week of the Year. In addition to providing practical advice on shopping seasonally, cooking with kids and fostering peace (not war) at the dinner table, her prescriptions are completely approachable for even the busiest family, as they require only a 1-2 hour time commitment each week. For a taste of what the book has to offer, author Jennifer Tyler Lee has shared three of her family’s favorite recipes and a few invaluable tips with us. Click through to sample them all!

Brussels Sprouts Chips

Ingredients for Roasted Brussels Sprouts Chips

1 pound Brussels sprouts, trimmed and peeled
2 tablespoons extra-virgin olive oil
¼ teaspoon kosher salt

Directions for Roasted Brussels Sprouts Chips

1. Preheat the oven to 350°F.

2. Using your fingers, peel away the leaves from the sprouts.

3. Place the leaves on a rimmed baking sheet. Add the oil and salt and toss to combine.

4. Bake for 10 minutes, then toss the leaves in the pan. Reduce the heat to 250°F and bake the sprouts for 3 to 5 minutes more, or until the leaves are crispy and almost burnt. Let your kids watch closely to figure out the best timing for your oven.

For expert tips on achieving the perfect chip (including rookie mistakes to avoid) click here.


Get your own copy of The 52 Foods Challenge right here.

What are your creative ways to eat healthier as a family? Tell us in the comments below!  

—Erin Feher

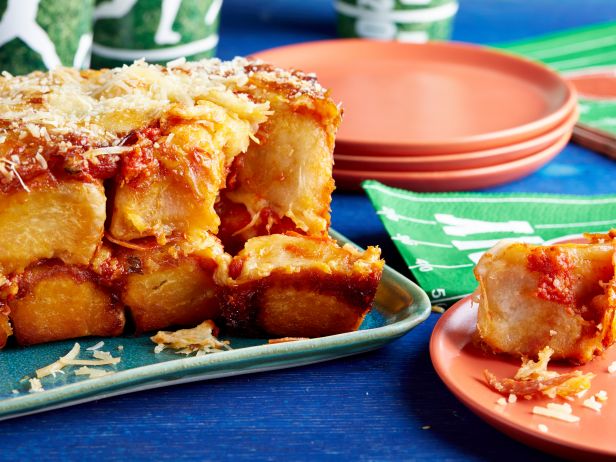
Kids-Can-Make-Pull-Apart-Pizza-Bread

Mix up your pizza routine with a simple pull apart pizza bread that your kids can help make. Courtesy of FoodNetwork.com, this recipe takes a total of 1 hour 10 minutes to create. Let your kids help measure, roll and assemble the bread before popping it in the oven.

Yields: 8-10 servings

Ingredients:
3 tablespoon extra-virgin olive oil, plus more for brushing
Kosher salt
2 pounds store-bought pizza dough, at room temperature
2/3 cup pizza sauce, plus more for dipping
24 pepperoni slices, quartered
1 cup shredded mozzarella (4 ounces)
1/4 cup grated Parmesan (1 ounce), plus more for sprinkling

Method:
1. Position an oven rack in the center of the oven, and preheat to 400 degrees F. Brush the bottom and sides of a 9-by-5-inch loaf pan with oil.

2. Pour the 3 tablespoons oil onto a large dinner plate, and sprinkle with 1/2 teaspoon salt. Pinch off pieces of dough the size of Ping-Pong balls, and roll them into rough balls. Roll each dough ball around in the salted oil until all sides are coated.

3. Put half the balls in the prepared pan, squishing them together. Spread half the sauce over the balls, then sprinkle with half the pepperoni, mozzarella and Parmesan. Repeat with the remaining dough balls, sauce, pepperoni and cheeses.

4. Put the loaf pan on a rimmed baking sheet (to catch any drips), and bake until the bread is puffed up and golden brown, about 25 minutes. Cover loosely with foil, and continue to bake until the bread is cooked through in the middle, about 25 minutes. Let it rest in the pan for 10 minutes, then use dry oven mitts or kitchen towels to carefully unmold. Sprinkle generously with Parmesan, and serve hot. (Let your guests pull the bread apart!)

Will you make this pull apart pizza bread? Tell us what you think below!

Food-Network-Logo
FOOD NETWORK (www.foodnetwork.com) is a unique lifestyle network, website and magazine that connects viewers to the power and joy of food. The network strives to be viewers’ best friend in food and is committed to leading by teaching, inspiring, empowering and entertaining through its talent and expertise. Food Network is distributed to more than 100 million U.S. households and up to 35 million unique web users monthly. Since launching in 2009, Food Network Magazine’s rate base has grown tenfold and is now the second largest monthly magazine on the newsstand, with over 11.6 million readers.  

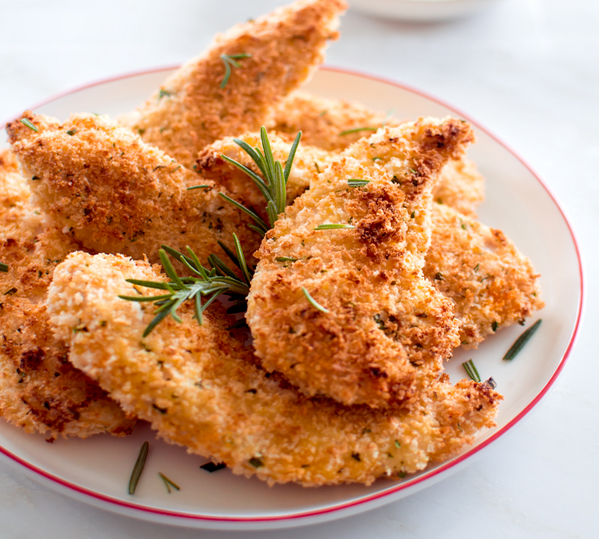
Healthy chicken tenders. Could it be possible? Laura of Fork Knife Swoon favors these crispy chicken bites because they have just as much of that satisfying crunch as their fried counterparts, but without all the extra grease and fat. With only about 10 minutes of prep and 20 minutes of cooking, you’ll have dinner ready in no time.

baked-chicken-tenders

Yields 2-4 servings.

Ingredients
1 lb boneless, skinless chicken tenders (purchased, or thinly cut from chicken breasts)
1 c all-purpose flour
2 large eggs, thoroughly whisked
1-1/2 c panko (Japanese-style bread crumbs), usually found in the Asian section of supermarkets
1/2 c Parmesan cheese, finely grated
1 tbsp fresh rosemary, finely minced
1 tbsp fresh parsley, finely minced
1 tsp kosher salt
1/2 tsp freshly-ground black pepper

Method
1. Preheat oven to 375 degrees. Fill one mixing bowl with the flour, another with the whisked eggs, and a third with the panko, Parmesan, rosemary, parsley, salt and pepper. Stir to evenly combine the panko mixture.

2. Dredge each chicken piece in the flour, until evenly coated, then dip in the egg mixture, and finally in the panko mixture, pressing the panko gently against the chicken to thoroughly coat.

3. Place the chicken on an oven-safe rack on a sheet pan, and bake for 20-30 minutes until golden brown and cooked through. Smaller tenders will cook more quickly. Serve warm with your favorite dipping sauce.

Will you make Laura’s healthy chicken tenders this week?

Bringing her California sensibilities to the deep South before settling in North Carolina, Laura of Fork Knife Swoon believes that entertaining at home should be stress-free and fun, and there is no better way to share memories with friends and family than over a delicious home cooked meal. Incorporating local, organic, and seasonal produce and ingredients, Laura creates simple and healthy dishes that often demand a second helping. Laura works with local ranchers and farmers to ensure the highest quality of ingredients in her recipes. Find her collection of recipes over at Fork Knife Swoon.

For an easy way to make homemade ravioli using seasonal pumpkin puree, check out this recipe from Jen of the Toddler Cafe. Here goyza wrappers can be baked, fried or boiled like pasta. In this case, the wrappers cook up just like pasta, with a creamy inside. Serve with browned cinnamon butter, or just plain as a great finger food. Freeze extra pockets for those nights when the kids are hungry and you’re too tired to cook. Just boil, drain and serve.

Ingredients:
8 ounces cream cheese
one 15-ounce can pumpkin purée
1 teaspoon kosher salt plus
1 tablespoon for pasta water
1/4 teaspoon ground nutmeg
1/4 ground cinnamon
1 package (60) round gyoza wrappers or wonton wrappers
2 tablespoons butter
Grated Parmesan cheese

Method
1. Place the cream cheese in a microwave-safe bowl and heat on high for 30 seconds to soften. Add the pumpkin and stir to combine.

2. Add 1 teaspoon of the salt, the nutmeg, and cinnamon, and mix with a stick blender or by hand until the filling is smooth.

3. Place a 1/2 teaspoon-sized ball of filling in the center of each wrapper.

4. Wet the edges with water and fold the ravioli over to form half moons. Pinch to close by pressing down lightly around the mounds of filling to prevent air bubbles.

5. Bring a large pot of water to a boil and add 1 tablespoon of the salt. Gently add the ravioli and cook for about 4 minutes, stirring occasionally until they float. (if you are cooking frozen Pumpkin Pockets extend cooking time to 6 minutes)

6. Drain the pasta and toss them with butter and Parmesan.

This is a guest post from our friend and blogger Chef Jen Carden. You can find her fabulous collection kid friendly recipes in her book The Toddler Cafe as well as on her blog.

The below is a guest post from Yummy Supper written by Erin Scott.

When I spend big bucks for high-quality beef, I don’t need to weigh my burger down with a bready bun. Yes, there are plenty of decent gluten-free hamburger buns, but we prefer to eat our burgers wrapped in crisp butter lettuce. When serving burgers this way, the meat takes center stage, just as it should. We often serve burgers with a side of Parsnip Crisps (page 71). And of course, you can add the condiments of your choice: Ketchup, mustard, and Sriracha mayo are favorites at our house.

Serves 4

Ingredients:
1
14 pounds ground beef
1 teaspoon kosher salt
Freshly ground black pepper
3 ounces Gruyere cheese, grated (sharp Cheddar is also good)
1 avocado
1 head butter lettuce, leaves separated
12 cup Quick-Pickled Onions (page 82)

Method:
1. Let the meat come to room temperature for 30 minutes before forming the 
burger patties. Always keep in mind that the key to a tender burger is to very lightly handle your ground beef. Sprinkle the beef with salt and black pepper. Gently form four 1″-thick patties.

2. Prepare a grill for high-heat cooking. Grill the patties over high heat for 3 to 4 minutes on the first side. Flip and top with the grated cheese. Cook for 3 to 4 minutes on the second side for medium-rare burgers.

3. Let the cooked burgers rest for 5 minutes before serving.

4. Pit, peel, and thinly slice your avocado. At serving time, nestle each patty into a large leaf of butter lettuce. Top with avocado slices, pickled onions, and plenty of ground black pepper.

Eating burgers this way is a bit messy, but my gang doesn’t seem to mind an excuse to lick their fingers clean.

What do you think of this burger recipe?

Reprinted from “Yummy Supper” by Erin Scott. Copyright (c) 2014 by Erin Scott. By permission of Rodale Books. Available wherever books are sold. Get the book for $15.80 at Amazon.com.

If there’s one thing we love more than a healthy dinner to serve the little ones, it’s a healthy dinner that doesn’t take many ingredients to make and even better, is fast and easy. This tuna pasta salad, from our friend Catherine McCord at Weelicious, is all of the above and more! It’s a tasty meal that your kids won’t say no to. And neither will you.

Ingredients
3 tablespoons lemon juice
1 tablespoon mustard
2 tablespoons mayonnaise
1 teaspoon kosher salt
2 8 oz cans fresh water tuna
4 cups pasta, cooked
1/2 cup carrot, peeled & shredded
1/2 cup cucumber, seeded & diced
1/4 cup dill pickles, diced
1 tomato, seeded & diced

Method
1) Place the first 4 ingredients in a bowl and combine to make the sauce.

2) Mix the remaining ingredients in a large bowl, pour the sauce on top and combine.

3) Refrigerate for 1 hour

4) Serve

This is a guest post from Weelicious, one of our favorite food blogs. Be sure to visit Weelicious.com for more kid-friendly healthy, simple and fast recipes and keep an eye out for Catherine’s new book that’s all about making healthy and delicious school lunches!

We always have Thai sweet chili sauce around the house. It is more sweet and tangy than spicy, but with just enough kick to add some interest. Our kids love it. It can be found at most any grocery, and you can glaze it on tofu, use it as a table condiment, or, like in this recipe, make it into a quick salad dressing. This salad is great when you need something to cut the richness of a coconut-milk curry, or the saltiness of a stir fry. You can change this salad up by adding a bit of soy sauce, sesame oil or grated fresh ginger to the dressing, replacing the mango with papaya or pineapple, or garnishing with thinly sliced shallots or toasted and crushed peanuts.

Ingredients:

6 tablespoons sweet chili sauce
1 tablespoon rice vinegar
1/2 teaspoon Kosher salt
2 ripe mangoes, peeled and cut into 1/2″ cubes
1 big English cucumber, cut into 1/8″ slices
1 handful mint leaves
1 handful cilantro leaves
toasted sesame seeds

Method:

1. Whisk together the sweet chili sauce, rice vinegar and Kosher salt.
2. Toss the dressing with the mango, cucumber, mint, and cilantro.
3. Serve on cold platter, garnished with the sesame seeds.

Michael Natkin is the author of the popular and award-winning vegetarian blog herbivoracious.com. His cookbook, Herbivoracious: A Flavor Revolution with 150 Vibrant and Original Vegetarian Recipes, was named to both Amazon and NPR’s top ten lists. He is known among foodies, vegetarians, and fellow bloggers for a cutting-edge, light and healthy, beautiful-on-the-plate style of meatless cooking. Natkin never preaches; he simply believes that if you are going to eat even one meatless meal a week, it should be delicious and satisfying.