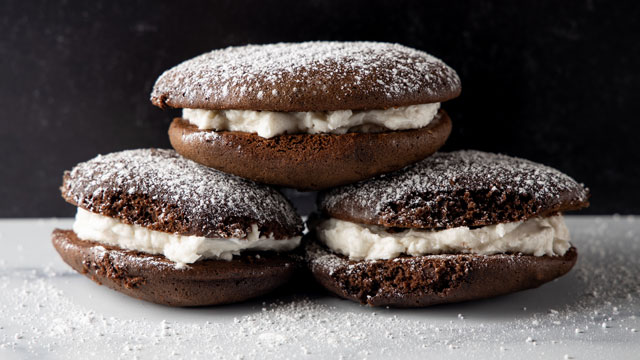
They’re cute, they’re miniature and they are oh-so delicious! Whoopie pies are the perfect-sized dessert for our little sweet tooth. And these orange-infused Nutella whoopie pies will have our little one begging for these homemade goodies again and again. Plus, this dessert makes for a great gift!

Ingredients for Orange-Infused Nutella Whoopie Pies

Cream filling:
1 orange
5 tbsp. unsalted butter
1/4 cup caster/ superfine sugar
1 egg
1/3 cup cream cheese

Whoopie pie:
1 1/4 cups all-purpose flour
1 tsp baking powder
3 tbsp unsalted butter
1/4  cup caster/superfine sugar
1 egg
1/2 cup Nutella
2 tbsp cocoa powder
1/2 cup skimmed milk
a pinch of salt

Method
1. Pre-heat the oven to 350°F

2. Make the cream filling. Finely grate the orange zest and squeeze the juice. Melt the butter in a bain-marie or a bowl over a pan of simmering water. Add the sugar, egg, juice, and zest of the orange. Beat continuously until the mixture thickens. Remove from the heat and leave to cool. Beat in the cheese and chill for 1 hour.

3. Make the whoopie pies. Mix the flour, baking powder, and salt. In a separate bowl, beat together the butter and sugar. Add the egg, Nutella, cocoa powder, and milk. Mix well then add the flour and baking powder mixture.

4. Place 30 small spoonfuls of the mixture on a baking sheet covered with baking parchment. Bake for 10–15 minutes. Remove from the oven, leave to cool on a cooling rack, then sandwich together with the cream filling.


6 Easy Recipes Your Kids Can Help Make

photo: Agnes Hsu via Hello Wonderful

Let’s be honest—one of your main parenting responsibilities is feeding little humans and sometimes it can be exasperating. Picky eaters, different preferences, early morning and end-of-the-day pressures are just a few things that can turn a family meal into something other than fun. Wishing you had a sous chef? Someone invested in liking the food instead of rejecting it?

There’s a way to outsource some of the cooking without paying someone else to cut the broccoli—and it’s right there under your feet asking what’s for dinner anyway. Here’s the thing: they have to learn to do it themselves sometime. What if sometime could start now?

Here’s how you get there: create your own catalog of easy recipes that kids can actually help with. If you’re working on your PhD in parenting you are likely long on common sense—you want them away from open flames and butcher knives, obviously, but that doesn’t mean they can’t cook. Want some examples? We thought you’d never ask!

  1. Standard Smoothie. Got a blender? Great. Nobody’s allowed to stick their hands in the bottom of it. You knew that. But putting half a banana, 1 cup of fruit, ½ cup of milk (or soy or almond), ½ cup of yogurt, ½ cup of juice, handful of nuts, 1 tbsp. of seeds is pretty darn doable and involves some fun measuring and math. And what do you do? Make sure the top of the blender is on securely. You have one job.
  2. Easy Pan-Toasted Gnocchi. Pasta, without the boiling water. Nice! A pan and low followed by medium heat. You can let go of this one with just a small bit of supervision. Half a minced shallot and a minced clove of garlic. You can even do some minced garlic from a jar to avoid knife work. Heat it lightly until you can smell it. Add fresh gnocchi and turn up the heat to medium. Quick-stir until golden-brown.  Serve with sauce and a veggie of choice. Or don’t!
  3. Antipasto. Just get a big platter or a pretty cutting board and get out of the way. Have your culinary artists lay out an appetizing amount of buffalo mozzarella, olives, salami, roasted peppers, breadsticks, fancy crackers or whatever you’ve got.
  4. Basic pancake batter. Why did you ever think you had to do this alone? One egg gets cracked. Then it’s easy measuring of 1 cup of milk (or soy/almond milk), 1 cup of flour, ½ tsp. of baking powder, ¼ tsp. salt. Whisk it up! Fun adds: mashed banana, chopped pecans, chocolate chips or blueberries. Pro-tip: If you’re freaking out about what’s going to spill where, put them on a step ladder and have them measure in the sink.
  5. Smashed or mashed potatoes. You can deal with the boiling. Then let them do the rest. You can go with butter and milk or just olive oil. Salt and pepper. Someone have some excess energy? Get out the masher.
  6. Guacamole. You can cut and pit them and chop up some garlic, onion and cilantro and/or jalapeno. Cut a lime in half. That’s all you have to do. Let them scoop the avocado into a bowl, add the ingredients and mash it altogether. Couldn’t be easier.

Top Chef Jr., here you come!  Or at least you’re on your way to some less stressful family meals.

The Anti-Cookbook Easy, Thrifty Recipes for Food-Smart Living
Tinybeans Voices Contributor

We're Shelley Onderdonk and Rebecca Bloom. A veterinarian and a lawyer-turned-writer walk into a kitchen… We aren’t chefs and that’s exactly the point. We have a lot to share about food-smart living with our own young-adult children and other people and their children, too. Together, we wrote The Anti-Cookbook: Easy, Thrifty Recipes for Food-Smart Living.

photo: Savory Nothings

These chicken tenders from Savory Nothings are going to be a game changer in your kitchen—they’re so crispy and delicious, you’ll never want to go back to the frozen kind (or the fast-food kind). Keep reading to learn how they’re made.

Ingredients
2 eggs
2/3 cup buttermilk
1 cup white flour
⅔ cup grated Parmesan cheese
4 tablespoons bread crumbs
1 teaspoon baking powder
1 tablespoon salt
2-3 teaspoons garlic powder
1 teaspoon ground paprika
1 teaspoon onion powder
1/2 teaspoon ground black pepper
2 pounds chicken tenders
1/3 cup butter

Method
1. Preheat the oven to 410°F (210°C).

2. In a medium bowl, whisk together the eggs and the buttermilk.

3. In a separate bowl, mix the flour, parmesan, breadcrumbs, baking powder and seasoning together.

4. Place a dark-colored roasting pan (a baking tray works as well) in the oven to heat up.

5. Dip the chicken pieces in the flour mix, coating evenly and shaking off any extra flour.

6. Next, coat the chicken pieces in the egg mixture. Then, dip them into the flour again, this time coating very well.

7. Take the baking tray out of the oven and melt the butter on it. Place the coated chicken pieces on the tray.

8. Bake for 10-12 minutes, carefully flip and bake for another 5-10 minutes (depending on how thick your chicken pieces are). Finish by broiling the chicken until it turns golden brown and crispy.

Thanks to Nora of Savory Nothings for sharing this recipe with us. Be sure to visit her site to find more family-friendly recipes for every night of the week.

Great news! Summertime’s favorite drink also comes in cupcake form. These sweet and just-a-bit tart cupcakes are perfect for summer birthdays, BBQs or any time you want to treat the littles. Garnish with lemon wedges or fresh raspberries and a tiny straw to get that uber-cute vibe right before you stuff them into your mouth. Scroll down to see our editor’s secrets to making the perfect batch.

You will need:

Your fave lemon cake recipe (see ours below)

Red food coloring or fresh (pureed raspberries)

The perfect buttercream frosting (click here) + lemon extract + zest

Garnish (lemon wedges, raspberries, sprinkles, cute straws…you decide!)

The cake:

1 1/2 cup all-purpose flour

1/2 tsp. baking powder

1/4 tsp. baking soda

1/8 tsp. salt

1/2 cup sugar

1/3 cup frozen pink lemonade concentrate

3 egg whites

1/4 cup canola or coconut oil

1-2 tsp. lemon juice

1-2 tsp. lemon zest

1/2 cup milk

3 tbsp. raspberry puree (for the coloring)*

*You can also use red food coloring, about 3 drops, but reduce flour to 1 cup only

Step 1: Preheat oven to 350 degrees.

Step 2: Grease a 12-cupcake pan (or line with cupcake liners).

Step 3: Mix together flour, baking powder, baking soda, salt and sugar. Set aside.

Step 4: Whisk together egg whites, lemonade concentrate, oil, and lemon juice. Add milk. (Adding the lemon mix to the milk may cause curdling, which is okay because most recipes call for buttermilk. Adding the milk last helps cut down on this a bit). Add lemon zest.

Step 5: In a stand mixer alternate the wet mix and dry mix until well blended. (About 1 minute on medium speed).

Step 6: Add raspberry puree and blend for 2 minutes at medium speed until batter is smooth.

Step 7: Bake at 350 for 20-25 minutes (or until cupcake tops spring back when touched lightly)

Step 8: Make the frosting while the cupcakes cool.

The frosting: 

Use the recipe found here, but add:

1 tbsp. lemon zest

1/8 tsp. lemon extract

1 tbsp. raspberry puree* or 2 drops red food coloring

*You may need to add a little bit of extra powdered sugar to thicken the frosting once you’ve added the puree.

Step 9: Once the cupcakes have cooled, frost each cupcake. If you want it to look fancy, use a piping bag or Ziplock bag to add the frosting in a spiral. Or invest in a cupcake decorating tip-set, so you can look like you know what you are doing!

Step 10: Garnish with lemon wedges, sprinkles or a single raspberry and/or a small straw (just cut a paper straw in half) to make it look more “lemonade-y.”

Step 11: Eat a cupcake! Great job!

What’s your go-to lemon cake recipe? Tell us in a comment below. 

If your kids think that milk, butter and cheese come from the grocery store shelves, it’s time to open their eyes to everything dairy farm. Recently, Red Tricycle Seattle writer, Helen did just that. She went on a WA Dairy tour to learn how dairy products are made. Not only did she get to visit with some happy cows, but Helen also learned that Washington state produces some of the highest-quality dairy products around (bonus: all of the milk is rbST free). So, the next time you’re at the grocery store take the opportunity to educate your kids about where their food comes from and then whip up one of these dairy-friendly recipes. Flip through the gallery to get inspired.

Danish Vanilla Bean Confetti Sandwiches

You haven’t tasted a real ice cream sandwich until you’ve made one yourself. Take a peek at this delicious recipe that comes to us from Snoqualmie Ice Cream.

Yields 7-8 sandwiches

Ingredients:
2 Pints Danish Vanilla Bean Ice Cream
1 ½ Cups flour
1 tsp. baking powder
1 tsp. cream of tartar
½ tsp. baking soda
½ tsp. salt
½ Cup unsalted butter, room temperature
¾ Cup pure cane sugar
1 vanilla bean
1 large egg
1 large egg
1 tsp. vanilla extract
½ Cup sprinkles

Method:
1. In a medium bowl whisk together flour, baking powder, cream of tartar, baking soda, and salt. Set
aside.

2. In the bowl of an electric mixer with a paddle attachment, beat the butter and sugar at medium speed until light and flu y. Split the vanilla bean and scrape the seeds into the butter mixture. Add the egg and vanilla extract, and beat until combined.

3. Reduce the mixer speed to low, and slowly add the dry ingredients into the wet ingredients until just
combined. Fold in ¼ Cup of the sprinkles.

4. Place the remaining ¼ Cup of sprinkles in a bowl. Scoop about two tablespoons of dough and roll it into a ball. Roll the ball in the bowl of sprinkles to cover. Put the balls on a plate. Repeat with the
remaining dough. Chill the dough for at least two hours or over night.

5. Preheat oven to 350°F. Line two baking sheets with parchment paper.

6. Transfer the chilled dough onto the prepared baking sheets, spacing 2 inches apart.

7. Bake cookies until they are just beginning to brown around the edges, 8-10 minutes. Let the cookies
cool completely.

8. When cookies are completely cool scoop ice cream onto the bottom of half of the cookies. Place
second cookie on top and squeeze down gently. Immediately place all of the sandwiches in the freezer
for at least one hour. When ready, take sandwiches out of the freezer and serve immediately.

Recipe courtesy of Snoqualmie Ice Cream

FUN FACT: WA dairy cows can produce 144 glasses of milk.

What is your favorite dairy-friendly dessert? Which recipe will you make Tell us in the Comments below.

The Washington Dairy Products Commission celebrates the contribution of local dairy farm families. By producing wholesome and nutritious dairy products and caring for their cows and land, local dairy farm families are a key ingredient to making the northwest a great place to live. Learn more at akeyingredient.com.

The next time you’re in need of a healthy and tasty snack that can double as breakfast, dessert or between-meal bite, make these chunky apple muffins courtesy of Chef Falk of OrganicLife.

Ingredients:
½ c raw sugar
3 T canola oil
1 large egg plus 2 large egg whites
½ c buttermilk
1 tsp vanilla extract
1 c organic all-purpose flour
2 tsp baking powder
½ tsp each: baking soda, ground cinnamon
1 medium Granny Smith apple or 1 Fuji apple, cored, cut into 1/3” dice

Method:
1. Heat oven to 375 degrees. Beat sugar and oil in bowl of electric mixer until smooth. Add egg, egg whites, buttermilk, and vanilla; beat until smooth.

2. Add 1 c of flour, baking powder, baking soda, cinnamon, and salt; mix well. Toss together apples and remaining ½ c flour in medium bowl. Stir apples into batter by hand.

3. Spoon batter into paper lined or greased muffin cups, filling each about 2/3 full.

4. Bake until golden brown and make sure wooden pick inserted in center comes out clean, about 22 minutes.

5. Cool in pan on wire rack 10 minutes. Remove from pan; serve warm or at room temperature. Muffins can be frozen up to 3 months.

Chef Jonas Falk is the CEO of OrganicLife, the Midwest’s largest food service provider of healthy school lunches, serving more than 3 million students each month. Chef Falk’s mission is to revolutionize the school cafeteria by providing nutritious, fresh, and delicious meals and changing the way children both eat and think about food.

Muffins or donuts, donuts or muffins… stop humming and hawing over which pastry to choose because there’s a recipe that lets you have donuts and muffins in one sweet bite. These double-whammy treats by A Bountiful Love bring a satisfying rich and cake-y texture to your morning that goes down perfectly with milk (or coffee for the parents). See what your pantry needs below.

Ingredients:
1 3/4 cup all purpose flour
1 1/2 tsp baking powder
1/2 tsp salt
1/2 tsp nutmeg
1/2 tsp cinnamon
1/2 cup oil
3/4 cup white sugar
1 egg
3/4 cups milk

For the Coating:
1/4 cup butter
1/3 cup white sugar
1 tbsp Cinnamon

Method:
1. Preheat  oven to 350 degrees.
2. Mix the dry ingredients ( flour, baking soda, salt , nutmeg and cinnamon).
3. Combine oil, sugar, egg and milk in a separate bowl.
4. Add the dry ingredients to wet and do not over mix.
5.  Just stir until it is incorporated.
6. Pour over greased muffin tins or lined tins. Bake for 15-20 minutes.
7. While waiting, melt the butter in a bowl. In another bowl make your sugar cinnamon mixture.
8. When muffins are done , let it cool slightly (warm to touch).
9. Dip the muffins in the butter, then into the sugar-cinnamon mixture.
10. Cool completely.

What amazing breakfast combinations have you tried before?

This recipe and photos is brought to you by A Bountiful Love, a baking blog about family and stirring up yummy dishes in the kitchen. Visit A Bountiful Love for more family-friendly recipes and tips from a stay-at-home mom. 


Basic Sugar Cookies

Each year Red Tricycle’s L.A. Editor, Meghan makes sweet treats for her annual holiday cookie party. While the staples like gingerbread houses and brownies are always a hit, Meghan always whips up a batch of these basic sugar cookies. Meghan says that she’s tried every sugar cookie recipe on the planet and this one is by far the best.

Ingredients:
2 cups all-purpose flour, plus more for rolling
1/2 teaspoon baking powder
1/4 teaspoon salt
1/2 cup (1 stick) unsalted butter, room temperature
1 cup granulated sugar
1 large egg
1 teaspoon vanilla extract (Meghan adds an extra teaspoon)
Assorted candies, sprinkles, or colored sugars, for decorating (optional)

Method:
1. In large bowl, whisk flour, baking powder, and salt. With an electric mixer, cream butter and sugar until light and fluffy. Beat in egg and vanilla. With mixer on low, gradually add flour mixture; beat until combined. Divide dough in half; flatten into disks. Wrap each in plastic; freeze until firm, at least 20 minutes, or place in a resealable plastic bag, and freeze up to 3 months (thaw in refrigerator overnight).

2. Preheat oven to 325 degrees. Line baking sheets with parchment. Remove one dough disk; let stand 5 to 10 minutes. Roll out 1/8 inch thick between two sheets of floured parchment, dusting dough with flour as needed. Cut shapes with cookie cutters. Using a spatula, transfer to prepared baking sheets. (If dough gets soft, chill 10 minutes.) Reroll scraps; cut shapes. Repeat with remaining dough.

3. Bake, rotating halfway through, until edges are golden, 10 to 18 minutes (depending on size). Cool completely on wire racks. To ice cookies, spread with the back of a spoon. Let the icing harden, about 20 minutes. Decorate as desired.

What’s your favorite sugar cookie recipe? Is it this one? Tell us below!

Photo courtesy of Meghan Rose; recipe courtesy of Martha Stewart

Here’s a great after-school snack for a hungry kid or any other member of your family. These are perfectly sweet with a strong apple flavor when you use homemade applesauce. The better the apple sauce the more flavor the muffins will have. No time for making applesauce? Add diced fresh apple to the recipe for a stronger flavor.

Ingredients

3/4 cups all-purpose flour
1/2 tsp baking powder
1/4 tsp baking soda
1/2 tsp cinnamon
1/2 tsp cardamom (optional)
3 tbs butter
1/8 cup brown sugar
3/4 cup fresh applesauce
1 egg
1/4 tsp salt (optional)
1/2 apple peeled and chopped very small

Method:

1. Heat the oven to 350 degrees.

2. Spray a mini muffin tin with non-stick cooking spray, set aside.

3. Whisk together the flour, baking powder, baking soda, and cinnamon in a small mixing bowl, set aside.

4. In a microwave-safe bowl, melt the butter on high for about 30 seconds; add sugar, applesauce, egg and salt to bowl. Mix well.

5. Pour the apple mixture over the flour mixture. Gently stir in the flour until just incorporated, do not over mix.

6. Fill the muffin tins about half full with batter. Bake for 8-9 minutes for mini muffins. Note: For 6 standard size muffins bake 15 minutes

Tip: For evenly sized muffins, a mini cookie scoop works wonders, get one at your baking supply or craft store.

Optional Add-ins: Small shredded carrot or zucchini, currants, chopped dates, flax seeds, quick oats, peanut butter, diced banana, shredded cheddar cheese

This is a guest post from our friend and blogger Chef Jen Carden. You can find her fabulous collection kid friendly recipes in her book The Toddler Cafe as well as on her blog.