Halloween isn’t the only day for dressing up. Tap into your creative side any time of year by making a hat. They make great additions to your costume box because they can serve as a full costume on their own—no snaps, zippers, buttons, tight leotards or confusing ties to figure out. With that in mind, we’ve dug up some simple, fun and totally crazy hat ideas that’ll make your day.

Cretaceous Crown

Cutting Tiny Bites

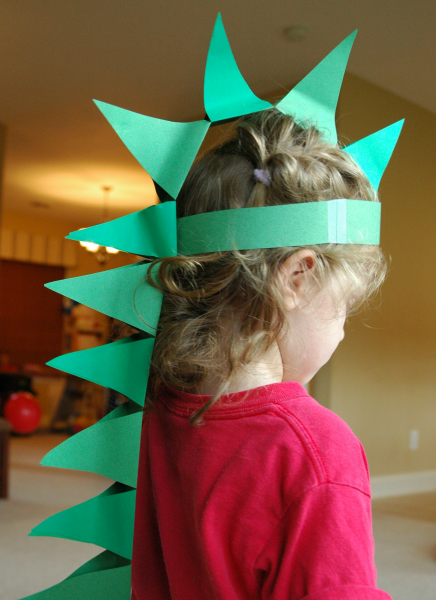
They're already obsessed with Jurassic World everything, so up your pretend play game with this adorable DIY paper dinosaur hat. It's easy to make, and you already have everything you need. Stomp over to Cutting Tiny Bites to learn how to cut, glue and assemble your way to your very own spiked dino hat.

Medieval Crown Craft

First Palette

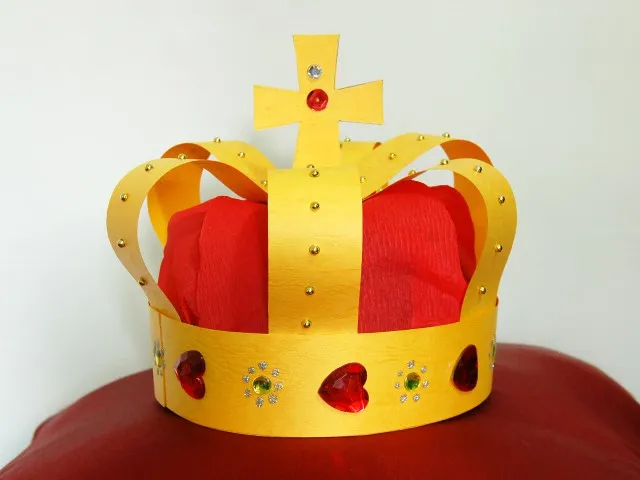
This craft from First Palette is fit for the pint-sized royalty in your life. With construction paper, crepe paper, and as much sequin bling as you can find, you'll have a new addition to the dress-up bin. Head here for the full instructions.

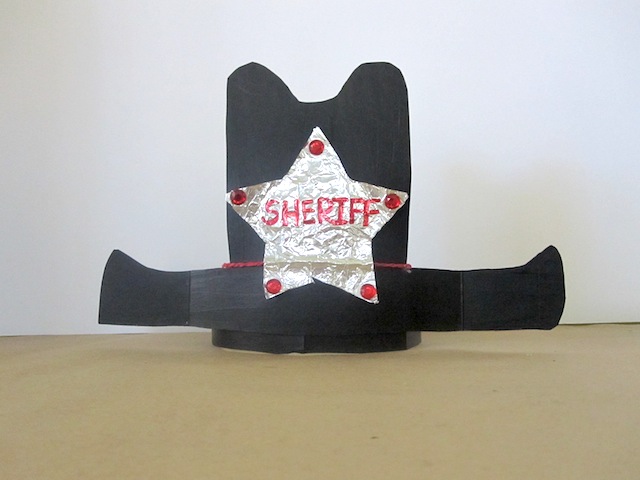
A cool cowboy hat

Gabby Cullen

This cowboy hat is an easy craft you can make with your kids. Say giddy up and grab the tutorial by clicking here.

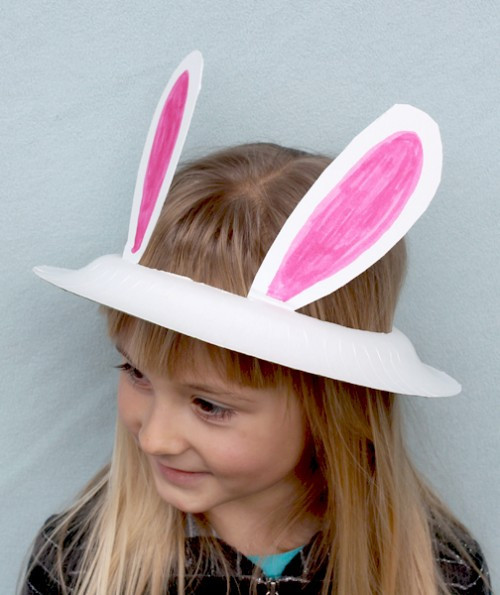
Bunny Hat

Alpha Mom

Your kids will be hoppin' around in no time with this super simple craft. Directions from our friend Alpha Mom call for scissors, one pink marker, and one paper plate. The site offers other great ideas for paper plate hats like decorative crowns and heart hats so check it out.

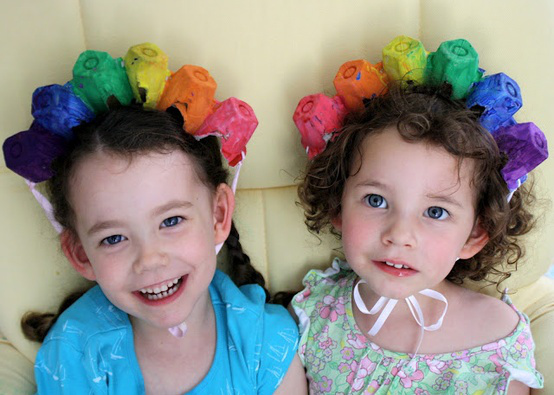
Rainbow Hat from Egg Carton

Having Fun at Home

Rainbow Queens? Rainbow Fishies? Flowers? Make these colorful egg carton crowns and see how they brighten up your kiddos' day. Having Fun at Home has the 411 on how to make this colorful hat—all you need is paint, an egg carton, and a ribbon for the tie.

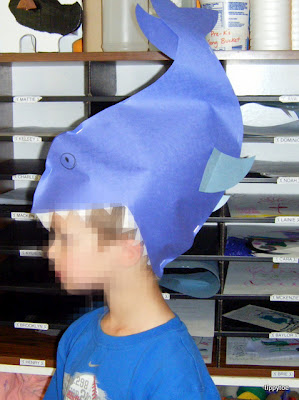
Shark Attack Hat

Tippytoe Crafts

For the shark and sea monster enthusiast that wishes he could breathe underwater, this hat's for you. There is a lot of scissor work involved so be prepared to help a bit if your kid isn't an expert cutter. All you need is blue construction paper, markers, glue, and a stapler. Head over to Tippytoe Crafts for the tutorial.

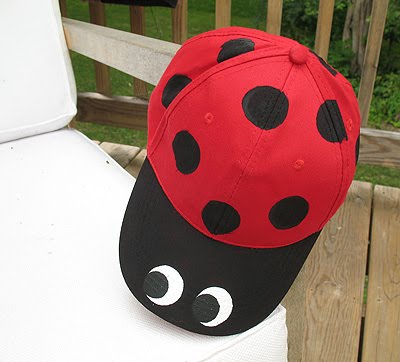
Ladybug Hat

Crafts by Amanda

You need black and white paint for this ... oh, and a red baseball cap but the good news is that you can get one on Amazon for just $3.99! And why not ... it's so cute and it's durable! See the tutorial over at Crafts by Amanda.

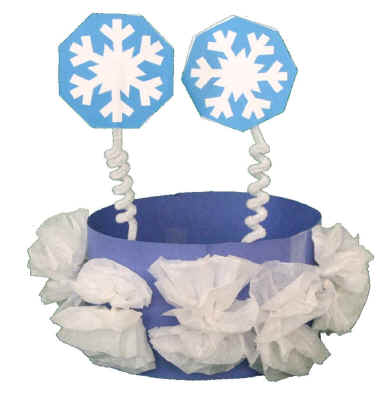
Snowflake Hat

DLTK

There are simple templates for this winter crown and all you need is blue construction paper, two white pipe cleaners, a pencil, scissors, tape, white tissue paper, and white thread. Optional craft supplies are stickers, markers, glitter or gel pens to decorate! See the how-to over at DLTK

Photo: Sharon McCutcheon via Pexels

Children go to school to learn, but there’s a lot of learning that happens outside the classroom too. The key to setting up the right play space is to prepare it so your child experiences sensory play instead of regular play. The difference is that they’ll learn how to use and enjoy their five senses instead of just “playing with toys.”

Sensory play works as the foundation for all the skills a child needs to solve math problems, read and write during regular school hours. And setting up a sensory play space at home is easy if you follow these simple tips that won’t cost a lot of time or money.

Kids with autism or other developmental challenges will also experience many benefits from sensory fun. Many children on the autism spectrum are unable to regulate sensory stimuli, and sensory rooms are an extension of occupational therapy in your home, even if they may take additional time getting used to sensory activities.

1. Play with Instruments: Being able to handle the sense of hearing in different situations will help any child succeed in life. They won’t be nervous or afraid to enter new scenarios where there may be loud or surprising sounds once they’ve gotten used to how sounds work.

Investing in instruments makes noises less frightening for kids. It gives them control over what they hear in a fun way. A simple beginner’s keyboard could be all your child needs to develop their ability to handle sounds at different volumes.

Or make homemade bongos with items you probably already have at home.

1. Clean out an empty soup can and cover it with a stretched-out balloon.
2. Use rubber bands to secure the balloon in place.

Play around with different-sized cans so various sounds can be produced.

2. Host a Bubble Wrap Competition: Bubble wrap is something that comes in nearly every package your child will receive in the future, but it can be scary for those who aren’t used to the sound of the bubble wrap popping. Instead, use it in their play space and host a bubble wrap competition by seeing who can create the coolest dance moves to music, while dancing on bubble wrap. It will make the experience of popping bubble wrap much more fun, so the next time your child sees bubble wrap, they won’t be afraid to interact with it or hear it pop.

3. Try Out Finger Painting: Cover a table with newspaper and have your child try out finger painting with all their favorite colors. Finger painting is one of the best sensory activities to do. Your child will use their touch and feel senses, as well as their senses of smell and sight.

4. Hide Toys in a Sandbox: Engage your child’s sense of touch by giving them an activity with sand. Use a sandbox in your backyard or an empty shoebox filled with sand. Hide small dinosaurs or other animal toys in the sand and have your child excavate them. Feeling around in the sand is a great sensory experience. They’ll also love the sense of accomplishment that comes with discovering the toy that’s been hidden in the sand.

Just make sure you don’t hide a toy they love or are used to playing with. It may scare them that the toy is missing and buried under the sand. Instead, get tiny figurines down at your local dollar store that they can even pick out for themselves. They’ll associate the new toy with the new sandbox game and not be afraid of playing along.

5. Create Edible Playdough: Many times, teachers will use playdough with younger kids to provide a sensory activity that gives them the power to make whatever they want. Sometimes, though, playdough isn’t always the best option.

Kids can easily take a bite of playdough when you’re not watching, and it’s not meant to be eaten. Instead, make it completely safe to play with by creating edible playdough at home. All you need is whipped cream, cornstarch, and olive oil. It’s not a healthy snack by any means, but it won’t hurt your child if they accidentally eat some while they exercise their sense of touch.

6. Taste-Test Together: When your child isn’t looking, put some of their favorite foods on a few dishes. Then, have your child close their eyes or wear a blindfold. Put all the bowls in front of them and present them one by one. Your child can have fun tasting the food and guessing what it is. Play along by taste-testing them, too. Have a prize ready for them at the end when they’ve guessed all the foods correctly.

You can combine the taste and touch senses by having them identify foods by feel instead of smell. Green beans, popcorn, and even crackers could be an easy way to do this.

7. Develop Their Interests: When your child plays with friends or on their own, what do they prefer to do? Developing their interests is a great way to work with kids who are afraid or unsure of other sensory experiences. A child who enjoys manipulating toys could try out finger painting. After they realize how much fun it was to play with what you suggested, they may feel more comfortable trying something new, like dancing on bubble wrap. With time, they’ll have so much fun that they’ll forget they’re learning.

Jennifer Landis is a mom, wife, freelance writer, and blogger. She enjoys long naps on the couch, sneaking spoonfuls of peanut butter when her kid's not looking, and binge watching Doctor Who while her kid's asleep.  She really does like her kid, though, she promises. Find her on Twitter @JenniferELandis.

It was a fall morning in the Carolinas, and a thin layer of dew coated the grass on a football field behind our home. I woke the kids up early, dressed them in sweatshirts, and had them grab their bike helmets. We walked outside and they saw the inner tube I’d purchased the night before. They asked, “Dad, what in the world are we doing?”

I left them full of suspense as we hopped in our golf cart and drove over to the football field. I hooked the inner tube up to the back of the golf cart with rope, looked up at my four children and asked, “Who’s up first?” Mason jumped in the tube, strapped on his helmet, and Blane and Easton sat on the back of the golf cart with a GoPro.

I put the pedal down and proceeded to pull Mason across the wet grass on the field, slinging him from side to side in the tube as if he was being pulled behind a ski boat on the water. His eyes were as big as saucers the first turn or two and then he settled in and was screaming like he was on an amusement park ride. I spent the balance of two hours pulling them across the field and they had the time of their lives.

The tube cost me $20. The epic memories we created that morning are priceless.

I am a firm believer and practitioner of creating epic moments for your children. I do it every week with my kids in what we call “Daddy Saturdays.” Each weekend is a chance to come up with something truly epic for me and the kids to have fun doing together.  

Now, I know what you’re thinking: Maybe I can create an epic event once or twice a year, but you’re telling me that I have to do that every Saturday? Yes, that’s what I’m saying, but as you’ll see in this article, creating epic moments is easier than you think.

Don’t Confuse Epic with These Two “E” Words

The first lesson is this: Epic does not have to be expensive or extravagant. In fact, epic does not necessarily even have to be experiential. It just has to be engaging. Epic can simply mean being together with your children in an intentional setting. In their eyes, that’s epic. Think about it: Why do certain memories stay with us while others seem to fade away? When you look back at your childhood, what memories stand out to you and have the stickiness factor allowing you to recall them years later?

I can think back to certain defining moments in my life and almost all of them have my parents attached to them. When I think about what made these defining moments stand out to me, it’s that they were elevated in my mind due to the epic nature of the memory.

I also have a deep emotional connection with the memory and it elicits the same emotion years later. Don’t miss this: the really interesting point is it’s not the few single big memories like going to Disney World that form the defining moments of how I view my childhood.

It’s really the culmination of all the small memories added up and a few bigger memories spliced into the continuum to create the overall definition of how I view my childhood. The point here is don’t forgo the small moments like going to the park, laying in the grass and looking up at the clouds, or going for a bike ride in exchange for a few big moments. The culmination of the little moments has more impact, long term, on how your kids will view their childhood.

Everything is Bigger When You’re Young

We sometimes forget as adults that everything is bigger when you are a child. Do you remember as a child the first time you went to the ocean, walked through a forest, went to a sporting event, or visited Disney World? Those moments seemed larger than life.

As we grow older, our sense of curiosity and instant amazement seems to diminish as we become more desensitized to the world around us. This desensitization makes it more difficult to connect with our children and create epic moments because we tend to think through our adult eyes, rather than through the eyes of a child.

As I look at my Daddy Saturdays, while we strive to create these epic moments, they’re not all “mind-blowing.” Just by being together, having fun, smiling and laughing, we’re stockpiling positive memories together. It just naturally becomes epic.

Some Ideas to Get You Started

I have to admit that coming up with a fresh, new, epic idea each and every Saturday doesn’t come naturally to me. I dedicate time each week and particularly on Friday mornings to plan for the day ahead with my children.

Early on, I was a little insecure about engaging my kids this way, but eventually I overcame the fear because the fear of failing as a father was a greater driving force.

There is no shortage of access to ideas online for how parents can engage their kids, but to make things easier, here are some of our favorite Daddy Saturday ideas.

One of my kids’ favorite epic ideas only cost a few dollars and was absolutely hilarious. I bought almost every roll of jumbo bubble wrap they had at Lowe’s and bubble wrapped the kids into what looked like large sumo suits. I also made jousting sticks out of bubble wrap, too, then I put them on the trampoline, and we had a bubble-wrap battle.

My kids will never forget the day that. It was so simple and so fun. The idea was so good we had to repeat it a year later, and also do a bubble-wrap obstacle course.

Another idea that the kids absolutely love is a taste test challenge or blind taste tests with all sorts of different types of condiments. It usually ends in a whipped cream fight.

We’re also huge fans of Nerf. We have a collection of Nerf guns, and I found that you can order thousands of Nerf darts off Amazon for practically nothing. We’ve taken Nerf to the next level and used it in so many different epic trick-shot battles and Nerf wars.

Coming Up with New Ideas

These ideas may not come to you naturally, just as they don’t come to me naturally. I spend time scrolling social media or browsing YouTube researching ideas. My goal is not to make them extravagant, just creative. Remember, you don’t have to take your kids to Disney World, or an amusement park, or on vacation for it to be epic. Extravagance does not equal epic. Now, there have been times where we’ve taken a big trip, and that’s certainly been epic, but the backyard times have rivaled the epic nature of the most extravagant and expensive memories that we have.

When in doubt, keep it simple and use the resources at your disposal. I’ve used glow sticks in more ways than you could ever imagine. The local party store is a great resource, so is The Dollar Store and Five Below, where nothing is over $5.

Amazon, of course, is another great tool, and we’ve developed the Daddy Saturday Alexa Skill to help generate ideas for each weekend and order the products necessary to execute them!

The point is: keep it simple, keep it inexpensive, and make it epic!

Justin Batt founded Daddy Saturday in his own backyard with his four children, and it’s grown into a national movement engaging fathers across multiple channels, including YouTube, social media, the Daddy Saturday book, an Alexa skill, a podcast, merchandise, live events, and a 501(c)(3) foundation.
Children diagnosed with autism tend to struggle with sensory stimulation, from the touch, noise, taste, or other sensitivities. Their symptoms usually include difficulty in processing this sensory information from the world around them. If they don’t know how to handle it, it can make ordinary interactions and situations quite overwhelming for them to deal with. Eventually, it may affect their daily function and isolate them from other people and the rest of the world. This is why it helps if you engage kids with autism with sensory activities to help them overcome sensory difficulties and improve their daily function.

Sensory arts and activities can help children with autism stay regulated, experience various senses in a controlled, calm, and fun way, and connect with other people better. These are seven sensory arts and crafts activities that can help kids with autism.

1. Plastic Baggy Painting

This activity is great for a starter activity to play with paint without having to actually touch it and make a big mess. Squish paint inside a Ziploc plastic bag, use multiple colors to make mixing more fun, and close the top. Tape the bag to the table and let your child paint using the mix of colors inside it. Talk to your child about the mix of colors and the images that they can create.

2. Create Personalized T-shirts

You can always have fun with laser printers by creating personalized T-shirts with your child. Prepare the design that your child wants along with the T-shirt ready for customization. Assist your child all the way through the engraving process, waiting for the machine to finish. If you know how to use the machine yourself, then you should be able to achieve the T-shirt design that your child has in mind. They should be even prouder that they’d get to wear the design that they made themselves. This activity can help develop your child’s processing of their sense of touch and sight.

3. Latex-gloved Finger Painting

Finger painting can be really fun for your child with autism, but with the latex gloves involved, it can be less messy since you won’t have to clean tiny fingers. Prepare some latex or non-latex gloves if your child’s allergic, construction paper, a container of washable paint, small containers, and an old bedsheet. To avoid a paint-filled mess, bring the activity outside. Lay the sheet down, fill the small containers with some of the paint, put the construction paper, and let your child wear the gloves. Then, let them free their creative mind and paint!

4. Sand Art

Sand can expose your kids to a different textural and auditory experience, but regular sand can be pretty dangerous to your child with autism so it’s best to create edible sand. Prepare some colorful sand, liquid food coloring, salt, Ziploc baggie, construction paper, glue, and disposable aluminum pan. You can make it more fun by playing in your backyard. Just get one of those silent generators for home use and light up your backyard, spread a blanket and a couple of cozy pillows and you have the perfect playing atmosphere.

5. Water Tub Colors

This can get quite messy, but it’s a fun activity that you can do outside. Prepare a large clear tub, soap, food coloring, and a few small containers. Kids in the autism spectrum often feel comfortable dealing with water, so this is something that they can do without difficulty. Fill the tub with water and soap and the smaller containers with colored soapy water. Guide your child on how to make different colors with the soapy water using the food coloring. This is a pretty simple activity that will teach your child about color mixing, while letting them enjoy it with their touch and sight.

6. Styrofoam Sculptures

If you have received packages with protective Styrofoam, make sure to keep them. They would make for food materials for Styrofoam sculptures, along with some toothpicks. Along with your child, you can break up the Styrofoam pieces and connect them with toothpicks, as required by the sculpture that your child has in mind. Let their imagination run free! To make the sculptures look even more impressive, you can give your child some markers to color them up. Let them take this activity with their sense of touch, sight, and hearing.

7. Bubble Wrap Painting

Bubble wraps can be more than just something that you can pop to keep your hands busy. They are also great materials for a sensory activity with children with autism. Just prepare it with a gallon of paint, an old bedsheet, a roll of packing tape, disposable aluminum pan, and a large area where your child can freely paint. Layout the bedsheet outside, put some of the paint on the aluminum pan and put it close to your child. Then, wrap your child’s feet in bubble wrap and secure them with packing tape. Lead your child to stand in the pan, then to walk, jump or run on the laid out bed sheet. With their feet, let them enjoy scattering the color around while hearing the satisfying pop of the bubbles under their feet. That should make for some great sensory input through their sight, hearing, and touch.

Try these activities with children with autism and help them deal better with sensation overload. Help introduce the fun side of the otherwise overwhelming world to your child by doing these projects.

Emma Williams is a young mother of 2, having expertise in writing about various topics of lifest‌yle, beauty, home improvement and a lot more. She enjoys diving into new aspects of life, learning as much as possible from the business world, marketing and branding.  

Why is Pluto no longer a planet? Thanks to the International Astronomical Union (what a mouthful!) declassifying Pluto as a planet in 2006, this is yet another question our kids can ask that some of us might not know how to answer. This is when it’s good to be a Chicagoan because we have places like Adler Planetarium to turn to when we need our kids to think we’re all-knowing. Read on to hear how their temporary exhibit What is a Planet? is providing simple answers to a big question.

Our definition of a planet has changed a lot in the past 500 years. Actually, there wasn’t an official definition until 2006—can you believe that? The word itself has been used along the way to describe the Sun, the Moon and asteroids. And Earth, our most favorite planet of all, wasn’t even considered a planet at one point.

The mission of the exhibit
Who knew people were so passionate about Pluto? They are. And scientists found that out when they demoted Pluto, the last planet to be discovered, from a full-fledged planet to a dwarf planet. People, kids in particular, felt Pluto was being picked on because of its meager size. Letters were written to the voting body who made the decision in defense of this little guy, but its label remained the same – dwarf planet. The purpose of the What is a Planet? exhibit is to explore the reasons behind developing the new definition of what makes a planet and explain why Pluto just didn’t fit the bill. We could give you the answers, because of Adler we know them, but we’ll let you explore the exhibit yourself to find out.

Why we love it
You can walk in virtually clueless about how astronomers classify planets and within minutes have a pretty solid understanding of the definition. And, more importantly, be able to explain it to your littles when they ask. What’s also cool is you can walk in with very little interest in the topic and walk away with a newfound appreciation for the world of astronomy—which, the same could be said with any exhibit you visit at Adler. It’s a pretty fantastic resource we have at our fingertips.

Things to look for
Visitors can cast a vote on how they feel about Pluto’s demotion in an interactive voting poll that shows results in real time. Also, explore artifacts from the Adler collections that illustrate the ever-evolving definition of a planet.

Don’t miss out!
Take note! What is a Planet? is only on display from now through August 18, 2019, so pencil in time soon to check it out!


While you’re there
Save time for a visit to the Community Design Lab. Visitors can test different materials to find out which would survive the journey to 100,000 feet above Earth’s surface, build a DIY telescope-mount for smartphones and become an instant astrophotographer by testing it on real telescopes and explore daily scientific challenges developed by Adler experts. With 600 ounces of marshmallows, 10,000 popsicle sticks, 12,000 yards of duct tape, 120 ounces of shaving cream and a steady supply of bubble wrap and cardboard, the design possibilities are endless!

Other ways to explore Adler
Take your fun to the next level by scheduling an Astro-Overnight where kids can participate in hands-on activities and see sky shows. Your kids will be over the moon if you sign them up for summer camp to discover new worlds, engage in eye-opening experiments and play next to Lake Michigan.

What are you waiting for? Show your kids science can be fun!

Adler Planetarium
1300 S. Lake Shore Dr., Museum Campus
Online: adlerplanetarium.org

— Maria Chambers

Photos courtesy of Adler Planetarium

If this is your first time hearing about the “Puffle” craze, you are in for a treat! Instagram streams from across the globe recently filled with this eye-catching sweet, and the moment we realized the shop is a short drive from LA, we had to try it out.  Is it as magically delicious as it looks?  See, and hear, for yourself…then hop in your car (or on your broom) and cool down with made to order ice creams and Puffle cones at Santa Ana’s Cauldron Ice Cream.

photo: Erin Harris

The Hype, The Craze, The Close, The Re-Open
With all the enticing pictures popping up just as temps were peaking, we had to try it out ASAP, and were greeted with a waiting crowd of hundreds of people and a nearly two-hour wait for an ice cream cone. Fortunately for everyone else, Cauldron took this pure insanity as a sign that they needed to overhaul their system in order to meet the raging demand and reduce wait times. The ice cream shop was closed to customers for one week and celebrated its grand re-opening on August 31, so now you won’t need to grumble about how long it takes to get your Puffle.  So rejoice and get in a nice short line to enjoy this made-fresh treat.

photo: Cauldron Ice Cream via facebook

Think Of It As Edible Bubble Wrap
“What they heck is a Puffle,” you ask? Based on a popular Hong Kong treat, it is an egg waffle that resembles large format bubble wrap, almost the reverse of a typical waffle. It looks like something out of a children’s storybook, or perhaps Willy Wonka’s factory, and it wraps beautifully around a couple of scoops of ice cream, essentially creating a two-in-one dessert. The cones are made to order and served warm (melting alert!), so be sure to grab plenty of napkins.

The ice cream is also following the latest ice cream trend (see local shops Creamology, Creamistry, Ice Cream Lab, etc.) of making and freezing your order before your eyes, using a creamy base, fresh add-ins and a blast of liquid nitrogen.  Freezer burn, farewell.  Plus, the smoke effect coming off the machines is super cool.

photo: Erin Harris

To Puffle Or Not To Puffle?
Next question: “Soooo…is it worth the hype?” (And the drive…) The answer on the part of your kids will likely be an unqualified and resounding “YES!” After all, there’s something irresistible about desserts that are nearly as big as your face and look like something you’d only find at a state fair. Grown-ups, on the other hand, may find the combination of a thick Belgian waffle wrapped around a couple of scoops of intensely rich ice cream to be a little, um, much. Unless you are some kind of a waffle fiend, big people are better off ordering the ice cream on its own.

photo: Maria Cariza V. via yelp

Don’t Worry: There’s Stuff For Grown-Ups Too
The liquid nitrogen process produces ice cream that is exceptionally dense, smooth and rich in flavor, so it makes for quite the indulgence even without the waffle-cone-on-steroids that is responsible for the shop’s sudden success.

And, in keeping with modern gourmet ice cream trends, some of the flavors (which rotate monthly) have definitely been developed with discerning palates in mind, including Earl Gray Lavender, Sea Salt Caramel (above) and Vietnamese Coffee. At the other end of the spectrum are kid-pleasing options like Rainbow Road (made with Fruity Pebbles) and Cirque de la Crème (made with Circus Animal Cookies, below). Whether you go full Puffle or not, your sweet tooth is sure to be satisfied.

photo: Olivia H. via yelp

Harry Potter Fans, Wave Your Wands
FOr young witches and wizards waiting with baited breath for Harry Potter World to open in 2016 at Universal Studios (if only there was a spell to make time fly!), consider passing on the Puffle and getting this magical sipper. The Wizard’s Brew Float is butterscotch soda with fresh vanilla ice cream, and if it puts you in mind of Butterbeer from Hogsmeade, well, we won’t tell the kids this concoction isn’t exactly what Harry and friends drink.

photo: Cauldron Ice Cream via facebook

Cauldron Ice Cream
1421 W MacArthur Blvd.
Santa Ana
657-245-3442
Online: cauldronicecream.com

Have you puffled?  What’s your verdict: worth the drive or it’s all hype?

—Erin Harris

Your little explorer is on the move. Whether your baby prefers the cross crawl, belly crawl, or butt scoot, it’s important to encourage his newfound mobility. So we’ve gathered a handful of DIY games perfect for the crawling set. Using items from around the house (or in the fridge), from bubbles to balls, boxes and more, these awesome activities are sure to inspire lots of movement.

 Photo: Jen via Plain Vanilla Mom

Have a Ball
It might sound far-fetched, but simply rolling a brightly-colored ball back and forth, or across the room, is a great way to get your tot to crawl. Jen at Plain Vanilla Mom calls it “a quintessential toy of childhood.” We couldn’t agree more.

Photo: Amy via Lilly & Bliss / Kimberly Photography

…Or Lots of Them
Why play with just one ball when you can create an entire ball pit? Use safety gates as a frame or inflate a kiddie pool like Amy of Lilly & Bliss did for her kids. Baby will have a ball swimming through the vibrant, multi-hued sea, and tossing the balls in and out.

Photo: Amanda via Dirt and Boogers

Sensory Crawl
Babies love feeling new textures. So Amanda at Dirt & Boogers combined crawling and sensory play by creating a “road” of sights and sounds with everyday household objects. Making their way from bamboo mat to fuzzy blanket, your little wriggler will enjoy discovering each new surface.

Photo: Jamie via Hands On: As We Grow

Follow the Bubble Wrap Road
Recently moved? Received a huge online order? Take a cue from Jamie over at Hands On: As We Grow and put all that extra bubble wrap to good use! Create a pop-able path by securing the sides with bright painters tape (so you don’t ruin the floor) and encourage Baby to crawl, or roll his favorite toy, back and forth. He’ll love the texture beneath their hands and knees, and the sound of the bursting bubbles.

Photo: Ana via Bluebird Kisses

Create an Obstacle Course
Under, over, around, and through. Obstacle courses are the perfect way to challenge your little mover. Ana, the mama bird over at Bluebird Kisses, transformed the living room floor into a soft obstacle course for her little guy to safely test his new skills. Easy to re-create, simply put pillows, cushions, plush toys and blankets around the room, and let the exploration begin.

Photo: Babble / Casey Mullins

Make a Water Blob
As temperatures rise, venture outside with a homemade water sensory mat. All you’ll need is plastic sheeting, waterproof duct tape, and a hose. Add some familiar toys and let your little one explore the squishy space. Check out the how-to on Babble.

Photo: Marcin Banaszek via Flickr creative commons

Blow Some Bubbles
Bubbles truly are a baby’s best friend. Your babe will burst with excitement trying to catch each bubble as it floats toward the ground. Check out the Artful Parent to find easy instructions for making your own bubbles and wand at home. Perfect for playing indoors or out, expect lots of giggles with every pop!

Photo: Meri Cherry: Sharing Arts, Crafts & Family

Make a Sensory Box
Crawling in and out of boxes, like this one created by private art teacher Meri Cherry, is an awesome sensory game that’s sure to offer endless fun. A cardboard box and variety of ribbons in different widths, colors and patterns are all you will need.

Photo: Anna via The Imagination Tree

Build a Cardboard Box Tunnel
Kids love boxes (it’s a cliché for a reason). So before you toss your boxes into the recycling pile, create a tunnel for the kids to crawl through. Anna at The Imagination Tree added an element of surprise by hanging socks and other soft items inside. Plus, it’s the perfect set up for a rousing game of peek-a-boo!

Photo: Andrea via Pinksugarland / Pink Sugar Photography

Play with Pull Toys
Get ready for a fun game of cat-and-mouse with your little one in hot pursuit. Zig, zag and wiggle a pull toy just out of reach to keep baby on the move, like Andrea at Pinksugarland. No pull toy on-hand? A favorite toy attached to a piece of rope also does the trick.

What games do you and your crawler play? Share with us in the Comments!

— Lauren Hill