This little taste of summer helps you celebrate America the healthy way. A combination of bananas, berries and hidden spinach topped with all your favorite superfoods will start your day of right!

Makes one bowl

Ingredients:

Smoothie:
1 cup frozen strawberries
1 frozen banana
1 cup frozen blueberries
½ cup kale or spinach
¾ cup almond milk (more or less depending on desired consistency)

Topping Ideas:
Shredded coconut
Hemp seeds
Dried mulberries
Cacao nibs
Dried goji berries
pecans

Method:
Place all smoothie ingredients into a blender and mix until well blended. Add a touch more milk if too thick and won’t blend, but you want it as thick as possible. Once blended, place in bowl. Top with all the toppings and enjoy!

What do you think of this vegan gluten-free recipe? Tell us below!

Sophia DeSantis is the author of Veggies Don’t Bite, a vegan, gluten free and refined sugar free food blog targeted to all types of eaters. She is the mom of two beautiful boys and wife to an amazing husband. Her and her family live a vegan, gluten free and refined sugar free life 90% of the time because she believes that the stress of having to be perfect shouldn’t overpower the benefits that their healthy lifestyle brings. Through her website, she hopes to reach anybody interested in making a positive health change in their life.

Artichoke Pie

Artichokes will become your kids’ new favorite food after taking a bite of this savory artichoke pie. With gooey cheese, flaky pie crust and soft and chewy artichokes we bet you can even sneak in other veggies or protein when you whip up this kid-approved dish.

Ingredients:
One pre-made crust and top crust
2 eggs, 1 yolk for egg wash (optional)
1/4 cup parmesan
2 cups shredded mozzarella
1 package frozen artichoke hearts
Garlic
Salt & Pepper

Method:
1. Pre-heat oven to 350

2. Defrost frozen artichokes (this can be done in the morning before school) and cut defrosted artichokes into bite-sized pieces with scissors.

3. Sautee in garlic and oil, season with salt and pepper to taste (easy on the salt, as there is a lot of cheese) and let cool slightly.

4. Mix eggs, cheeses, and hearts in large bowl.

5. Add to bottom crust and cover with top crust (cover with egg wash if desired).

6. Bake at 350 for 1 hour or until golden-brown

This delicious recipe comes to us courtesy of the Vano family in Yonkers, NY. 

The below is a guest post from Momtastic written and photographed by Brittni Mehlhoff.

Reuse cereal boxes or scrap pieces of cardboard the DIY way, with these clever (and crafty) cardboard crowns for kids. They are perfect for birthdays or everyday playtime. It’s also a great way to get kids involved in craft projects and keep them entertained for hours during the summer months. Want to make your own? Here’s how…

Supplies:
Cereal box
Decorative paper, gift wrap, or patterned contact paper
Glue (optional—use if you decide to use decorative paper or gift wrap)
Scissors
Tape

Instructions
Step 1: Start by cutting up a cereal box into large, flat pieces. You’ll want these to run the length of the cereal box and then cut down the width to your desired crown height.

Step 2: Next, cut pieces of decorative paper or contact paper (as shown), large enough to wrap all the way around the cardboard, front and back. Cut off excess from the sides, if necessary.

To read more head over to Momtastic for the full instructions by clicking here.


Momtastic cuts through the noise to deliver authentic advice from other moms who have been there, on pregnancy, parenting, health, and much more. Oh, and they also serve up beautiful recipes, crafts, and DIY projects.

The below is a guest post from Momtastic written and photographed by Shauna Younge.

Summer was off to a slow, rainy start in Minnesota, but it’s finally kicked into high gear. A slew of 90 degree days has me looking for any excuse to eat a big dose of ice cream. And, since kiddo is out of school, I’m also on the hunt for projects to keep her and her little sister entertained. What better way to marry dessert and DIYs than a summery spin on the dyeing fun that my girls love when they design Easter eggs? Hello, ice cream cones! Meet food coloring!

Most of my dessert tables and sweet DIYs are a union of design and color trends, which is evident in this project. Neon, color block, and cones? Yes! My girls were eager to dip and tilt their way to vibrantly hued ice cream cones, and this dyeing ice cream cones project was finger-staining (only temporarily, of course) fun for all three of us.

Supplies:
sugar ice cream cones
liquid or gel food coloring
clear plastic cups or glasses
paper towels

Instructions
Step 1: Line a clean counter top with several paper towels. Following the package instructions, mix your desired colors of food coloring in clear cups or glasses.

Step 2: Lower the tip of an ice cream cone into a glass of dye. To create an angled block of color, tilt the glass to the degree that you want reflected on the cone.

To read more head over to Momtastic for the full instructions by clicking here.


Momtastic cuts through the noise to deliver authentic advice from other moms who have been there, on pregnancy, parenting, health, and much more. Oh, and they also serve up beautiful recipes, crafts, and DIY projects.

If you’re anything like Catherine McCord of Weelicous, chances are you’ve left the Farmers’ Market with heaps of peaches. Put all those peaches to good use before they go bad by making this easy peasy recipe for fruit leather. Bonus: Catherine tells us that this recipe stays good for weeks!

Ingredients:
4 Ripe Peaches (skin on)
1 Tbsp Honey

Method:
1. Preheat oven to 225 F degrees.*

2. Rinse and remove seeds from peaches.

3. Place the peaches and honey in a blender and puree until smooth.

4. Pour the mixture onto a parchment lined baking sheet and spread with the back of a spoon or spatula in a large rectangle (my rectangle was 11 x 15 inches) making sure that the thickness is completely even.

5. Bake for 3-4 hours or until dry and not sticky to the touch. Remember, cooking times will vary depending on how thick you spread your mixture and how much water (juice) is naturally in the fruit.**

6. Set aside and cool at room temperature; it takes several hours for the fruit to soften up. Note that when you first take the fruit leather out of the oven, the edges will be a bit dry and crispy, but if you allow it to sit out for several hours it softens up nicely.

7. Cut with a knife, pizza cutter or scissors into strips, keeping the paper on if desired, then roll the leather into “roll ups”.

8. Serve.

* If you choose to use a dehydrator, cook the fruit leather at 135 degrees for 5 hours.
** Every oven is different, so the cooking time maybe less than 2 hours if your oven tends to run hot.

This is a guest post from Weelicious, one of our favorite food blogs.  Be sure to visit Weelicious.com for more kid-friendly healthy, simple and fast recipes.

One taste of this raw tomato marinara and you’ll rethink all doubts about raw cuisine. The flavor that these fresh ingredients come together to create will leave your taste buds dancing.

Ingredients:
1 cup sundried tomatoes (not in oil)
4 medium sweet variety tomatoes (vine ripened are good)
2 cups cherry tomatoes
2 tablespoons thyme
2 green onions
Himalayan pink salt, lemon pepper, and garlic powder to taste

Chef’s note: Any tomato varieties work here, but the sweeter they are the better the taste will be. You can substitute fresh garlic but it will have a more pungent taste.

Method:
Place all ingredients in a food processor, blender or high speed blender and mix until pureed into a sauce like consistency. Taste seasonings and add more to reach desired taste.

Have you tried your hand at raw cuisine? We think this is a fab place to start if you’ve never explored the raw movement. Tell us your thoughts below!

Sophia DeSantis is the author of Veggies Don’t Bite, a vegan, gluten free and refined sugar free food blog targeted to all types of eaters. She is the mom of two beautiful boys and wife to an amazing husband. Her and her family live a vegan, gluten free and refined sugar free life 90% of the time because she believes that the stress of having to be perfect shouldn’t overpower the benefits that their healthy lifestyle brings. Through her website, she hopes to reach anybody interested in making a positive health change in their life.


If you’re planning to forego Easter brunch this weekend, then you’ll want to have a hearty dinner to nourish your little munchkins after a busy day of Easter egg hunting. This traditional Easter ham takes the hassle out of cooking. The brown sugar and maple syrup provide that great sweet taste, while the pineapple juice helps to relieve some of that overpowering saltiness of the ham. Plus, the meat will be nice and tender after it’s been stewing in the crock pot for a few hours. Prep this in the morning, head out for a few egg hunts, and by the time you come back, it’s ready to eat.

Ingredients
7-8 lb bone-in spiral-cut ham
1 c dark brown sugar
1/2 c all natural maple syrup
2 c pineapple juice

Method
1. Place ham, flat-side down in a 6-7 quart slow cooker.

2. Rub brown sugar on all sides.

3. Pour on maple syrup and pineapple juice.

4. Cover and cook on low for 6-8 hours.

5. If desired, baste ham with collected juice from the bottom of the crock an hour or so before serving.

6. When ready, remove from crock pot and let rest on a cutting board for 15-20 minutes before carving.

Serves 10

What’s your fave way to cook ham? Tell us your recipe secrets in the comment section below.

recipe courtesy of Stephanie O’Dea of A Year of Slow Cooking and photo courtesy of raybdbomb

It doesn’t get much easier than this recipe–place all of your ingredients on parchment paper, wrap up the bundle, and bake it for 15 minutes. Think of it as a more simple one pot dish because there’s no hovering around the stove to check on your meal. Other types of fish and veggies work well for this meal–simply customize it to what is in season or in your fridge.

Ingredients:
parchment paper
4 salmon filets
3/4 pounds of green beans
2 lemons
4 teaspons extra virgin olive oil
salt and pepper
shallots, sliced (optional)
capers (optional)

Method:
1. Preheat oven to 400 degrees. Place salmon filet on a 16″ piece of parchment paper and put green beans, two lemon slices and two strips of lemon zest on and around the salmon. You can also add sliced shallots and/or capers if desired. Season with salt and pepper and drizzle with a teaspoon of olive oil. Repeat with as many salmon filets as you have.

2. Fold parchment into a twist or envelope shape (not sure what it’s supposed to look like? Click here for a helpful video). Place parchment wrapped salmon on a baking tray and bake for about 15 minutes until salmon is cooked through.

Photo and recipe from Erin Lem. Originally adapted from Martha Stewart. 

Beat back boredom with an easy, super cool and clever arts and crafts project. Need an idea? Little pretenders will get a kick out of putting together a butterfly mask. Could be a pretty-in-pink winged creature or maybe a wild and crazy insect right out of the amazon. Check out one kid’s creation from start to finish.

The Supplies

Starting out, these simple supplies can be found at Michael’s or another crafts store. The butterfly base mask comes in packs of 6, which could be awesome and handy for an afternoon of kids hanging around the house. Let the kids pick the paint colors and cloth colors they want, sequins and gems come in all types of colors and styles, if those are even desired. The cloth roll was a total of1/2 yard. Total cost for supplies: $20

What’s a cool craft you’ve done with the kids?

Copy and photos by: Gabby Cullen

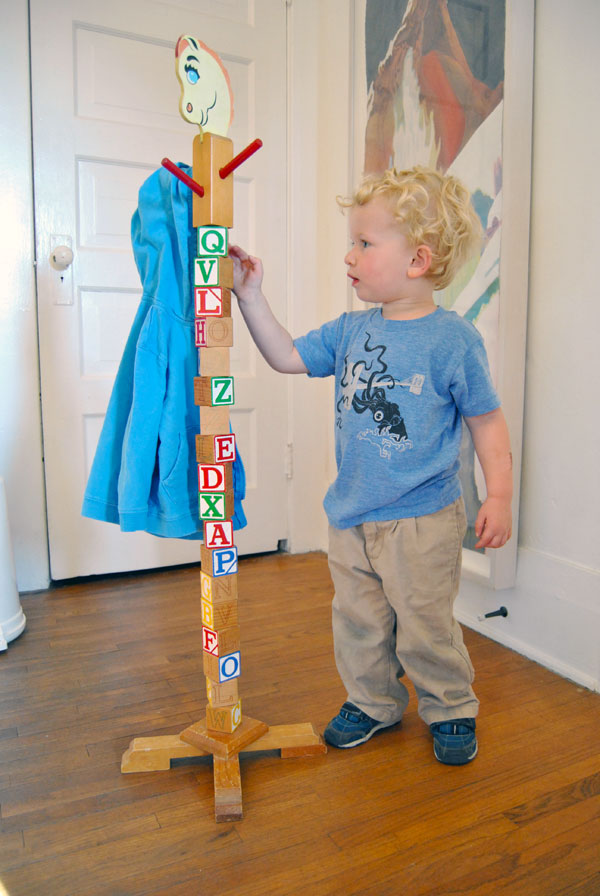
Building blocks are one of the most popular toys available and if you’ve got kids you probably have more than one set of blocks. Instead of storing or giving away your extra set of blocks, you can use them to build this cute hat rack for your growing kids. This unique piece of furniture, which comes to us courtesy of our friends at Built by Kids, can also be educational and if you have enough blocks you can spell out your child’s name or your families initials and use it as a teaching tool for your little one.

Materials:
One set of children’s wood building blocks.
Used lamp or pedestal base
48” long 7/8 dowel for building blocks
20” long 7/16 dowel for hat rack pegs
4” long block of ½” square wood
Paint if desired
Wood screws

Tools:
Cordless drill or drill press
7/8 drill bit
7/16 drill bit
Hand saw
Paint brush

Step by Step Instructions:

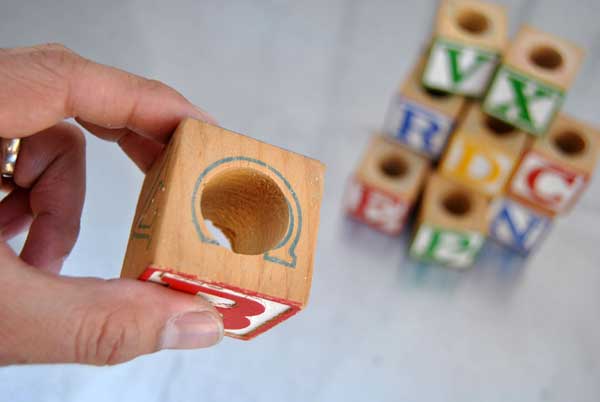
1. Select Building Blocks
When selecting your building blocks we suggest going with the standard size which is about 1 ½” on each side. You could go bigger but if you go smaller your hat rack won’t have enough stability. We had some vintage blocks that were painted various colors and we prefer the raw look of unstained blocks as opposed to the shiny blocks you most often see in the stores.
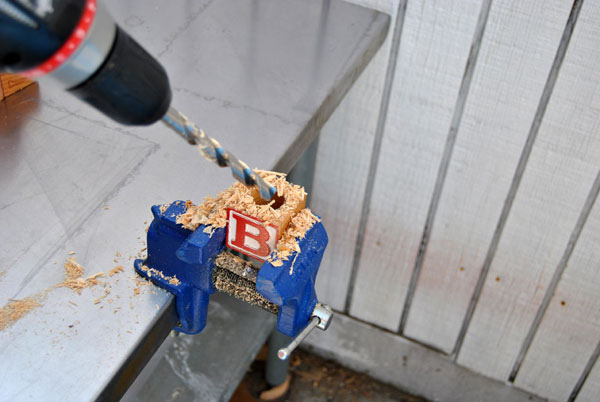
2. Drill Holes
If you’ve got a drill press this makes the job much easier as you need to make sure the hole goes straight down and not at any angle or else your blocks won’t line up correctly. We used a small table vise and our cordless drill, which worked out great.
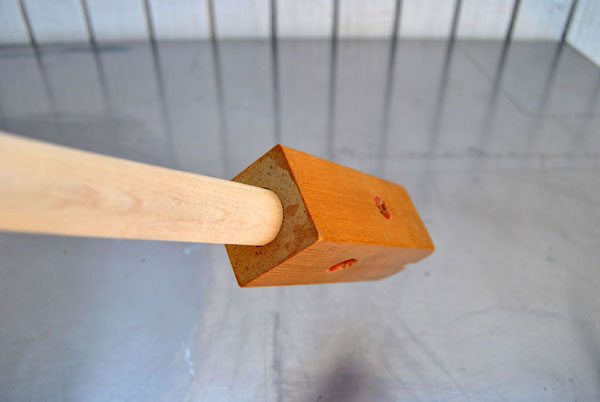
3. Setup Dowel
We used our drill to also bore out a divot into the wood block for the top of the hat rack and into the base of our lamp legs. We switched out bits and drilled out the holes for the hat rack pegs at about a 45 degree angle. We previously painted the pegs red but it’s your choice. We cut these pegs down to 5” and setup four of them into the wood block. We then glued the dowel into the wood block and had our finished top.

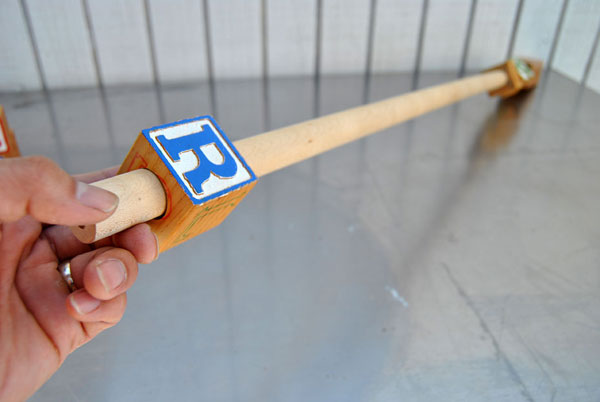
4. Slide Blocks onto Dowel
Now comes the fun part! We slid the blocks onto the dowel and we chose to only use 18 as that seemed like the ideal height. We cut the dowel down to 30” and with the wood top and base the hat rack is about 3 feet tall.

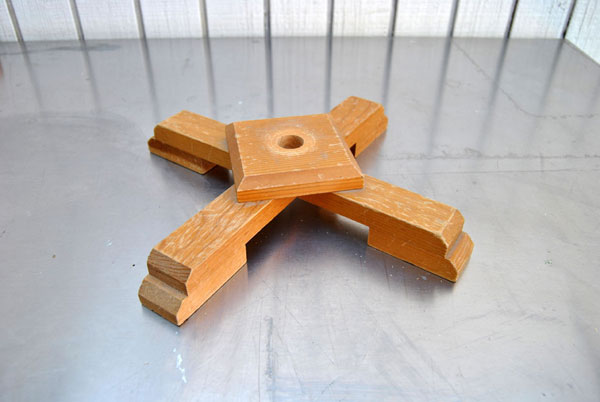
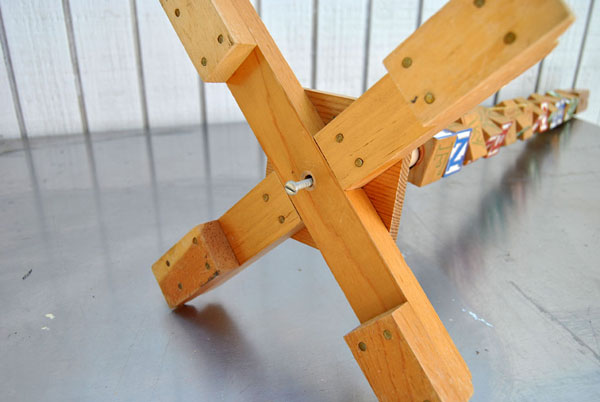
5. Attach Dowel to Base
We drilled a pilot hole into the bottom end of the dowel so our wood screw could be better seated then we drilled another hole through the bottom of the lamp base before attaching the base to the dowel. You should also drop a dab of wood glue onto the end of the dowel to make sure it stays seated on the base.

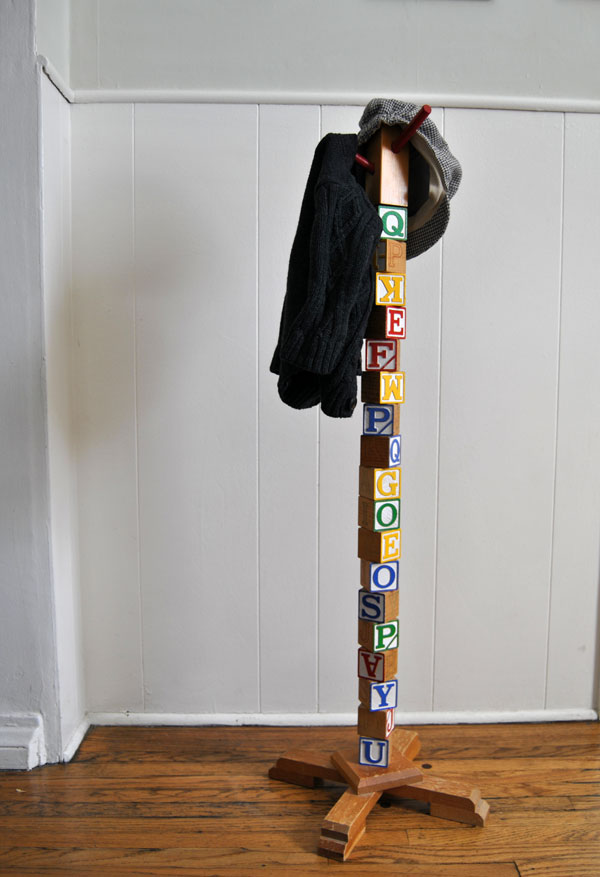
6. Add Hats and Coats
You’re finished! You can add hats or coats to this rack and your kids now have an easy to reach place to put their favorites instead of on the floor.

Additional Notes
You don’t necessarily need the wood topper. You can drill holes for the hat pegs directly into the side of a block. You could also paint the base or the blocks for a totally different look.

Parents to a little guy who’s two feet tall, Timothy and Laura Dahl founded Built by Kids as an extension of their adventures in raising a capable, confident and independent man. The Dahls are inspired by the Makers of the past and are passionate about introducing the next generation to the skills and creative thinking that will help empower their future.

RELATED STORIES:

Learn How to Build a Storage Step Stool