If you’re looking for a kitchen utility player that might open the floodgates to green eating, look no further. Pesto is perfect and it goes way beyond pasta. Pesto converts “take out the green stuff” people into green-eating machines—on the daily. Why? Because it’s absurdly delicious, that’s why!
Make it vegan, make it extra lemony, crank up the garlic, hide some spinach up in there, up the protein and anti-inflammatory properties with walnuts. It’s amazing what you can do with a blender and a dream.
Super Easy Pesto Recipe
Measure about 1 cup mixed parsley, basil, and/or arugula (basil is traditional) and about ½ cup of pine nuts (or other nuts). Put in blender with 1 tsp. sea salt, ¼ cup parmesan, 4 tbsp. olive oil, and 1 to 3 minced clove(s) garlic (how much raw garlic one prefers is highly variable).
Here’s some easy ways you can change it up:
Leave out the cheese and add lemon juice (2-3 lemons).
Add pepper!
Use walnuts or cashews or almonds for a slightly different flavor profile.
Add some spinach leaves or other vegetables—what happens in the blender stays in the blender.
Use a mortar and pestle instead of a blender if you’re feeling fancy.
Once you’re done tinkering with the recipe, it’s time to talk about the ways you can serve that secret sauce. Here we go:
Imagine the Pasta-bilities
It’s tried and true, so there’s no reason to knock it. Extra points for fun-shaped pasta, but you knew that.
Panini Perfection
Regardless of what you put between the bread—turkey, tofu, cheese—it’s going to taste a lot better. Hot or cold, trust us.
Omelette Accelerator
Looks gorgeous, tastes amazing. From bland to bam!
Vigorous Veggies
Put a big spoonful of pesto in a pan. Chop up some veggies into small pieces. The more surface area, the better. Cook them up. All of a sudden, they’re asking for vegetable seconds? Data point!
Better Broth
You probably didn’t realize this, but your homemade flavor-packed pesto can be a tasty cooking broth too. Just add water! Literally. Just. Add. Water. Then use it as you normally would to cook your couscous (or riced cauliflower if you’re gonna be that way about carbs). Try some fresh peas, sliced cherry tomatoes and some lightly crumbled feta on top if you want to show off a little. Or just give the people what you know they’ll eat.
And here’s the thing about pesto, moms and dads: it’s a gateway green. Who knows what they’ll be willing to try next. We see your zucchini and we raise you a Brussels sprout.
The Anti-Cookbook Easy, Thrifty Recipes for Food-Smart Living
We're Shelley Onderdonk and Rebecca Bloom. A veterinarian and a lawyer-turned-writer walk into a kitchen… We aren’t chefs and that’s exactly the point. We have a lot to share about food-smart living with our own young-adult children and other people and their children, too. Together, we wrote The Anti-Cookbook: Easy, Thrifty Recipes for Food-Smart Living.
As cookbook writers, moms and lifelong wellness warriors, we’re always watching out for what’s next in food. One thing we’ve learned from feeding our kids: fresh ideas are a must.
You think they love that cauliflower with breadcrumbs, so you keep on making it because you’re ecstatic that they’re eating it. Then the fatigue sets in. It’s like when you tell a joke to your surly teenager and she actually laughs. You tend to repeat it because you love to be funny to her but eventually, you get the side-eye.
Here are some food trends to keep you on top of your game:
Hidden Hemp Seeds
Their omega-3 fatty acid profile is anti-inflammatory. They are next in line of all the “hip” seeds over the last decade: pumpkin, sunflower, flax and chia. They may be the best yet. Sprinkle at will. Wherever.
Just Beet It
They’re high in dietary folate and nitrates (cognitive function boost, we’re looking at you!). Golden beets are delicious, easy to cook—roast or boil them, nothing to it—and they don’t stain and get all over everything
On the other hand, just one red beet can do amazing things for your table. We’ve been roasting one and popping it into traditional hummus for some nice flavor and incredible color. It tastes healthy and delicious and looks like strawberry ice cream!
Homemade Nut Butters
We’ve loving almond butter, with cashew butter rising. It takes patience to blend nut butter just so, but the flavor is incredible. So much better than store bought.
Once you’ve slaved over a hot food processor or blender, the possibilities are endless. There’s the obvious almond butter toast with a drizzle of honey, maple syrup or jam, the base for a yummy Asian sauce to use in a rice or quinoa or barley or noodle bowl or a protein punch-up for your morning oatmeal. (Don’t love dairy? Put that stuff on your bagel instead of cream cheese.)
Getting a picky eater to eat can be tricky, but these tricks will at least help you make those lunches and snacks just a little bit healthier—and your kids will be none the wiser.
The Anti-Cookbook Easy, Thrifty Recipes for Food-Smart Living
We're Shelley Onderdonk and Rebecca Bloom. A veterinarian and a lawyer-turned-writer walk into a kitchen… We aren’t chefs and that’s exactly the point. We have a lot to share about food-smart living with our own young-adult children and other people and their children, too. Together, we wrote The Anti-Cookbook: Easy, Thrifty Recipes for Food-Smart Living.
In the world of plant-based proteins that appeal to people of all ages, hummus is a perennial favorite—and rightfully so. It’s an always flavorful sandwich spread and a dip for the ages (as we all know, kids just love to dip). And, yes, you can pick it up at a store and it will serve its purpose just fine.
Once you’ve blended your own chickpea chowder (catchy, right?), it might be hard to go back. So, how do you make hummus? There’s more than one way! All it takes is a blender (or a food processor) and a few minutes. Here’s our no-fail guide on how to hummus like a chickpea champ.
The Basic Ingredients
A pretty classic take is chickpeas, tahini, lemon juice, olive oil, garlic, salt, pepper and paprika, but here’s another one that’s easy and delicious!
Put this in a blender (or food processor) and adjust amounts to taste:
Roasted eggplant (4 Japanese)
Tahini, about 1/3 cup
1 can garbanzo beans with about half of the liquid
2 cloves crushed garlic
1 tbsp sea salt
Juice of 1 lemon
Olive oil (about 1/4 cup)
Mint leaves (about 30 leaves)
Turmeric, 1 tsp
Blend until smooth, surround with whatever you want to dip–pita bread, crackers, vegetables—there you go!
How to Take It Up One Pinkalicious Notch
And now, for something gorgeously garbanzo, not to mention spectacularly easy. Who doesn’t want to eat something pleasantly pink that’s healthy and plant-based? Beet hummus checks all the boxes. It tastes fantastic, its full of protein and it makes quite the design statement.
Here’s the drill: Roast one small beet—yes, just one—or even boil it. (Cook for 30 to 40 minutes either way.)
Toss it in the blender with basic hummus ingredients: chick peas, tahini, lemon juice, olive oil, garlic, salt and pepper (see above). Add your ingredient to taste.
If you’re allergic to tahini or you don’t like it lemony or garlicky, drop one of those ingredients. It’ll be alright. And it’ll be pink.
We're Shelley Onderdonk and Rebecca Bloom. A veterinarian and a lawyer-turned-writer walk into a kitchen… We aren’t chefs and that’s exactly the point. We have a lot to share about food-smart living with our own young-adult children and other people and their children, too. Together, we wrote The Anti-Cookbook: Easy, Thrifty Recipes for Food-Smart Living.
Forget about trying to coax your kid into eating all his veggies, and give it to him straight—in juice form, that is. The following juicing recipes for kids are big on yummy flavors and vitamins, making them the perfect easy breakfast-on-the-go or afterschool pick-me-up, especially during cold and flu season. Keep reading to discover 14 recipes below that’ll help you get your daily dose.
Carrot, Orange, Pear Juice
For this tasty combo, you can juice the carrots and pear in your regular juicer, but you’ll need a non-electric juicer for the orange unless your juicer can handle citrus. Get more recipes like this one over Inhabitots.
This beginner juice from Reboot with Joe is perfect for kids. It looks and tastes just like a creamsicle! Yum.
Ingredients: 1 apple 1/4 pineapple 1 sweet potato 4 – 6 carrots Yields one serving.
Melon Berry Splash Juice
Skip the sugar-laden store-bought juices in favor of a refreshing homemade mix like this one from Courtney's Sweets. You don't need a juicer for this recipe, and using a blender ensures that you're getting all the vitamins and minerals (rather than losing them in the pulp).
Ingredients: 4 cups watermelon Juice of 1 lemon 10 frozen strawberries, partially thawed
Method: In a blender combine the above ingredients. Blend until smooth. Enjoy! Serves 3.
Berry Red Beet Juice
Skip the coffee this morning—get your energy boost from a delicious mix of beets, strawberries, and oranges that little ones will love, too. This ruby red recipe comes from Sophia at Love and Lentils.
Method: 1. Wash the beets, strawberries and orange. 2. Cut the greens off the strawberries, and slice the beets and orange into quarters. 3. Place all ingredients through your juicer. 4. Serve and drink right away.
Apple, Carrot, Orange & Ginger Juice
If your tots aren't yet convinced on green juice, this recipe from The Peach Kitchen is a good way to ease them into the world of veggie juices. Sweet carrots paired with yummy fruits make for a kid-approved afternoon pick-me-up.
Ingredients: 2 large carrots 1 orange, peeled 1 apple a knob of ginger or turmeric
Method: Let everything pass through your juicer and drink.
Strawberry-Apple Juice
This pretty in pink juice from FoodNetwork.com is the perfect way to wake your littles up on a weekend morning. The chia seeds help thicken the mixture and provide a boost of fiber.
Ingredients: 2 cups strawberries, tops removed 1 medium Red Delicious apple, peeled and cored 1 tablespoon chia seeds, optional
Method: Juice the strawberries, then the apple, following your juicer's specific settings for each. Stir in the chia seeds if using and let soak for 5 minutes. Serve the juice immediately over ice, if desired.
Our friend Dr. Michael Murray of SPUD (they deliver fresh organic fruits and veggies directly to your doorstep) is their resident natural medicine expert and juicing fanatic. He calls this juice recipe “a great tasting green drink that most kids love.” It’s chock full of fruits to give it a sweet taste, but delivers lots of vitamin C, vitamin K, calcium and fiber.
Ingredients: 1 handful of Swiss chard, kale, spinach or a combination 1 pear 1 cup strawberries 1/2 lemon, unpeeled 1 apple, cut into chunks
Method: Juice the greens first, followed by the pear, strawberries, lemon, and apple.
Thomas’ “I won’t eat chicken, but I’ll drink kale” Juice
Charina Lumley
This recipe comes to us from Red Tricycle’s own Director of Sales, Charina Lumley. She makes this juice on a daily basis for her son Thomas, who prefers his morning juice from his special snowman sippy cup.
Ingredients: 3 Romaine lettuce leaves 2 kale leaves 1 cup spinach 1 handful of baby carrots 1 Fuji apple (or similar sweeter variety) 1/2 Navel orange (or 1 clementine)
Method: Wash fruits and vegetables. Juice greens followed by fruits. Immediately serve in your kiddo’s favorite sippy cup and enjoy.
This juice recipe is a classic and a definite must-have in your juicing arsenal. It only has three ingredients, and, you guessed it, each item stands for one of the first three letters of the alphabet. Make a game out this recipe by letting your kiddo switch up the ingredients to spell different words.
Like a Tequila Sunrise minus the alcohol, this fruit/veggie concoction is a good balance between sweet and tart. Plus, adding in a few veggies gives this otherwise fruity drink an extra healthy kick.
This super juice is just what busy parents and their tots need to get their day started. Since pears are less allergenic than other fruits, they are great for infants and the littler set, while still delivering a healthy dose of vitamin C and fiber.
Ingredients: 1 pear 1 handful kale 1 apple 2 stalks celery
No doubt your kid is an expert on identifying colors, so they’ll love the bright orange hue of this hearty beverage. And they’ll hardly notice the carrots through the natural sugars from the orange and apple (try Fujis or a similar sweet variety).
Speaking of colorful juices, this one reminds us of the slime they used to dump on celebrities on Nickelodeon. Tell your kiddo that it’s the same slime recipe that gave the Teenage Mutant Ninja Turtles their powers and he or she might be even more inclined to gulp it down.
Ingredients: - 2 stalks celery – 1 handful kale – 2 apples
Combine this juice with a regular exercise routine, and you’ll be back to feeling fit before you know it. Think of this as your homespun version of V8 at a fraction of the cost. And when your little ones see you downing this super juice, they’ll want to try some too.
– Combinations of ingredients are super important, especially when maximizing the juice’s nutritional value without compromising flavor. While you may be a fan of mixing a whole mess of fruits and veggies together, your kiddos might want something a little less adventurous.
– Certain foods like ginger can overpower or mask other flavors, so use them sparingly.
– You can increase the fiber content by blending the pulp and combining it with your juice for an extra healthy boost without the “no pulp” whine.
–If you don’t have a juicer, try parboiling or partially baking root vegetables like carrots and beets to make them soft enough to whip in a blender.
Have you introduced juicing into your kid’s diet? If so, we want to know your go-to recipeS—leave a comment below!
If your daily dose of fruits and veggies come from a half-eaten banana on the way out the door, it’s time to sign up for a juice or smoothie delivery service. Here’s how it works: They provide premade juices or all the goods to make your own blends if you want to go the DIY route. And in return a balanced diet is now attainable without you barely lifting a finger. Read on for three juice and smoothie delivery services worth your time and money.
GreenBlender
The scoop: If you want to DIY your own smoothies without the hassle of going to the store, you’ll fall head over heels for GreenBlender. Each week they send five new smoothie recipes (enough to make 10 smoothies), along with labeled, preportioned ingredients. Making each smoothie is as easy as opening bag and putting the ingredients into a blender.
Good to know: GreenBlender aims to work with organic and local farms whenever possible. To make their smoothies you’ll need a blender or a magic bullet.
Get it:Plans include a week-to-week subscription starting for $49, a monthly 4-box subscription for $176 and a 12-box subscription for $468.
The scoop: With smoothies, activated bowls, soups, harvest bowls and now even sundaes, Daily Harvest is a great option if you’re looking for something beyond just juice or smoothies. Each product comes packaged up with everything already combined into a convenient cup so there’s no sorting ingredients or figuring out what produce goes in what bowl.
Good to know: We love that all Daily Harvest goods come frozen, which means there’s no pressure to consume the products that very day or week. And, if you’re wondering if there are benefits beyond convenience for frozen delivery, check this out.
Get it: Choose from weekly or monthly plans with cups starting at $6.99/each.
The scoop: To say we’re enamored (ok, obsessed might be a better word) with Pressed Juicery may be an understatement. What began as a tiny storefront in West LA has now burgeoned into a nationwide cult following. All of their juices are made with a custom hydraulic press with farm-fresh produce. Cleanses and home delivery subscriptions available.
Get it:Subscriptions start at $160/month for 12 juices, which includes free shipping. One-day cleanses start at $55 with the option to upgrade to three- and five-day cleanses.
Many new mothers should learn how to make easy organic baby food for their little ones. It can cut down on the food bill and is better for the baby. There are not any additives in the baby food and you know exactly what the ingredients are.
You can also make it match the tastes of your baby. Some little ones like a more robust flavor and some do not. Don’t worry, you’ll learn by trial and error as you go, and eventually you’ll hit on that perfect mix for your little one. In addition to all of the organic ingredients, one piece of equipment that is essential in making your own baby food is a blender.
Using A Blender
There are two different types of blenders you can use in order to make organic baby food. There is the standard jar type that sits on a stand with a container on top and the blades inside the container. You can also use an immersion blender, also called a hand blender or wand. A hand blender allows you to put the appliance right into the pot you are using to cook vegetables and blend them while they are hot. You can use a food processor but generally they do not puree the food smooth enough for a young baby.
Fruit Based Baby Food
Purchase ripe organic fruits like bananas. A banana can be just mashed up with a fork for an older baby learning to take in solids. It can be pureed easily with the best blender for a younger one. Mangoes are also great in the same manner. Some fruits, like apples, may have to be cooked down first for the child to eat. With apples, you should peel the fruit then core it and slice it into small slices. Put it in a pan with a little water or organic apple juice and turn on the heat. Continue heating until the slices become soft and mushy. You can add a little sweetener if you think the apples might be a little sour. Do not use honey as it could cause health problems (botulism, which is a type of food poisoning) in infants under one year. You can use just a tiny bit of sugar or add another sweet fruit like strawberries.
Vegetable Medleys
Organic vegetables make great baby food. You can steam different types of potatoes, carrots, or peas. Steam in a steaming basket until the vegetables are soft and getting mushy. Steaming the vegetables makes all the nutrients stay in instead of flowing away with the water you boil them in. Blend the vegetables adding a little bit of water if it needs to be thinned down.
Using Frozen Foods
If you cannot get fresh fruits or vegetables buy the organic frozen ones. You will have to either boil the vegetables or put them in a microwave until they become soft. Then puree them in a blender. Frozen fruits just need to be blended once they thaw and that’s it.
Meat Based Baby Food
If you eat meat you can also make meat product organic baby food by using organic meats. Take turkey or chicken and put it in a pan, bones and all. Then add water or, if you prefer, use a homemade stock to make it more flavorful. Boil until the meat becomes tender and falling off the bone. Remove it from the stove and let it cool a bit. Cut the meat into small chunks and add it to the blender. You can also add some of the water or stock to thin the mixture down. Simply repeat the same process if you want to use beef.
Flavoring
When the child gets older you can start adding some flavor to their foods. Use cinnamon or ginger with fruit based recipes. You can also add parsley, rosemary, thyme, and garlic with meats and vegetable based recipes.
Preservation
Here is a great way to preserve your organic baby food. Pour it in to ice cube trays and freeze it. Pop the cubes out and store them in freezer bags. Just take out what you need for the next day and defrost it. You can make large batches in your blender and just freeze it so you only have to make new batches every week or so.
How convenient, easy, and healthy! Your baby will love your homemade organic baby food!
If your kids love yogurt and fruit, they’re in for a real treat with this easy recipe that calls for only three ingredients! And, what makes these treats even more amazing is that they’re a healthy treat that’s easy to grab while you’re on the run!
Makes: 1 cup yogurt ice cream or yogurt bites
Ingredients:
1 (8-ounce) container vanilla yogurt
½ cup frozen blueberries
½ cup frozen raspberries
Method:
1. In an electric blender at high speed, blend together yogurt and frozen fruit until mixture is smooth and the consistency is of soft ice cream.
2. Scoop the yogurt/berry blend 1 teaspoon at a time into dots on parchment paper or Silpat and flatten lightly with a spoon or finger.
3. Flash-freeze yogurt dots in freezer until frozen, approximately 10 minutes.
4. Place in a container and keep in freezer for up to 2 weeks.
Treat Tips from the Chef!
Even though I use blueberries and raspberries, feel free to use whatever kind of fruit you and your kids like. And, if you do use these berries, you can either blend them together to create one purple color or blend the colors separately to have purple dots and red dots. Rather than forming the yogurt mixture into dots, you can even just place it in a small bowl and eat it like ice cream! It’s delicious, quick, and healthy!
What is your kids’ favorite fruit? Do they love yogurt? Tell us what they think of this recipe in the comment section below!
Love the idea of making homemade baby purees, but can’t figure out when you’ll have the time or energy? We’re here to tell you, it’s really not that complicated or time consuming, especially when you have a trick up your sleeve like the just launched Baby Brezza Glass One Step Baby Food Maker. Here’s why it’s your pureeing secret weapon.
What’s so cool about this baby gadget?
Baby Brezza Glass One Step Baby Food Maker is the first glass baby food maker on the market. This is a great innovation because now Baby’s fresh fruits and veggies don’t have to cook in a plastic steamer basket or bowl. Instead the food safely cooks inside a glass bowl, keeping the food’s contact with plastic to a minimum. So you can stop losing sleep over whether or not any BPA or other chemicals are getting into your baby’s food.
What can the Baby Brezza Glass One Step Baby Food Maker do?
Let’s say you want to make a baby food puree. You add water to the steam tank, toss in your cut up fruits or vegetables, close the lid and press the “steam + blend” button and wait for your baby’s meal to be made. Easy peasy. You don’t have to steam, change bowls and then blend, or steam on the stovetop and then puree in a blender. This gadget really is a time saver (and a dirty dish saver!).
You can also just steam or just blend food. This means once baby moves on from simple purees you can use the machine to puree table food or steam veggies for finger foods. This isn’t a gadget you’ll hide away in the cupboard after a few months of baby’s first bites.
Baby Brezza Glass One Step Baby Food Maker is available at babybrezza.com, $159.99.
Do you make your own baby food? Tell us your little eater’s favorite recipe.
Ice cream…the ultimate in summer sweet treats. Nowadays, even little (or big!) fans who struggle with allergies or upset tummies can enjoy an ice cold dish. We’ve rounded up 15 delicious concoctions from around the web packing just as much flavor as traditional ice cream—all without a drop of dairy. Your only problem will be trying to put down the spoon.
Dole Whip
Even if you can’t swing a trip to Disneyland this summer, you can still pretend you’re hanging out with Mickey by making Real Food Real Deals’ rendition of the cult favorite theme park dessert. No ice cream maker needed—just a blender and a shallow, airtight container for freezing. Click here to grab the full recipe.
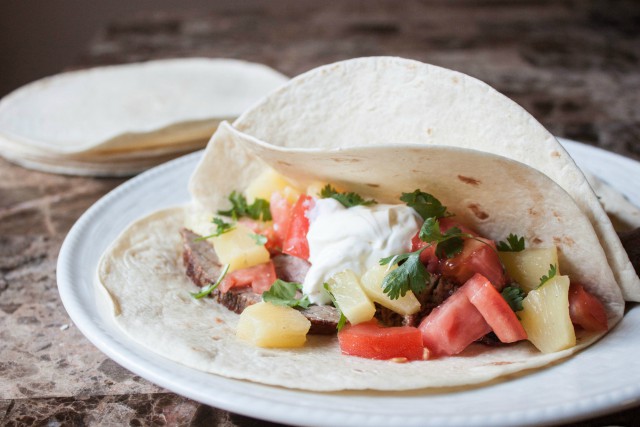
Savory steak and sweet pineapples! We would have never tried this amazing combination if it weren’t for food blog The Rustic Willow who dreamed up this awesome combo. Lunch or dinner this meal will be a huge hit with your youngsters, especially when it’s in an easy-to-eat wrap. Or, serve it buffet-style so kids can make their own portions. Scroll down for the full recipe.
Ingredients: Marinade 1 can of sliced pineapple rings
Juice from half a lime
2 cloves of garlic
2 tablespoons of olive oil
2 tablespoons Worcestershire sauce
1 teaspoon salt
1 teaspoon pepper
Meal 1.5 lb flank stank
1 large tomato
1 cup fresh cilantro
Sour Cream
1 package of 10 medium-sized tortillas
1 gallon-sized Ziploc bag
Method: 1. Take 2 pineapple rings and the juice from the can and pour into a blender (reserve the rest of the slices).
2. Add the remainder of the marinade ingredients into the blender. Blend until all ingredients are well combined.
3. Place steak in Ziploc bag and pour marinade over. Make sure steak is covered.
4. Refrigerate for 30 minutes (no longer!)
5. While marinating, chop your tomato, additional pineapple rings, and cilantro.
6. Heat your grill to medium-high heat.
7. Heat your oven to 350 degrees.
8. When steak is done marinating, cook steak on grill: 3-4 minutes each side for medium rare to medium, and 5-6 minutes on each side for medium to medium well.
9. Take steak off grill and let sit for 10 minutes.
10. Wrap tortillas in tinfoil and bake in oven for 10 minutes.
11. After 10 minutes, cut the steak in strips against the grain.
12. Fill the tortilla with 3 strips of steak, a handful of tomatoes, pineapples and cilantro.
13. Lastly, add a dollop of sour cream.
14. Dig in!
Have you tried any other awesome flavor combinations? Let us know in the Comments below!
Inspired by her time in New Orleans, Cat runs the wonderful The Rustic Willow, a blog that covers recipes, DIY, projects and fun life lessons. Her amazing flavor combinations and bright photographs will make you want to experiment in the kitchen. Click here to see her awesome recipes.