photo: iStock

It was an evening I wish I could erase from my mind. My 13-year-old daughter Nori had been spiraling downwards for months. The possibility of drugs crossed my mind enough times that I had her drug tested, which she thankfully passed. She was morphing into someone I did not recognize or frankly even like and I didn’t know why. Grades were dropping while calls from her school became more frequent. Cute clothing she used to love was slowly being replaced with baggy hoodies and sweatpants. Her long, blond hair became a point of frustration for her where it had always been a source of fashion. The withdrawing from friends came first followed by what seemed to be a withdrawal from life itself.

None of our usual parenting tactics seemed to break through her new wall. The helplessness I felt as a parent forced me to question the way I was raising her. Was I doing it wrong? Had I ruined her in some way? I continually felt torn between wanting to wrap my arms around her as a shield from the everything causing all this pain and change or wanting to throat punch her for being the source of so much chaos and disarray in our family.

Finally, a break. Our oldest daughter came to us with news that Nori had confided in her something that needed to come out. That evening was one of the worst I have ever had. Nori’s pain was genuine and raw. Her dam had finally broken and everything came gushing out. I sat speechless as I heard Nori share things like she was born in the wrong body and was meant to be a male. How she was suffering from gender dysphoria and despised the way her body was changing as female bodies do. Binding her breasts was something she was already doing on a daily basis with duct tape. I had no words when Nori started lamenting on the need for starting testosterone injections. She had grown to hate the beautiful long hair she had always known and was ready to chop it all off.

I tried to hold myself together. Thoughts and feelings reeled through my head that evening. Tears were shed, yet numbness kept drying them up. I cycled through a myriad of emotions.

Anger. This can’t be real, it’s got to be a phase and I was angry at the amount of passion she was exhibiting during this performance. Anger that she was binding her breasts with duct tape without a second thought to the permanent damage she could cause. Angry at the disregard for all the upheaval she had been putting us through with her antics

Sadness. Whether or not this was a phase, her pain was real and I felt sad that my child hated herself with so much fervor when all I saw was a beautiful young woman. Sadness that coming to us first wasn’t something she felt she could do when I thought we were close enough for that.

Mourning. Suddenly and without any say or input from me, the daughter I had known for 13 years could quite possibly be gone forever and was being replaced with this new version of her that I hadn’t gotten to know yet. That evening there was a stranger in my daughter’s body. I didn’t recognize her and I mourned the daughter I had known.

Relief. I was immensely relieved to know that this change wasn’t due to drugs, pregnancy, or being raped. Crossing those off the list somehow made things a tad easier for me.

A year has passed since that bombshell. A year since our family changed forever. Life is a great deal different although still not without its challenges. Nori’s hair has since been chopped off. I don’t hate it. All her clothing and shoes now come from the boy’s department. I don’t hate that either. The kind-hearted child I gave birth to is still in there no matter what her exterior looks like.

Hormone therapy and breast binding is not something we are allowing at this time. There are battles worth fighting and while outward male/female appearance is not one of them, permanently altering my 14-year-old is a hard no.

Having strangers in public look at my child and refer to her as my son is something I will never get used to. I will love Nori no matter what her/his future choices are. I will always mourn the little girl I had for 13 years that suddenly wasn’t anymore and that is okay. Mourning who they were does not negate the love you have for your child as they currently are. Do not be ashamed of feeling like there was a death because in several ways there was. My relationship with Nori is surprisingly good, different then it used to be but good nonetheless. Creating a new normal comes with time and will change even the most unyielding soul.

This post originally appeared on Medium.

I am a mom to three, wife to one and a writer of many things

When it comes to Halloween costumes for kids, there’s nothing quite like the original, DIY Halloween costumes you see on the festival circuit and at your front door on the big night. So, in order to inspire major creativity in parents everywhere, we collected 33 of the most jaw-dropping homemade costume ideas that anyone—from Martha’s protege to the totally last-minute types—can tackle. Keep reading and check ’em out. 

Giraffe

Brit Co

How adorable is this giraffe costume? With a little paint, a leotard and a headpiece bought off Amazon, your little animal lover will be wildly appropriate for Halloween night in no time. Get the tutorial over at Brit + Co

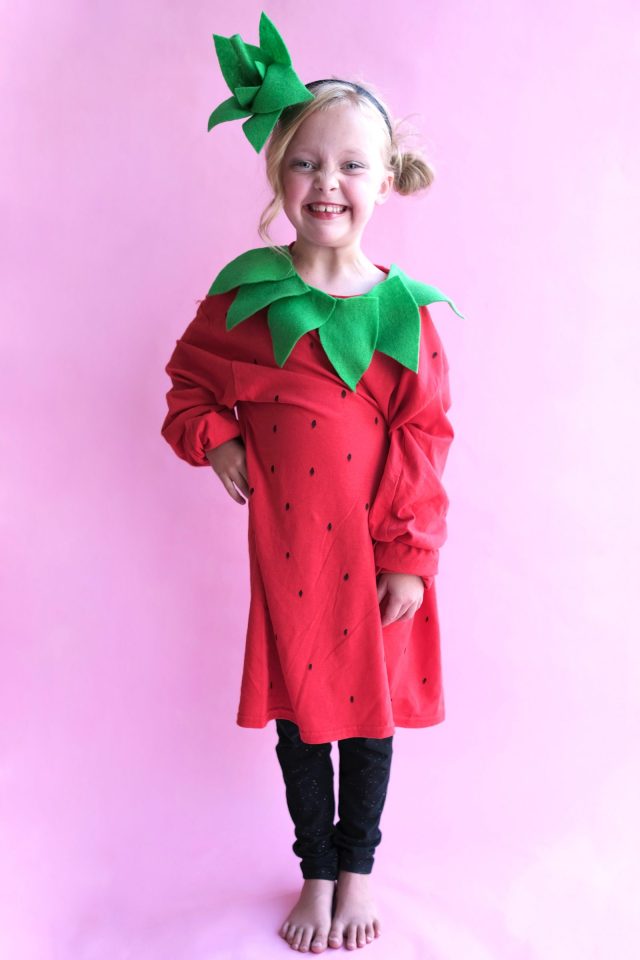
DIY Strawberry

Strawberry last minute halloween costume
Pretty Life Girls

Five supplies are all you need to make this sweet strawberry from Pretty Life Girls. After a quick trip to the craft store, you can whip up this no-sew costume that is adorable, but more importantly is comfortable for kids and adults, too!

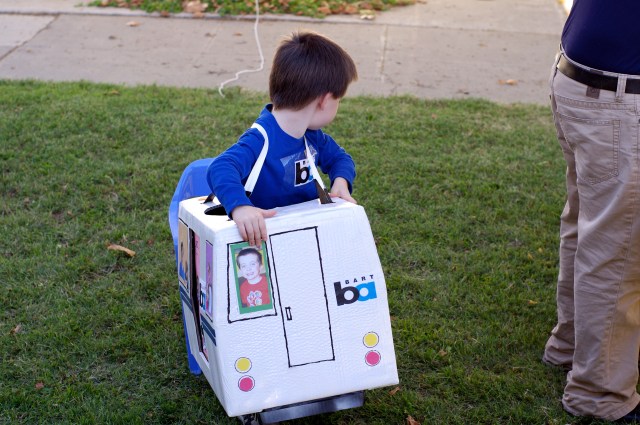
BART Train Car

Jinjer Markley via Flickr

Do you have a BART or DART or some sort of public train system in your area? Using a cardboard box, markers and pictures of your kid and her friends, you can make a wearable train car for your kid this Halloween. The trickiest part is the straps, for which you can use old suspenders, old straps off a tote bag or even fabric. 

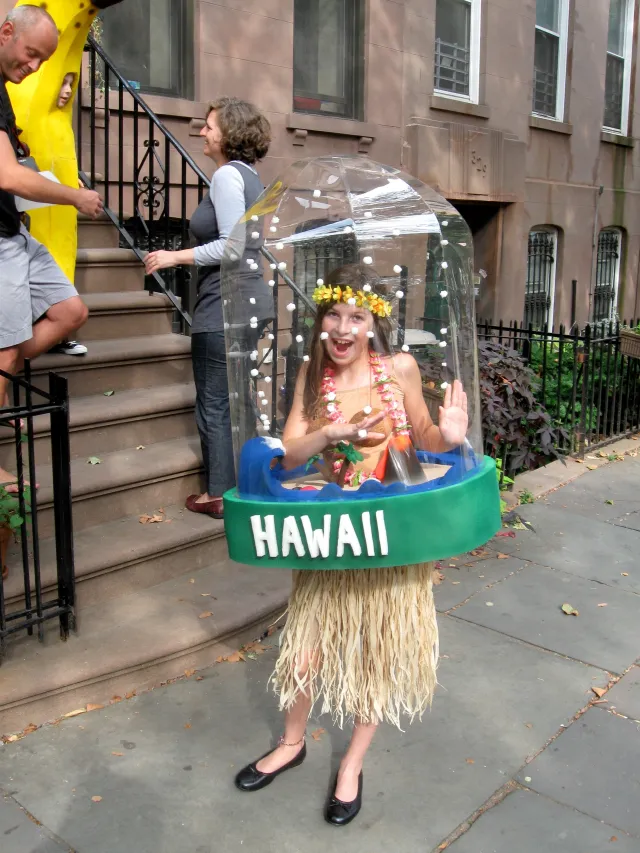
Hula Girl Snow Globe

J Potisch via Flickr

This lucky girl had her father make a snow globe costume in just three days. With foam, lots of paint, cardboard, plastic and of course, a coconut, it’s the perfect, enlarged version of the classic travel souvenir. Check out the entire project, and see all the materials here.


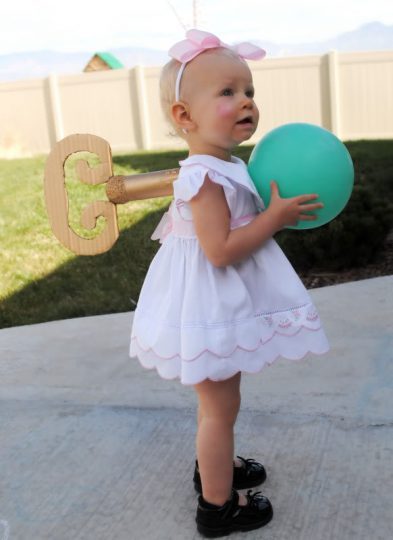
Wind Up Doll

Stacy Hart via Hart and Sew

This precious wind-up doll from Hart and Sew has us in “awwww!” Quite possibly one of the easiest and cutest DIY’s we’ve seen, anyone can make a version of this genius idea. Head over to Hart and Sew to get the details.


Rubik's Cube

City of Marietta via Flickr

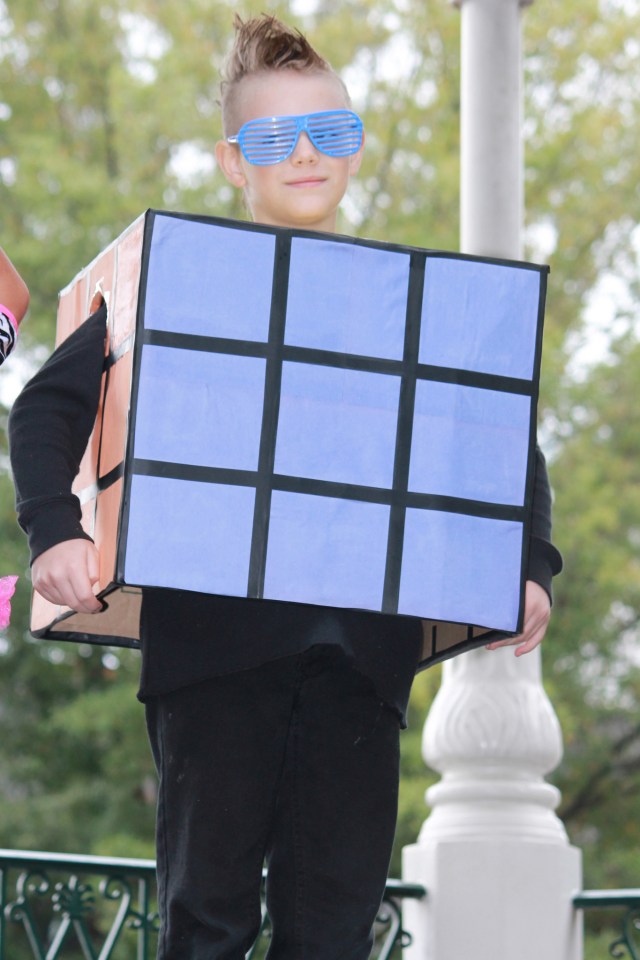
Figuring out how to make your own Rubik’s Cube costume will be easier than actually solving the classic brain-bending puzzle. Colored paper, electrical tape and cardboard are your main ingredients, but we think the groovy glasses and sweet hairdo add a little something extra, too.


Fantastic Mr. Fox

Cat Sets via Mom Inc. Daily

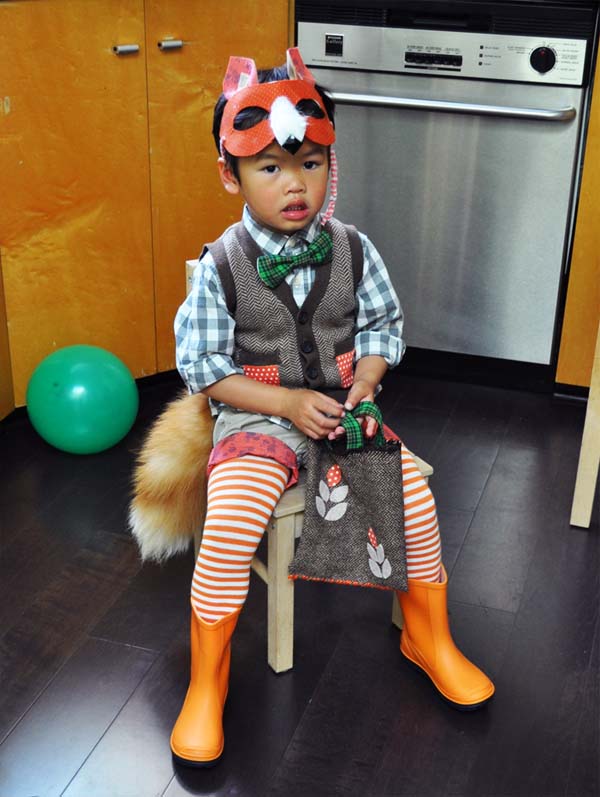
Oh, how fantastic is this little Mr. Fox? From the striped leggings to the furry tail, it’s easy to whip up your own version for Halloween, this year. Cat, of Mom Inc Daily, suggests starting with a store-bought mask and using glue, lots of glue. Find out what else you’ll need by skipping over to Mom Inc Daily.


Pac Man

Emily Morgan via The Effortless Chic

This Pac-Man costume will thrill kids of all ages! We love the pixelated fruits and sunglasses added for extra appeal. If you’re worried about having the skill set to make your own, don’t be. The hardest part of this project will be getting it off your kid at the end of Halloween night. There’s even a tutorial to make an adult-sized ghost! Find out how it’s done and what you’ll need over at The Effortless Chic.
 

The Day the Crayons Quit

Brittany Jepson via The House That Lars Built

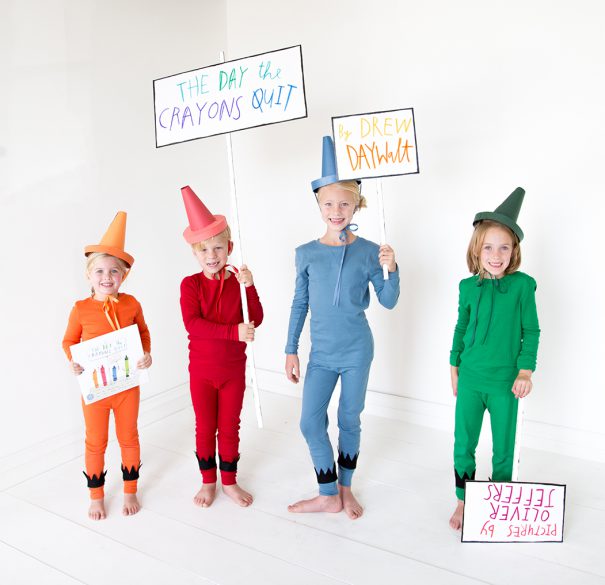
The crayons may have quit on you, but Brittany from The House that Lars Built sure hasn’t. This adorable and easy-to-replicate tribute to the popular picture book is fun and perfect for a group of friends or a family. Find out what you’ll need to make it happen over at The House that Lars Built.


Medusa

Evan Long via Flickr

If you’ve got a white sheet, rubber snakes, and a wig, you’ll probably have everything you need to make your own version of this mythical Medusa costume. A beginner set of sewing skills could be handy for the toga (sheet) and a cape but the snakes are what makes this stare-worthy costume shine.


Hipster DJ

Eduard Bonnin/Stocksy United via A Subtle Revelry

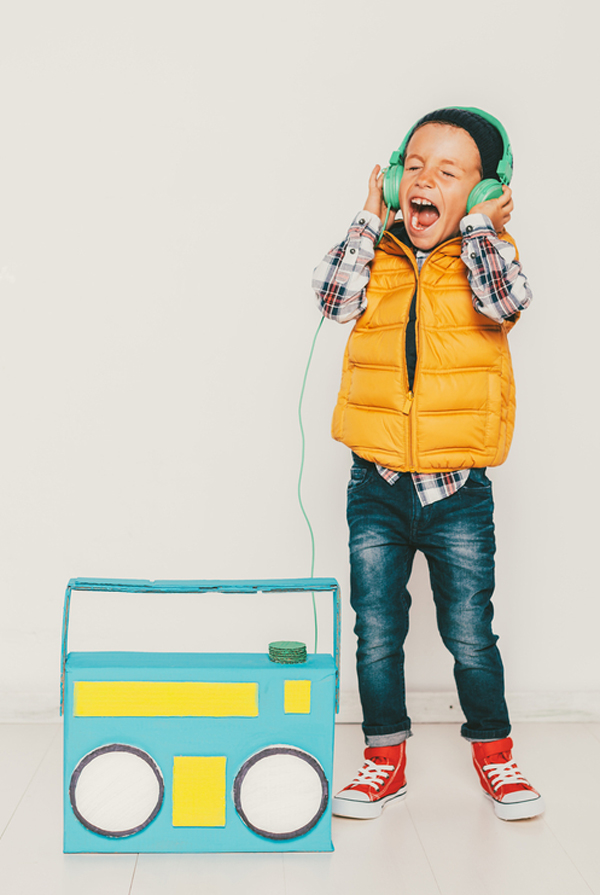
It seems as though hipsters have taken over the world—why not Halloween, too? This adorable idea is super simple because you’ll only need to make the cardboard boombox. There’s even an option for adding a tape player, which, of course, is hipster approved. Bonus points for funny little mustaches! Find out more by visiting A Subtle Revelry.


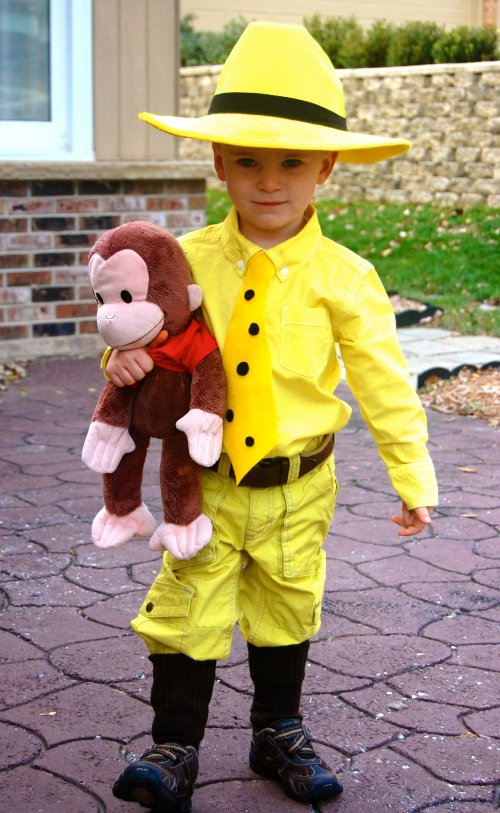
The Man with the Yellow Hat

courtesy Haute Apple Pie

If there’s a little kid who hasn’t been obsessed with Curious George at some point, we haven’t met him yet. Indulge your kiddo's love of the classic literary figure and create a Man with the Yellow Hat outfit. We love this no-sew version spotted over at Haute Apple Pie because while you might need to spend time collecting the gear, you won’t be sweating over stitches at the final hour. Find out what you’ll need to make your own version here.


Bird Costume

Merilee Liddiard via MerMag

If not the colors, then the simplicity of this gorgeous bird costume from Mer Mag will have you in awe. The handmade bird legs are especially awesome. Fly over to over at Mer Mag for more info.


Vector

Small Fry Blog

This idea from Small Fry Blog has both direction and magnitude. It’s also hilarious and easy to whip up on your own. Plus, if you’ve got a minion-loving tyke at home, it’s the perfect Halloween combo. Find out what pieces make this look come together over at Small Fry Blog.


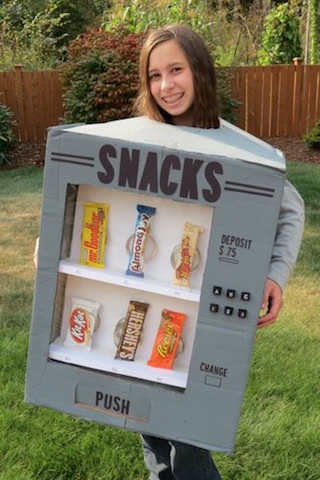
Vending Machine

Christy Palmer via Thrifty and Thriving

This is an easy, and great idea for using up all those boxes from Amazon! Just be warned— this cool costume could have other trick or treaters trying to get the candy to dispense. A Slinky, paint and a few other items are all you’ll need to make your own version of this tasty get-up. Head over to Thrifty and Thriving to get the entire tutorial.


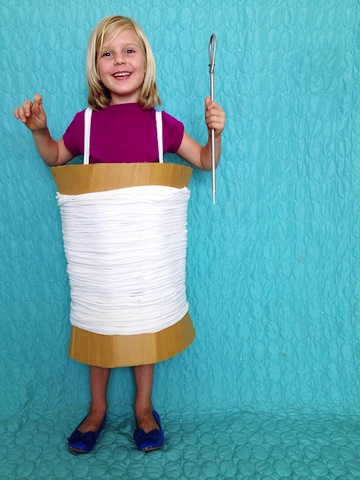
Needle and Thread

Amy Johnson via Maker Mama 

It’s sew simple to make your own version of this clever costume. The hardest part might be finding the right lampshade to shape the spool. Wondering what else you’ll need? Head over to Maker Mama for the complete tutorial.


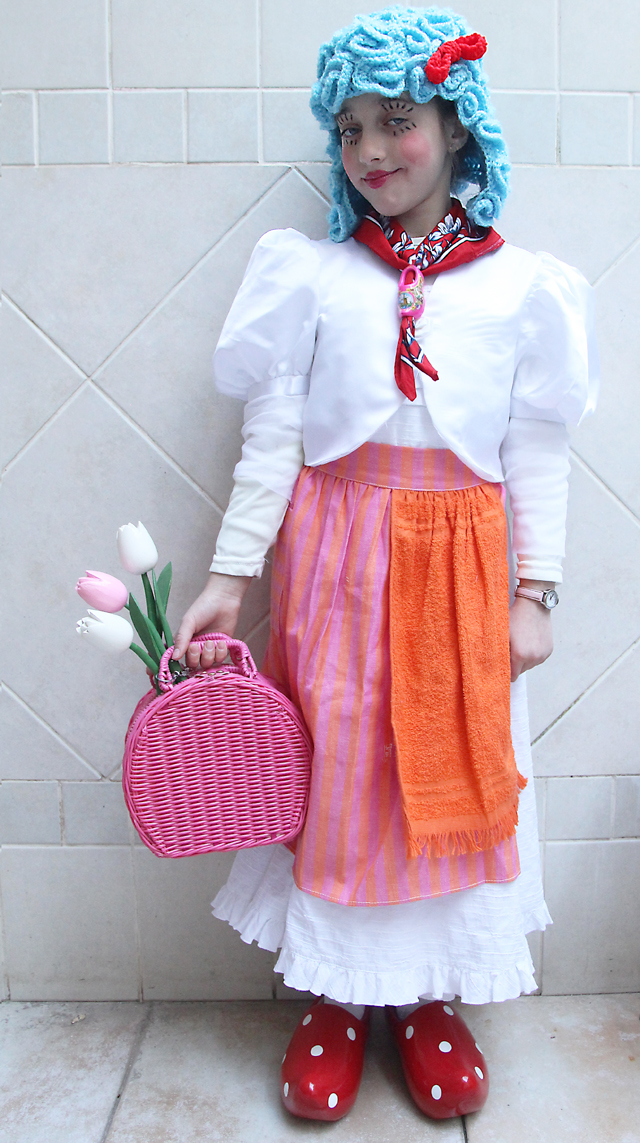
Dutch Doll

Sara Rivka via Creative Jewish Mom

She’ll be as darling as the Delft milkmaids themselves, with a bright and cheery costume like this one from Creative Jewish Mom. Mom Sara found everything she needed from around the house and provides the tutorial for making the crochet wig, here. If you don’t have the skills (or time) to whip up a wig of your own, consider a grabbing one from the local costume store, instead.


Simple Spider

Leslie Manlapig via Pink Stripey Socks

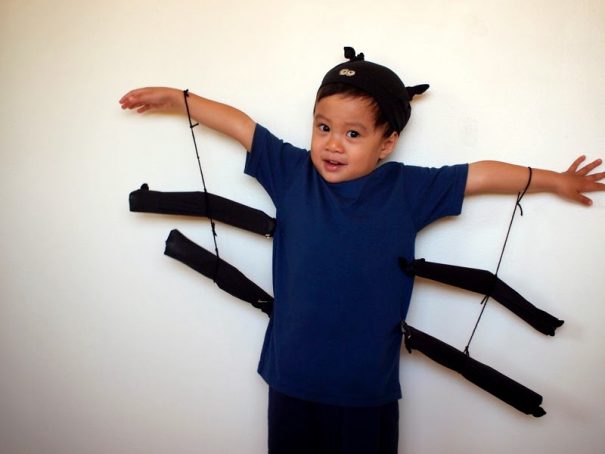
Leslie of Pink Stripey Socks is at it again, and this time she’s come up with a seriously simple spider costume perfect for Halloween. Inspired by the book, Scaredy-Cat Splat, this adorable outfit can be made in a single afternoon. Gather your materials, which include black stockings, yarn, and sharpie markers, and head over to Pink Stripey Socks to find out how it’s done.


Pack of Play-Doh

Melinda Beth via Melinda Beth Blog

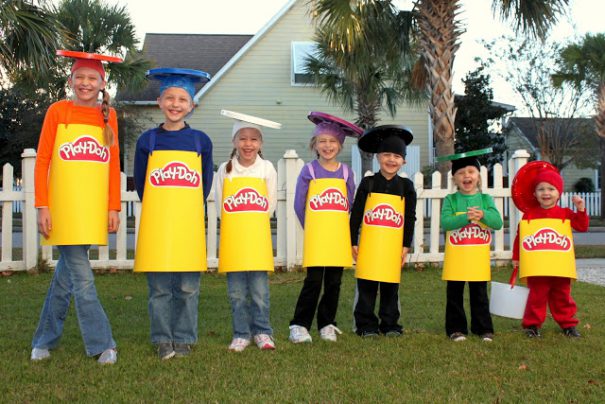
Whether you need one costume or many, like Melinda from Melinda Beth, a can of Play-Doh is a clever and creative idea for little trick-or-treaters. We love the upcycling concept of this idea, as well as the basic material list (poster board, hot glue, spray paint, bucket lids). Get the entire tutorial over at Melinda Beth.


Bacon and Egg

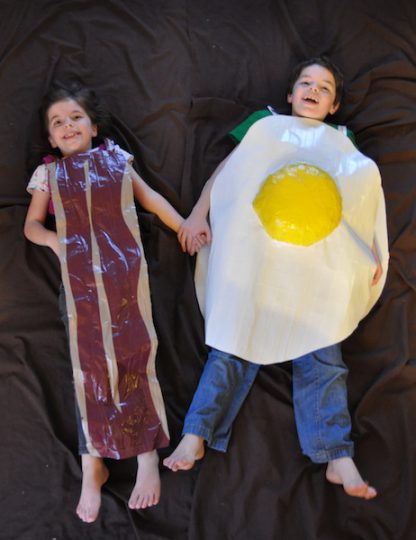
Bacon and egg—the classic combo. This quick costume (about two hours from start to finish) is a fun idea for siblings! Find out how to duct-tape your way to costume bliss by watching the YouTube tutorial here.

Stylish Superhero

courtesy Brit Co

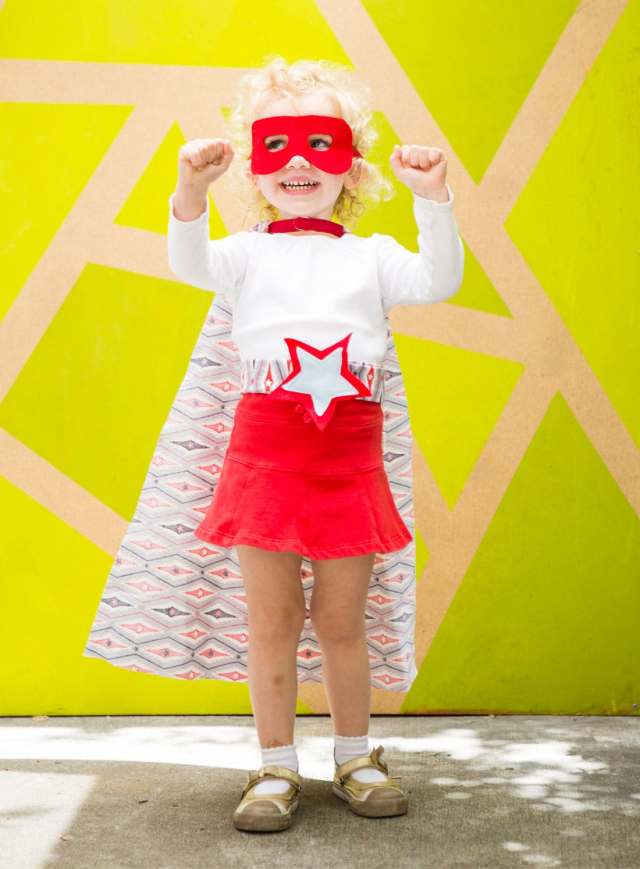
Mini fashionista by day, sweet superhero by night—your tot wants to play the hero without giving up her sense of style. This adorable DIY from Brit + Co will give her a little bit of both. While this one does require a bit of stitching, the easy-to-follow tutorial means you can handle it in one afternoon. Grab the details here.


Ninjago

Delia Randall via Delia Creates

If your kids are anything like ours then Ninjago rules. Your spinjitzu master can pick his favorite student (Lloyd, Kai, Cole?) and you can go from there. Finding all matching colors for each suit is easy, but the small touches like shoulder gear and certain weapons give each costume a unique look. Delia of Delia Creates shows us how it’s done, so hop on over for the low-down.


Llama, Llama

Merilee Liddiard via Mer Mag

We love this creative llama costume from Mer Mag. With just a few items on the supply list, the hardest part about this project might be procuring the poncho and hitching a ride to Peru! Find out what you’ll need over at Mer Mag.


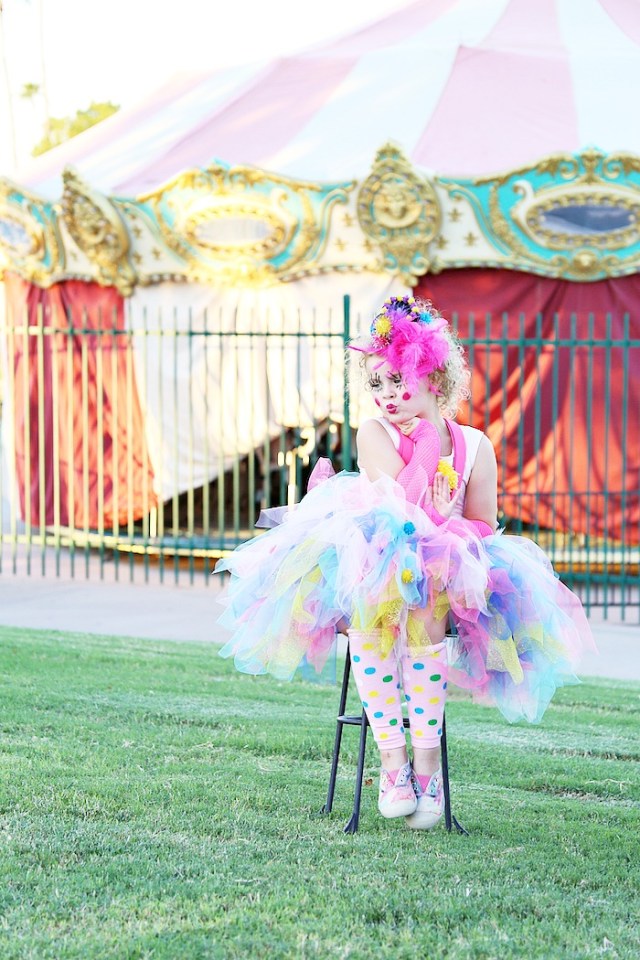
Cute Clown

Classy Clutter

If your kiddo wants to run away and join the circus, indulge her fantasy by whipping up a version of this whimsical clown costume we spotted over at Classy Clutter. From the cheery colors to the fact that this DIY starts with a leotard, we think your little ringmaster will love life under the big top. Find out how to get started by clicking here.


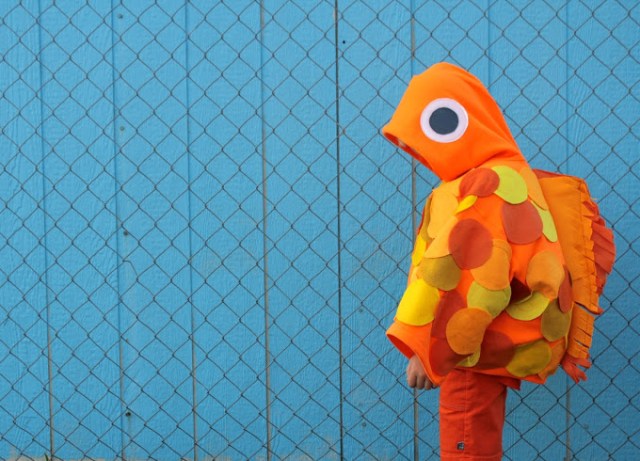
Goldfish

Dana Hillard via Made Everyday

Here’s one that’ll stand out in a crowd of costume-adorned kiddos. Dana of Made Everyday starts with an orange t-shirt and shorts and adds felt, hot glue, some stitching to make something truly unique. You can get the details over at Made Everyday.  


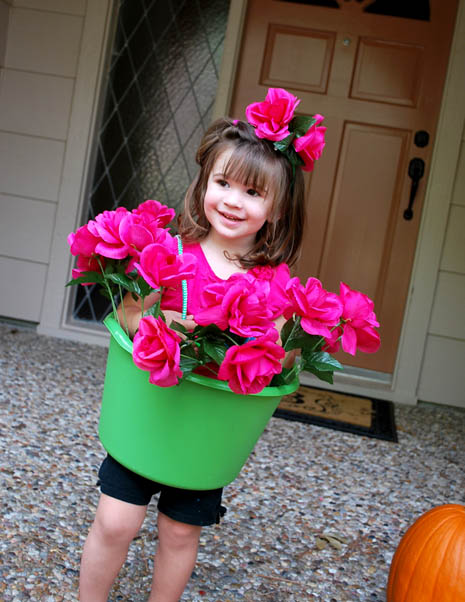
Flower Pot

Bobby Bryd via Clumsy Crafter

How creative and easy is this flower pot costume? The perfect size for your toddler, he or she can even pick out the type of flowers that'll adorn the pot! Find out how to make your own over at Clumsy Crafter.


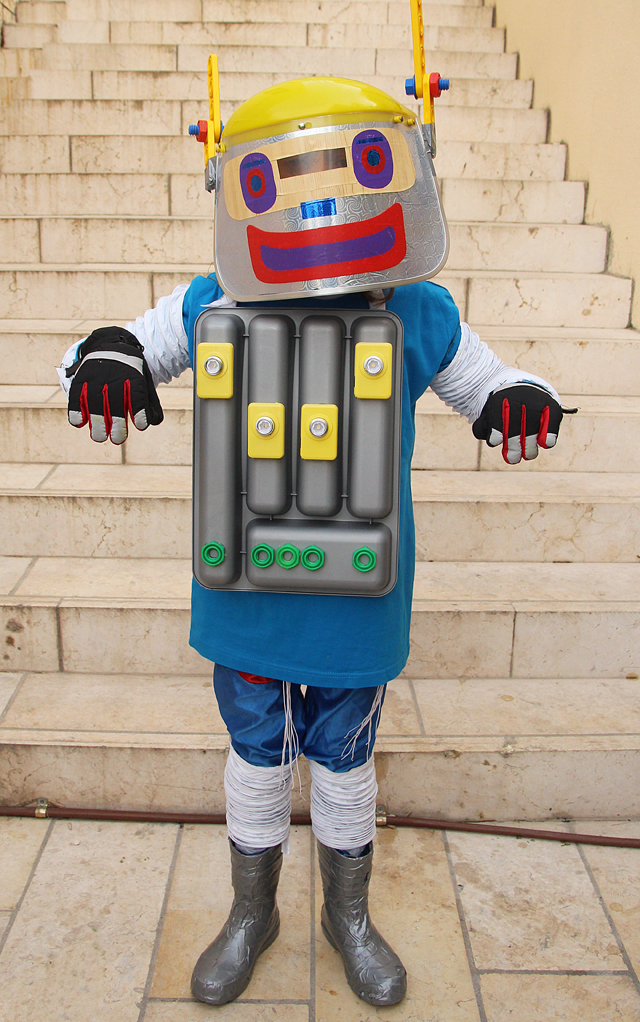
Robot

Sara Dahan via Creative Jewish Mom

You don’t usually hear “robot costume” and “easy” in the same sentence. We love this version from Creative Jewish Mom; not only is it designed for all-day wear (your kid can actually sit down!), but you don’t have to collect boxes for a year to make it happen. Head over to Creative Jewish Mom to see how it’s done.


Carrie Lindsay via Carrie Elle

Everyone's favorite elven warrior from the ‘80s is back, and we couldn’t be more thrilled. For your little Legend of Zelda fans, this adorable Link costume from Carrie Elle is the perfect fit. And, the best part? You won’t need to sew a thing! Find out what you’ll need to get started over at Carrie Elle.


The Rat Race

Kathleen Ballos via Handmade Charlotte

Parents, if you’ve ever had to commute and from the office, then you’ll appreciate this creative take on “the rat race.” It’ll take some coordinating to make it happen, but the results are guaranteed to see a few chuckles when your crew knocks on doors come Halloween night. Take a closer look over at Handmade Charlotte.


A Piece of Flair

Erin Holland via ©A Subtle Revelry

Adorning jackets, bags, shoes and just about everything else with flair has made a comeback in a big way. This adorable idea from A Subtle Revelry is super-easy to replicate (only six supplies needed!), and totally on trend. Find the tutorial over at A Subtle Revelry.


Easy Bee

Courtesy fiskars.com

For a last-minute costume that couldn’t be cuter, why not go for a buzzing bumble bee? If you have a headband and black ruffle ribbon already stored away in your house, then you’re halfway there!

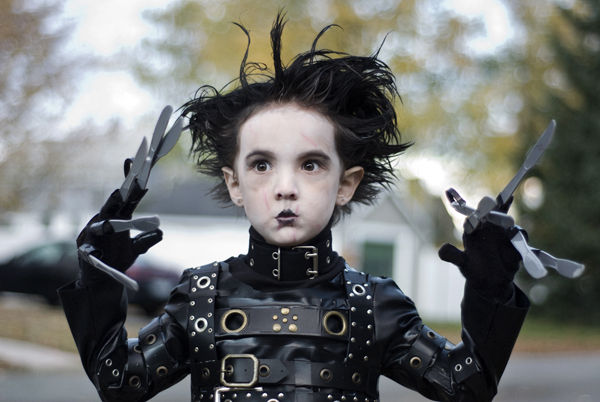
Edward Scissorhands

courtesy Cara Slifka via Instructables

Belts—lots and lots of belts. That’s the key to re-creating the classic Tim Burton character. Oh, and an incredibly patient parent, too. Dressing up like the sweet and just-a-little-spooky Edward Scissorhands is gonna take some time. Want to dive in? Check out the DIY info at Instructables.

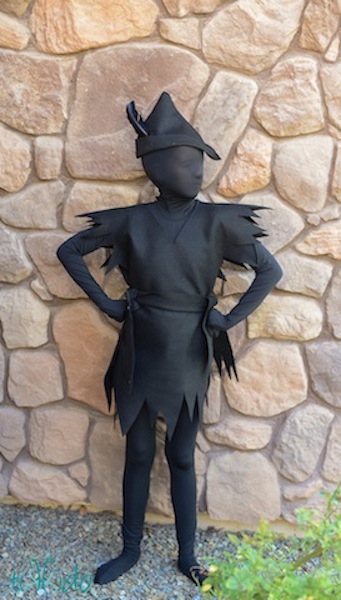
Peter Pan's Shadow

Nikki Wills via Tikkido

Instead of dressing up like Disney’s favorite flyer, why not embody his mischievous doppelgänger instead? A unique twist on a classic childhood tale, the hardest part about this cool costume is the hat. FYI: Your kiddo will totally be able to breathe, says DIY blogger mama Nicole of Tikkido.


Just because school is out doesn’t mean that learning needs to end. But, since it’s summer vacation time, learning should be strictly fun in our book! We rounded up the coolest science experiments for kids that can be done on while enjoying sun, sand and surf. From the science of sand castles to studying the tides, here are a bunch of ideas to make your next beach day one to remember.

Before You Go

Derek Thomson via Unsplash

Look over the experiments below and pack along the needed items. Some will require assembly ahead of time, and most are easy to pull off, but if you’re like us, you might want to try them out by yourself before showing your kids in order to keep the eye-rolling to a minimum.

The Science of Sand Castles

Benjamin Carlson via Unsplash

Things to Pack:
Sandcastle tools (pails, shovels, cups of different sizes, etc.)

Things to Do:
Scoop up the driest sand you can find on the beach and have your kid pack it in a cup as tight as they can. Turn it upside down and see what happens. When the sand comes pouring out, have your kid try it again with sand that has a bit more moisture and repeat. Continue doing so (perhaps adding a little water to the mix) until you get a nice solid cylinder of sand.

Things to Discuss:
Kids will clue in pretty quickly that wet sand holds together better than dry sand, but help them understand that water actually creates a thin “bridge” or “glue” that helps to hold the sand together. This is due to the surface tension of the water. Too much water and the “bridge” or “glue” gets broken down. Continue making observations throughout your masterpiece making. Make a moat. Does the water stay in place or does it get absorbed in the sand?

Filtering Water

Max Goncharov via Unsplash

Things to Pack:
Two empty bottles or canning jars
A funnel
A few paper towels
A few paper coffee filters

Things to Do:
In one bottle, place the funnel at the top and line with a paper towel. Fill the second bottle with dirty water (We suggest filling water from the lake or ocean and adding in sand granules, specks of seaweed, a teaspoon or two of dirt, etc. However, you don’t want really muddy water.). Pour the dirty water into the other bottle through the funnel. Next, replace the paper towel with a coffee filter and repeat the process. Then, do the experiment one more time with two coffee filters.

Things to Discuss:
At each stage, ask your kiddos what they see. Did the paper towel capture some of the dirt particles while others ran through? Does the water get cleaner the more filters that are used? Explain that we use filters all the time at home, and a water filter keeps the dirt out and makes the water safe to drink.

The Big Rocks in Life

Things to Pack:
Two large wide-mouthed jars
One smaller jar

Things to Do:
Collect two piles of large rocks or driftwood of about the same size. Then gather two piles of smaller rocks and shells, two piles of sand and a jar of water. Have your kid fill one jar with the sand, then the smaller rocks, and finally the larger rocks. There shouldn't be room to hold all of the big rocks. Then repeat the process with the other jar placing the big rocks in first, then the smaller rocks and then the sand and everything should fit. For the grand finale, pour the water into the jar.

Things to Discuss:
Were your kids surprised you could fit everything in the jar if they did it in reverse order? Did they think there would be a difference? This is an exercise that is often meant to symbolize life’s priorities, but it can also serve as a way to show spatial awareness too.

Become a Sand Inspector

Things to Pack:
A few sheets of black  and white construction paper
A magnifying glass
A magnet
A clear “zippable” plastic bag
A few toothpicks

Things to Do:
Place the magnet in the plastic bag. While holding the magnet, push the bag into the sand. Slowly lift the bag up. If your beach contains sand made from granite, then little black specks should be attracted to the magnet. Sprinkle these granules on the white paper. Then, sprinkle some lighter sand particles on the black paper and look at them through the magnifying glass. Try to pile the grains of different sand with the toothpicks.

Things to Discuss:
At first, all sand looks alike, but by looking more closely, you’ll see different colors and textures meaning that each sand particle came from much larger rocks of different colors and textures. The black sand is made of magnetite which forms when iron is mixed with oxygen.

Wave Watching

Things to Pack:
A watch or stopwatch
A pencil
Notepaper

Things to Do:
Look for an item bobbing up and down in the water like a bird or throw in a small piece of driftwood. Use your watch to time how long it takes for the object to go from the top of the crest to the bottom and back up again. That’s one bob. Record how long it takes for ten bobs to happen and then divide that number by ten. That will give you an average time for each wave’s period.

Things to Discuss:
When the water is at its high point, it is called a crest. When it dips down to its lowest point, it is called a trough. The space between two crests is called a wavelength.

Explore a Tide Pool

Things to Pack:
Water shoes – careful where you step!

Things to Do:
Look for periwinkles – little snails that live on the top of rocks in the “splash zone.”
Look for barnacles – grayish/white bits that look like tiny volcanos.
Look for mussels – blueish/black shellfish.
Look for sea anemones – they look like flowers.
Look for starfish

Things to Discuss:
All of these creatures are alive and are animals. When the rocks are dry, periwinkles will seal themselves up, so they don’t dry out. Barnacles close up when out of the water, but they feed on smaller plants and animals while submerged in the water. Mussels attach themselves to rocks so that they aren’t pulled away with the waves. Sea anemones will close up when gently poked. They stretch out in the water and shrink down when they are dry. Starfish “play dead” when they are out of the water but will slowly move when in it.

Make a Magni-Bucket

Frank McKenna via Unsplash

Things to Pack:
Plastic ice cream bucket or something similar
Plastic wrap
Large rubber band

Things to Do:
Before you leave the house, cut a hole (large enough to fit your kid’s hand in) about an inch away from the bottom of the bucket. When at the beach, cover the top of the bucket with plastic wrap and secure with rubber band. Make sure that the plastic wrap has some give to it. Pour water on top of the plastic wrap so that it sags down a bit. Then, have your kid hold different objects in the hole and look at them from the top of the bucket.

Things to Discuss:
The water is deeper in the middle and shallower on the sides just like a swimming pool and also like a magnifying lens making those objects appear larger.

Become a (Wind) Speed Racer

Things to Pack:
Two strips of cardboard
Four paper cups
Straight pin or thumb tack
Pencil with an eraser
Stopwatch
Pen and paper

Things to Do:
You’ll want to do the first part of this experiment at home. Cut out two strips of cardboard so that they are about an inch wide and about 12 inches long. Staple a paper cup at each end of the strips—one going the opposite direction from the other. Mark one cup with a large “X.” When at the beach, cross the cardboard strips together so that the top of each cup is pointed at the bottom of the next cup all the way around. Use the straight pin or thumbtack to puncture a hole in the middle of the strips and then stick it into the pencil. Facing the wind, see how many times the marked cup spins in 15 seconds. Multiply this number by four to get the total number of spins per minute, and mark down your findings. Repeat the process a few times during your beach visit.

Things to Discuss:
You created an anemometer. How did the wind speeds vary from each time you recorded? Was it faster in the morning or faster in the evening? When the wind pushed the cups, the air molecules caused them to spin around the pin. The faster wind pushed harder than the slower wind.

Whirlpool in a Bottle

Things to Pack:
Two empty and clear 2-liter bottles
Metal washer
Duct tape

Things to Do:
Fill one bottle with about two-thirds of sea or lake water. You might want to toss in a few specs of seaweed or leaves too. Place the washer on the bottle and line up the empty bottle on top of the water-filled one. Wrap the duct tape around the middle securing the two bottles together. Then, turn the bottles upside down.

Things to Discuss:
Does the water go straight down or do you see a mini whirlpool (Swirl the top bottom a bit for a better effect.)? The spinning water is called a vortex, and all tornadoes, hurricanes and typhoons are examples of air vortexes. Since you’re using water, this is an example of a whirlpool. As the water spins faster, it pushes to the outside of the bottle creating a hole in the middle. The air from the bottom of the bottle comes up the middle and the water from the top flows back down through the hole.

Hunting for Crabs

Things to pack:
Small shovels

Things to Do:
Walk down the beach toward the water, and look down for little holes. Sometimes you’ll find a bubble or two coming up. With your shovel, dig in the sand a few inches under the hole and scoop up the sand. When you brush away the wet sand, you might find a small crab or other creature.

Things to Discuss:
Crabs protect themselves by burying themselves in the sand when waves or other threats come by. While your kids might be tempted to take the baby crabs home to live as a pet, you’ll want to discourage this idea as they won't stay alive for long. 


When it comes to the 4th of July, riding in the kiddie parade is as much of a tradition as the big firework show at the end of the day. With a little imagination and a few supplies, you can deck out your kids’ wagons, bikes, and trikes for the biggest and best birthday bash of the year. Get inspired with the fun and creative ideas we’ve gathered below.

photo: Jeff Youngstrom via Flickr

1. Use Your Helmet
We get it. Finding the time to whip up a parade float is the last thing on your to-do list. So, let your kid’s helmet do all the decor work while he rolls through the parade route. It’ll take you almost no time at all.

photo: la fattina via Flickr

2. A Pie for the Parade
Get yourself a plastic kiddie pool, balloons, brown paper, and a wagon, and you’ve got yourself a slice of Mom’s apple pie. Sweet!

photo: Baker County Tourism via Flickr

3. Take Flight
Send your little patriot soaring with an adorable airplane float. This version is made out of plywood, paint, rope, and stickers, but we’re betting a cardboard box will do the trick.

photo: Larry Tenney via Flickr

4. Sparkly All-Stars
Your older kids will love to be the all-stars of the Independence Day Parade. They can walk or ride their bikes!

photo: Danielle Hampton via Sometimes Sweet

5. A Ride for the Tiny Tots
You’ve got tiny tots along for the ride this year. Keep it simple with a red wagon, a few flags, and some star garlands. We love the way Danielle of Sometimes Sweet doubled up on adorable with two tiny passengers.

photo: Jim, the Photographer via Flickr

6. The Power Parade
It’s time to charge up the Power Wheels and drape it with party decor. It’ll take you all of five minutes, and you won’t have to pull anything (Make sure the battery is fully charged!).

photo: Megan Cooley

7. Take a Rocket Ride
Blast off! How about a rocket ride for the kiddie parade? Megan of Penny Carnival snapped a picture of her niece riding shotgun to the moon. You’ll need cardboard, tissue paper, a wagon, fringe, and some prep time.

photo: Jim, the Photographer via Flickr

8. Lady Liberty
This impressive float caught our eye. After all, it wouldn’t be the 4th without Lady Liberty!

photo: Rob O’Hara via Robohara

9. A Sweet Sailboat
From sea to shining sea! Rob O’Hara, of Robohara, and his hearty crew won “Most Patriotic” for their clever play on the American tribute song at the annual Freedom Fest in Yukon, Ok. The little sailors aboard helped with the stars and stripes using paint and colored duct tape. Head over to Robohara for the details.

photo: Sarah Zimmerman via Repeat Crafter Me

10. A Firetruck for the Fireworks
Firetrucks are a parade staple. How cute will your little one look in her very own red ride? Give the kids a pom-pom or two, and it’s time to celebrate! Find out how to make your own over at Repeat Crafter Me.

photo: Jim, the Photographer via Flickr

11. The Food Float
This festive kiddo decided to bring the food to the parade route, and we can’t think of a better way to say “let’s get this party started!”

Will your family be in the parade this year? Share with us in a Comment below!

— Gabby Cullen


Jaques Cousteau. Lewis and Clark. Your two-year-old. They’re all about discovering new things while charting their own courses. Keep your little explorer happy with these sure bets—as beneficial as they are brilliant—below.

photo: While She Naps

1. Make your own beanbag using this tutorial by While She Naps, and then play catch to improve hand-eye coordination.

2. Hand over a stack of scarves (or cloth dinner napkins if you’re clean out of scarves, or neck ties, assuming Daddy won’t mind), turn up some tunes, and enjoy the show.

3. Cut up pipe cleaners and put them in a clear plastic bottle, and replace the lid. Then give your kiddo a magnet and watch as she explores and manipulates! See how they did it at Frugal Fun for Boys and Girls.

photo: The Imagination Tree

4. Thread colorful cardboard “beads” onto pipe cleaners or string to work on color awareness, patterns, fine motor skills, and imaginative play. We love how The Imagination Tree did it.

5. Blow bubbles and have the littles pop each one before it hits the ground.

6. Pour rice in a bin and hide toys in it. They’ll love playing with the texture of the grains in this sensory activity and finding treasures.

photo: The Teaching Mama

7. Lay contact paper flat on a table and let your tot create pictures on the sticky surface with pom poms, pipe cleaners, buttons, acorns, goggly eyes and more. See how The Teaching Mama does it here.

8. Thread squares of felt onto a ribbon that’s been anchored by a button at one end and create a soft caterpillar to pull. Don’t tell them, but you’ll be improving their fine motor skills and working with colors, too! We like the one that Jackie at Happy Hooligans made with her kids.

9. Using solid color cardstock, reinforcement stickers (the round ones that look like an “o” and are sticky on both sides), and sparkly pom poms, cut out simple bunny shapes and let your littles match the correct bunny tail to each differently colored bunny. See how Twodaloo kicks it up a notch with a magnetic chalkboard and lamination.

photo: Laughing Kids Learn

10. Using nothing but straws, uncooked rigatoni, and play dough as a base, build noodle towers and cityscapes, like Kate did at Laughing Kids Learn.

11. Use duct tape to attach empty toilet paper and paper towel rolls to a wall, then have fun dropping brightly colored pom poms through each route. Place an empty egg carton below the out spouts and see if you can get a pom pom into each divot, like Teach Me Mommy did.

12. Cut out images of family members’ faces without their hair, then let your mini stylist use play dough to give each person in their family a new ‘do. We like this tutorial by No Time for Flash Cards.

photo: Mess for Less

13. Using a colander and pipe cleaners, let your mad hatters create marvelous masterpieces as they improve fine motor skills. Skip on over to Mess for Less for inspiration.

14. Use colorful, solid color duct tape to wrap empty toilet paper and paper towel rolls, then turn your two-year-olds loose to create floor art, tunnels for cars, and music with them. Teach Preschool has great suggestions for this activity.

15. Create matching cards with your toddler’s favorite toys by tracing them on colorful card stock, then letting them figure out which toy belongs to each shape. We love how Toddler Approved does it.

photo: Donnie Ray Jones via Flickr

16. Put on your galoshes and splash in a puddle after the rain, or let them cruise through the puddles on their scooters.

17. Place stickers and a piece of construction paper on the table and let your two-year-old go to town.

18. Cut out images of food from a magazine, and let your little chef glue them onto a paper plate. They’ll love making you dinner (possibly while you make them theirs)!

19. Use plastic tongs to make sorting different colored pom poms more fun.

photo: The Realistic Mama

20. Use paint samples to create simple, two-piece puzzles. Check out The Realistic Mama for tips.

21. Teach little ones colors by creating a color wheel using a painted piece of cardboard, paper plate, or other sturdy circle and matching clothes pins. The manipulation of the clothes pins improves hand strength while they learn to sort and match by color. Check out Craftionary’s tutorial, here.

22. Create a crunchy box with stale crackers, cereal, and unused noodles in a storage box, then let your little bang away using a toy hammer or plastic cup! Find out more over at Busy Toddler.

23. Make your own confetti creations with construction paper, a hole punch, and some glue. See how Picklebums makes it happen in this tutorial.

photo: Hands On As We Grow

24. With a can and colorful rubber bands, you can keep them busy putting bands around the can. Then, when their attention starts to wane, you can show them how to make different sounds by flicking the bands agains the side of the can. Check it out at Hands On As We Grow.

25. Cover a table in paper and let your little artist draw, stamp, and sticker his heart out.

How do you keep your two-year-old happily occupied? Tell us in the comments section, below.

—Shelley Massey


NYC is flush with literally dozens of wonderful playgrounds. But even the best ones can feel a little stale after visit 823 — same slide, same sandbox, same crazy climbing structure. Good news! A new, ever-changing, kid-imagined and kid-built playground is popping up on Governors Island this summer, and it’s a must-do for families looking to change up the playground routine and let kids’ imaginations (and autonomy) run wild.

photo: play: ground

One Adult’s Trash…
You already know that an empty refrigerator box is infinitely more appealing to any child than a pristine, plastic superfort from a big box store; this play scape, dubbed “play:ground” and created in the tradition of what’s called an “adventure playground,” takes that concept to the nth degree.

With origins reaching as far back as the 1940s, adventure playgrounds are modeled after a junkyard, and let children shape their environment using an assortment of materials, tools, duct tape, water, dirt and things that others typically describe as trash.

The 5,000-square-foot adventure playground play:ground is coming to Governors Island on May 28, and the free form (and free) play space will be open from 11 a.m. – 4 p.m. on weekends to kids and families all summer long, through September 25.

photo: play: ground

The First Rule of play:ground: There Are No Rules
Ok, that’s not completely true — in fact, all play is supervised by trained playworkers, who are on hand to provide assistance when asked or needed and to make sure kids are safe.

But beyond that, it’s a kid-ruled space, where kids are free to self-organize, independently create, take chances and experiment. That might mean creating a fort out of pallets and hay bales, scribbling all over a box, crafting a see-saw from wood planks…really, anything a kid might dream up.

photo: play: ground

Live the Adventure This Summer!
If you know a child for whom one day of this free-form play would be a torturous tease, listen up: kids can also attend play:ground Summer Camp!

Open to children ages 7 to 13, play:ground NYC Sumer Camp Adventure runs weekly sessions from July 7 to August 19, and can be attended for as little as one week or as many as all six. Under the supervision of seasoned head playworker Morgan Leichter-Saxby of Pop-Up Adventure Play, campers will learn to work with hand tools such as saws and hammers, and use everything from planks of wood, old tires, discarded strollers, industrial wooden spools, crutches and more to craft whatever their imaginations can conjure.

It’s not all building and making. Campers will also have the opportunity to learn about gardening and animal care through a partnership with another Governors Island resident, Earth Matter. On Mondays and Fridays, campers can visit the Earth Matter site, which is home to a garden, as well as chickens and goats, to learn about caring for plants and animals.

Rates are $550 per week, with a 10% sibling discount, and financial aid is available on a first come, first served basis. Camper drop-off is at the Governors Island Manhattan Ferry Terminal. Click here to enroll.

play:ground on Governors Island
Weekends, May 28 – Sept. 25, 11 a.m. – 4 p.m.
Governors Island
347-470-4238
Online: play-ground.nyc

Has your family ever visited an Adventure Playground? Tell us about it in the comments!

— Mimi O’Connor

Rise and shine and for today’s challenge: complete all of the games and activities below. Can you jump to the task?

1. Jump Rope
Whip out that jump rope and see how many times your kids can jump without messing up. Already conquered jumping rope? Try hopping on one foot or if you have at least three people and two ropes see if you can master double dutch.

2. Leap Frog
We bet you remember this game! Position one person on all fours on the ground. Leap over that person spreading your legs like a frog. If you have more than two people playing, keep leaping until you reach the front of the line, and then land in a crouched position covering your head on the floor. Start the game over with the last person in line starting the leaping. (Right about now, you’re wishing you’d stuck with that yoga class).

3. Long Jump
Cut five 12-inch long pieces of duct tape. Position each on the ground parallel to each other about 5 inches apart. Have your kiddo stand behind the first piece of tape and ask her to jump. Measure how far she makes it. Too easy? Move the pieces of tape so they are farther apart.

4. Hippity Hop Obstacle Course
Practice his motor and coordination skills by taking a soft foam ball and putting it between his knees while standing. Have your kiddo hop around with the ball between his legs to different parts of your living room. Can he hop to the couch without dropping the ball? How about leaping to touch the TV?

5. Hopscotch
Take a piece of chalk and draw a hopscotch game on your sidewalk, driveway or an empty school playground. Even without chalk, you can still outline hopscotch on the snow with sticks, rocks or even food coloring.

6. Stair Hop
Keeping your feet close together hop up a short flight of stairs, one stair at a time. Sounds easy, but you’ll soon find it’s quite a challenge to keep up the pace. Hop back down. See who can complete the most stairs.

What games do you play that require jumping and leaping? Did you complete all of ours? Leave a comment below!

photo: Jose Maria Cuellar via flickr 

The below is a guest post from Momtastic written and photographed by Kersey Campbell.

This super easy and quick DIY toy garage is perfect for your little one’s cars! They will love parking their cars, and you will love that the cars aren’t all over the floor being stepped on. All you need are a few things from around the house, and you’ll have your new garage in no time! You can even let the kids decorate their own!

Supplies:
Cardboard box
Duct tape
Scissors
Marker

Instructions
Step 1: If your box has a lid, cut the lid off of it with your scissors.

Step 2: Next, you will want to cut an opening for the cars to drive through. You know, like a real parking garage!

To read more head over to Momtastic for the full instructions by clicking here.


Momtastic cuts through the noise to deliver authentic advice from other moms who have been there, on pregnancy, parenting, health, and much more. Oh, and they also serve up beautiful recipes, crafts, and DIY projects.