If you’ve traveled more than five minutes in the car with kids, you’ll know snacks are one way of buying backseat harmony. You’ll also know those same snacks can result in a tsunami of crumbs and chip packets at the end of the journey. With summer road trips on the horizon, it’s worth having easy car snacks at the ready that are big on nutrition but won’t spoil your interior. We’ve curated a road trip menu with tips on how to keep the mess to a minimum. Keep reading to find out more. 

Roadtrippin' Waffles

Super Healthy Kids

Crispy waffles are a good alternative to crackers and are going to hold up better to the rigors of the back seat. That means more food in stomachs and less crumbled between the seats. This recipe from Super Healthy Kids makes enough for you to freeze batches in quarters, all ready to put in the car at a moment's notice.

Cheerio Accessories

Lexie Loo, Lily, Liam & Dylan Too

A car trip with kids isn't complete without Cheerios featured somewhere, and while a tipped snack box will create that dreaded tide mark of detritus, those little 'o's threaded on a string could solve the problem. You can even get the kids to help with the prep work. You don't need a how-to, but these tips from Stephanie at Lexie Loo, Lily, Liam & Dylan Too will help. If you want more cereal DIY fun check out this post from our archives

Celery Sticks

Emily Myers

Chopped veg is an easy snack for the car and while a dip is tricky, one solution is to put the veg directly into a peanut butter jar. Head to The Daily Hostess for tips on this perfectly portable snack. Again, it might be worth having wipes at the ready!

Fruit Rollups

Weelicious

Making homemade fruit leathers might seem time-consuming, but the prep takes just 15 minutes, and the drying out process can be done unattended. This recipe from our archives uses just two ingredients and needs no special equipment.  With a sweet treat packed for the road trip, you're ready to roll!

Fresh Fruit

Frédérique Voisin-Demery

Whole fresh fruit is an obvious choice for the car—especially apples and clementines, which stay fresh at any temperature. Clementines are easy to peel, and apples can be eaten without getting sticky fingers. Win, win. 

Fruit Totems

Dinner At The Zoo

Another option is to build colorful totems of fresh fruit to keep the kids happy when you are on the go. You might want to avoid berries (for the stain factor) but the clementines, pineapple, kiwi and grapes in this version from Dinner at The Zoo would work well on the road. If you're worried about skewers in the car, you can shrink these down and put them on toothpicks. Just make sure an adult retrieves the picks once the fruit's been eaten to avoid someone getting poked.

Edamame

Quinn Dombrowski

Edamame works double time as both snack and fine motor skills challenge. Little ones will have fun popping beans out of pods—just supply the kids with something to put the waste in, and you'll have well-fed kids and a clean car at the end of your journey.

Bite-Sized Dough Balls

Eating Bird Food

Crumbly cookies or less-mess dough balls? If you've never made dough balls, they're easy on-the-go snacks. High in energy, these bite-sized balls are easy to customize with oats, seeds or shredded coconut for sweetness. Take your pick from this list from our archives. Kids won't want waste a single scrap, although you might want to have wipes handy.

Chickpea Addiction

Weelicious

Honey roasted chickpeas aren't entirely mess-free it's true, but they don't crumble and this sweet and nutritious snack is so addictive, you're unlikely to find any left over at the end of the journey.  Head to Weelicious for the recipe or find this savory version in our archives.  


Homemade Jerky

Teaspoon Of Spice

High in protein but low on mess, beef jerky is easy to customize to the tiny tastebuds in your family. For tips on how to pull off this super simple snack head to Teaspoon Of Spice

— Emily Myers


RELATED STORIES:

The Best Car Games for Kids

20 Road Trip Hacks for Your Next Long Car Ride

5 Cool Podcasts to Try on Your Next Road Trip

No More Meltdowns: Easy Activities for the Car & Airplane Ride

SaveSave

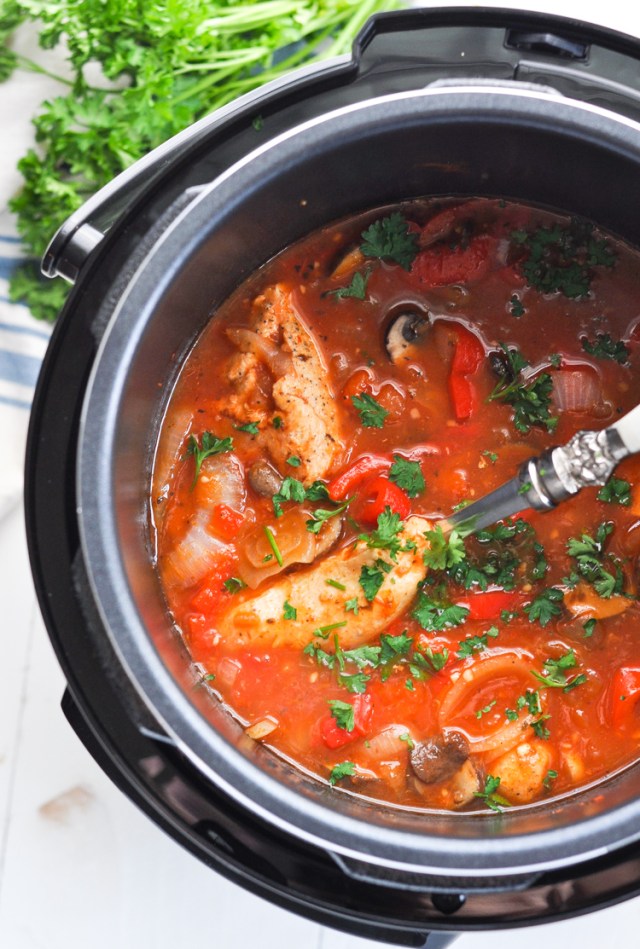
This slow cooker recipe from The Seasoned Mom is sure to find a place in your meal rotation. There are lots of ways to remix it—serve it with pasta or rice, or make it into a cheesy sandwich. Plus, if you’re an Instant Pot fan, it can be put to use with this recipe.

Ingredients
4 boneless, skinless chicken breasts (about 24 ounces total)
1 tablespoon olive oil
2 red bell peppers, seeded and sliced
1 sweet onion, sliced
4 teaspoons minced garlic
8 ounces sliced mushrooms
1 teaspoon Italian seasoning
8 ounces crushed tomatoes
½ teaspoon crushed red pepper (add more for a spicy dish or omit entirely for a mild dish)
½ teaspoon salt
¼ teaspoon black pepper
Garnish: chopped fresh basil or fresh parsley
For serving: pasta, rice, zucchini noodles, or cauliflower rice, etc.

Method
1. Season chicken with salt and pepper on both sides.

2. If you have time to sear the chicken in a hot skillet for a few minutes per side before placing it in the slow cooker, it gives the meat great flavor.  If you don’t have time to brown the chicken first, that’s okay too!

3. Place all ingredients in a slow cooker and stir to combine.

4. Cover and cook on “LOW” setting for 3-4 hours, or until chicken is cooked through. Season with salt and pepper, to taste. Serve chicken, vegetables and sauce with a slotted spoon over pasta, rice, zucchini noodles or cauliflower rice, if desired. The meat is also great in hoagies (toasted with melted cheese on top) or as a topping on pizza or flatbread. Garnish with fresh herbs just before serving.

Alternative Instant Pot Method
1. Press “sear” or “sauté” on the pressure cooker. Add oil to the pot and brown chicken for about 2-3 minutes per side. Turn off sear function.

2. Add remaining ingredients and stir to combine. Close the top properly and select “Poultry” or “Manual” setting. Set the time to 8 minutes for fresh chicken breast, or 13 minutes for frozen chicken breast. (These times are for typical 6-8 ounce chicken breasts. If yours are larger, add a couple of minutes.)

3. When done, let the pressure naturally release for at least 5 minutes. After that, you can turn the valve to “vent” for quick release if you’re in a hurry, or continue natural release for the most tender texture.

Blair shares family-friendly recipes on her blog, The Seasoned Mom. Hop over to her website to find more kid-approved recipes that won’t take hours to make.

photo: Savory Nothings

These chicken tenders from Savory Nothings are going to be a game changer in your kitchen—they’re so crispy and delicious, you’ll never want to go back to the frozen kind (or the fast-food kind). Keep reading to learn how they’re made.

Ingredients
2 eggs
2/3 cup buttermilk
1 cup white flour
⅔ cup grated Parmesan cheese
4 tablespoons bread crumbs
1 teaspoon baking powder
1 tablespoon salt
2-3 teaspoons garlic powder
1 teaspoon ground paprika
1 teaspoon onion powder
1/2 teaspoon ground black pepper
2 pounds chicken tenders
1/3 cup butter

Method
1. Preheat the oven to 410°F (210°C).

2. In a medium bowl, whisk together the eggs and the buttermilk.

3. In a separate bowl, mix the flour, parmesan, breadcrumbs, baking powder and seasoning together.

4. Place a dark-colored roasting pan (a baking tray works as well) in the oven to heat up.

5. Dip the chicken pieces in the flour mix, coating evenly and shaking off any extra flour.

6. Next, coat the chicken pieces in the egg mixture. Then, dip them into the flour again, this time coating very well.

7. Take the baking tray out of the oven and melt the butter on it. Place the coated chicken pieces on the tray.

8. Bake for 10-12 minutes, carefully flip and bake for another 5-10 minutes (depending on how thick your chicken pieces are). Finish by broiling the chicken until it turns golden brown and crispy.

Thanks to Nora of Savory Nothings for sharing this recipe with us. Be sure to visit her site to find more family-friendly recipes for every night of the week.

photo: Saporito Kitchen

Dig into some classic comfort food to warm up this winter. This meatloaf recipe from Amanda of Saporito Kitchen is sure to be an instant hit with your family, and it’s pretty easy to whip up with herbs and spices you already have in your pantry. Amanda recommends using a mix of ground pork and beef, but you can also use all beef if you prefer.

Ingredients
1 slice bread
1/4 cup milk
1 pound ground beef
1 pound ground pork
1 whole egg
2 teaspoons dried parsley
2 teaspoons dried basil
2 teaspoons dried oregano
1 teaspoon garlic powder
1 teaspoon onion powder
1 teaspoon kosher salt
1 teaspoon ground black pepper
1/3 cup grated parmesan cheese
1 cup marinara sauce

Method
1. Preheat oven to 350 degrees and line a baking sheet with parchment paper or foil.

2. Place the slice of bread in a small bowl and pour the milk over the top of it. Set aside.

3. In a large bowl, combine the remaining ingredients. Add in milk soaked bread and mix together with hands until ingredients are incorporated.

4. Turn mixture out onto prepared baking sheet and shape into loaf form.

5. Bake meatloaf at 350 degrees for 40 minutes.

6. Take meatloaf out of the oven and top with marinara. Bake for another 10 minutes or until the internal temperature reaches 155 degrees.

7. Remove meatloaf from the oven and let rest for 10 minutes before serving.

Share this recipe with your friends and then let us know your favorite winter comfort food recipe in the comments below!

Find more of Amanda’s awesome recipes on her website, Saporito Kitchen. As a graduate of the Le Cordon Bleu program at Scottsdale Culinary Institute, this foodie knows her stuff!

Nothing beats a good stir-fry, and this recipe courtesy of Crys from The Leaner Approach is our new favorite. Chop up the veggies when you have a free moment on the weekend or the day of, and then you’ll be able to fry it up in a flash. It’s easy to customize to match your family’s tastes too—you can sub in broccoli or cauliflower instead of green beans.

Ingredients
⅓ cup low sodium chicken stock
¼ cup oyster sauce (Kikkoman)
2 tablespoons low sodium soy sauce
2 teaspoons rice vinegar
1 teaspoon red pepper flakes
½-1 pound blanched green beans, cut into 2 inch sections
8 scallions, cut into 2 inch sections
6 garlic cloves, minced
1 tablespoon fresh ginger, grated (either with or without skin)
2 large flat iron steaks, fat trimmed off and sliced thinly against the grain
Safflower oil, for searing and sautéing

Method
1. Prep all ingredients before cooking.

2. Whisk chicken stock, oyster sauce, soy sauce, rice vinegar and red pepper flakes into bowl; set aside.

3. Heat 1 teaspoon safflower oil in large skillet/sauté pan over medium-high.

4. Add green beans and sear until slightly charred, 4-6 minutes. Transfer to bowl.

5. Sear meat in 4 batches (seasoning each batch with salt, pepper and using 1 teaspoon of safflower oil) until browned on both sides, 1-2 minutes per side. Leave a little pink in the middle—do not overcook. Transfer meat to separate bowl.

6. Add 1 teaspoon safflower oil to pan and briefly sear scallions until slightly browned, 2 minutes. Remove and set aside.

7. Turn heat down to medium. Sauté minced garlic and grated ginger for 30-60 seconds, then add HALF of oyster sauce mixture to pan. Allow sauce to simmer and thicken for a couple minutes, scraping up the browned bits from the bottom of pan.

8. Return green beans, scallions, meat and accumulated meat juices to pan. Then add remaining oyster sauce mixture.

9. Turn heat to low and simmer until sauce thickens, 2-3 minutes. Stir occasionally. Serve hot.

At The Leaner Approach, Crys shares healthy recipes that are mostly gluten free and always delicious (with a few indulgent treats thrown in for good measure). Head to her blog for more meal inspiration.

A risotto recipe that doesn’t require constant stirring? Sign us up! This recipe from Savory Tooth is super simple, and it tastes amazing too. With creamy cheddar cheese and a healthy dose of veggies, it’s definitely a weeknight winner.

Ingredients
5 cups small broccoli florets
1 cup risotto rice or arborio rice
3 cups vegetable broth
1 cup shredded sharp cheddar cheese
5 cloves garlic, chopped
2 tablespoons olive oil
2 tablespoons butter
3/4 teaspoon salt
1/4 teaspoon pepper

Method
1. Heat olive oil in a 3 quart nonstick sauté pan over medium heat. Add broccoli, garlic, 1/4 teaspoon salt, and pepper. Cook until the broccoli is tender, about 5 minutes, stirring occasionally. Transfer broccoli to a plate and set aside.

2. Add rice, vegetable stock, and 1/2 teaspoon salt. Stir. Bring to a boil over high heat, then cover with a lid and decrease to medium-low heat or lower to maintain simmer. Simmer for 30 minutes.

3. Uncover the pan and check that the rice is tender and done. Add cheddar cheese and stir with the rice until melted. Add broccoli and butter to the pan, stirring until the broccoli is heated and the butter is melted. Serve while hot.

This recipe and photo come courtesy of Julia from Savory Tooth. Stop by Julia’s blog to discover more one-pot recipes perfect for busy families.

Craving something different for dinner? Transport yourself to the islands with by whipping up these yummy sliders from Or Whatever You Do. Grilled pineapple is always a hit, and once you pair it with pork tenderloin and a slathering of teriyaki sauce, you’ve got a dish that’ll please your whole crew.

Ingredients
1 1/2 pounds pork tenderloin
1 can pineapple rings
1 package King’s Hawaiian rolls
6-8 ounces teriyaki sauce
1 1/2 teaspoon salt
1 teaspoon onion powder
1 teaspoon paprika
1/2 teaspoon garlic powder
1/4-1/2 teaspoon cayenne pepper

Method
1. In a small bowl, mix all dry ingredients for your rub together. Apply dry rub to the tenderloin. Make sure it is evenly coated.

2. Place meat on an outdoor grill at medium heat (325 F) and cover. Turn meat judiciously every 3-4 minutes to avoid burning the outside. When the meat reaches a minimum internal temperature of 145 F, it is done. Remove from the grill and let it rest for 5 minutes before slicing into 1/2″ thick medallions.

3. While the tenderloin is cooking, open the can of pineapple rings and place them on the grill. Flip the rings when they have nice dark brown grill marks and remove when the other side is done.

4. At the same time you are grilling the pineapple rings, open your package of King’s Hawaiian Rolls and using a bread knife, cut them in half. Place both halves of all your cut rolls on the grill and leave there until the undersides are toasty brown, then remove.

5. To put your sliders together, first put the bottoms of the rolls down, followed by the pork tenderloin, and pineapple ring on top of that. Next, drizzle some teriyaki sauce on top of the pineapple and finish the slider by adding the top portion of the rolls.

This recipe and photo come courtesy of Nicole Johnson from Or Whatever You Do. A busy mom of seven kids, Nicole shares smart recipes that your whole family will enjoy—check out her blog for more.

Gouda Roll Ups

Serves 1

Ingredients

  • 2 slices Arla® Gouda Cheese
  • 3 pieces thinly sliced turkey, ham or your favorite deli meat
  • 1 10-inch tortilla
  • 2 lettuce leaves
  • 1 teaspoon reduced-fat mayonnaise

Add-on ingredients

  • pickles
  • tomatoes slices
  • hummus or ranch dressing
  • avocados

Steps

  1. Place one tortilla on a plate and spread reduced-fat mayo over it with a knife.
  2. Lay the deli meat and the slice of Arla® Gouda sliced cheese on top of the tortilla.
  3. Place lettuce leaves on top.
  4. Add any additional toppings that you and your family love.
  5. Roll up the tortilla with the contents inside and slice the roll into five bite-sized rolls, discarding the ends of the tortilla.

recipe and photo courtesy of Arla®

Did you know that Arla® is a farm-to-fridge dairy company that currently offers a full range of naturally delicious cheese varieties, including cream cheese, snack cheese and sliced cheese? As an added bonus, Arla cheese is made from only simple ingredients that you can recognize. Arla is the better-for-you-cheese the whole family will love. What more could a parent want?

If you want the taste and crispiness of fried chicken, but aren’t thrilled with the idea of actually deep frying your meal here’s a tasty alternative: oven baked crispy chicken from one of our favorite food bloggers, Marin Mama Cooks. The chicken is packed with flavor thanks to the brine (good to know: you’ll need to plan ahead to make this as the chicken requires 3-4 hours to brine before baking). So if you have the time to plan ahead this recipe is a sure winner. Check it out below!

Serves 4-6

Ingredients:
6 chicken drumsticks and 2 thighs (bone-in, skin-on) or 4 thighs and 4 drumsticks – see my above note on chicken quantities – You can use any combination of chicken pieces for this recipe, even bone-in, skin on breasts. We just prefer the darker meat, as it has more protein and way more flavor.
3 tablespoons sea salt – Don’t use table salt! Table salt contains iodine, which doesn’t work with brining.
1 tablespoon honey – honey adds a depth of flavor
1-2 quarts warm/room temp water – you want enough water to cover all of the chicken
For the breading:

1 cup almond meal flour – I used Bob’s Red Mill
2 teaspoons celtic sea salt – I love this brand as it’s unrefined and chock-full of minerals
1 tablespoon nutritional yeast – I love this brand from Bragg
1 teaspoon chopped fresh thyme leaves
½ teaspoon cayenne pepper
½ teaspoon smoked paprika
In a large (large enough to hold all the water and chicken) stainless steel or glass bowl, (don’t use plastic) whisk together 3 tablespoons sea salt, 1 tablespoon honey and 2 quarts warm water to create a brine.

Method:
1. Place chicken drumsticks and thighs into the brine, cover, and transfer to the refrigerator. Let the chicken marinate in the refrigerator for 3-4 hours. Make sure that there is enough water to submerge the chicken, if not, add more water.

2. When the chicken is finished brining, preheat your oven to 350 degrees, and line a rimmed baking sheet with parchment paper.

3. Take out the chicken drumsticks and thighs and pat each piece of chicken throughly dry with a paper towel. Drying the chicken drumsticks and thighs will keep your chicken from getting soggy.

4. In a shallow bowl, gently whisk together the almond meal, seal salt, nutritional yeast, thyme, cayenne pepper and smoked paprika. Dredge the chicken drumsticks and thighs in the seasoned breading until well-coated on all sides. Arrange them presentation side down in a single layer on the baking sheet.

5. Bake for 20 minutes, then turn over each drumstick and thigh, and then increase the oven temperature to 425 degrees and bake for an additional 10-15 minutes, or until the chicken’s internal temperature reaches 165 degrees. Increasing the oven’s temperature to 425 helps to ensure a crispy skin.

Note: If your chicken is finished cooking, but not browned to your liking, then you can place the chicken under your boiler for a few minutes to brown up the skin.

NOTE: Baking times vary as chicken cuts vary in size. My chicken cuts were on the smaller side, so my total baking time was roughly 30 minutes. Don’t worry if you overcook the meat, brined dark meat chicken is very forgiving and still tastes great even if it’s overcooked!

Have you tried brining meat before? We love this method! Tell us your thoughts below!

Recipe and photo courtesy of Jacquelyn of Marin Mama Cooks. Visit her website for more tasty kid-friendly recipes.

photo: chadilaksono via flickr

We love how versatile muffins are–they’re great for breakfast, snack or even dessert. Satisfy those hungry tummies all day long by reaching for these healthy muffins that are packed with fiber. Expect about twelve muffins from this fantastically easy recipe from Susan Schuman of Our Family Eats.

Ingredients:
1/4 cup unrefined coconut oil, melted
1/2 cup milk
2 large eggs
1/2 cup light brown sugar, or palm sugar
4 ounces unsweetened applesauce
3/4 cup old fashioned oatmeal
1 1/2 cups all purpose flour (or whole wheat flour)
1 teaspoon baking soda
1/4 teaspoon salt
2 tablespoons ground flax seeds
1/2 cup chocolate chips

Method:
1. Preheat oven to 350 degrees.

2. Line a muffin pan with paper liners and set aside.

3. In a large mixing bowl stir together coconut oil, milk, eggs, sugar, and applesauce.

4. In an additional mixing bowl, stir together oatmeal, flour, baking soda, salt, and flax seeds.

5. Add flour mixture to the wet mixture and stir until just combined.

6. Fold in chocolate chips.

7. Divide mixture evenly between muffin cups, filling each about 2/3 full.

8. Bake for 20 minutes. Let cool for 5 minutes in the pan.

9. Then transfer to a wire rack to cool completely.

What’s your favorite muffin recipe? Share yours below!

Susan Schuman is a working mom with two small kids and a hungry husband. She writes Our Family Eats to share ideas for fun, wholesome meals that anyone can fit into their hectic schedule. You can connect with Susan on Twitter @ourfamilyeats.