Spring is almost here! And besides enjoying everything there is to love about the season, now’s also the perfect time to clean out your drawers and get the grime off your tiles and tubs. Need some simple organizing tips and spring cleaning hacks to help you get there and—even better—keep you there for months afterward? Keep reading!

Clean Out Your Dryer Vent

Karly Wood

Does it take more than one cycle to get your clothes dried? If so, your dryer vent may need a good cleaning. This vent is not the same as the lint trap, and is the path your dryer lint and fuzz usually takes to get outside. If it's clogged, it can result in long dry times and even pose a fire hazard! Head to Frugally Blonde for easy tips on purging your dryer vent.

Wipe Out Window Tracks

Karly Wood

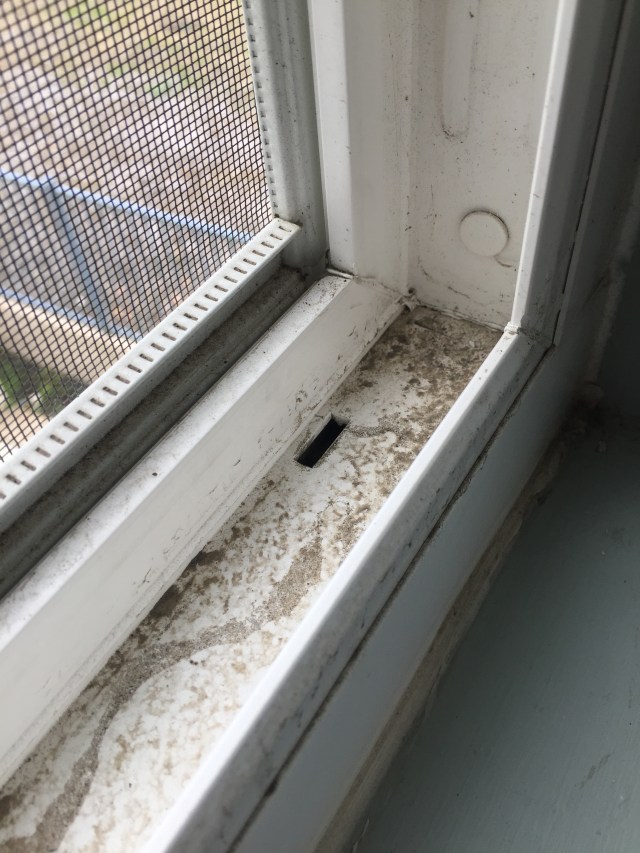
Long winters mean dust and grime can build up in your window tracks, preventing them from properly closing and looking downright disgusting! Spend 10 minutes using the tips from The Intentional Mom and you're on your way to sparkling windows!

Dust Heating & Air Vents

Karly Wood

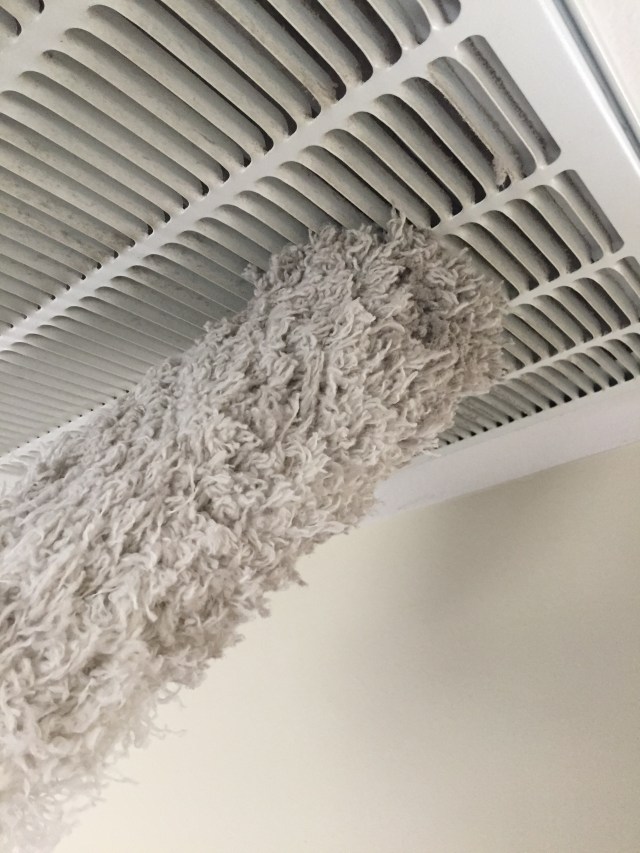
After a hot summer and long, cold winter, your heating and air vents have probably taken a beating. Use a duster, toothbrush, or a butter knife wrapped in an old towel to get in between all the vents for a thoroughly cleaning. The next time you turn on the heating or AC, you won't be sending excess dust flying around!

Make Your Bed, Every Day

Beddy's

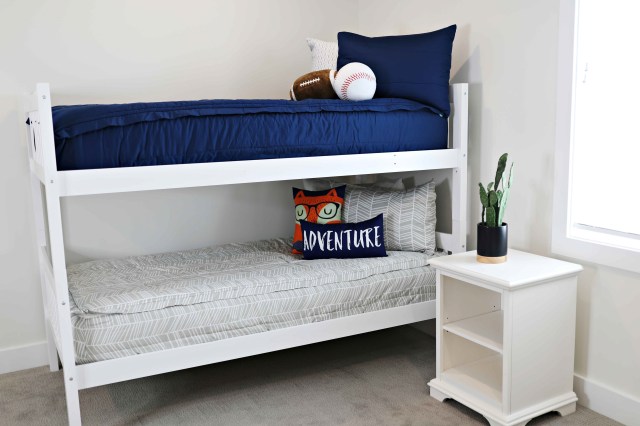
This simple act can become a habit and can help a whole room look better in just a few minutes. If you want to go one beyond, try this awesome bedding from Beddy's: your bed and your kids' beds can be made in seconds. The bedding essentially is like a comforter + sheet set that fits any size mattress (there's even a toddler size). You simply zip it up along the sides to make a seamless look. Unzip to give yourself breathing room in the night, or keep it zipped up for coziness. Added bonus? Your partner can't kick the sheet down in the bed. Find out more at beddys.com.

Disinfect Your Dishwasher

Karly Wood

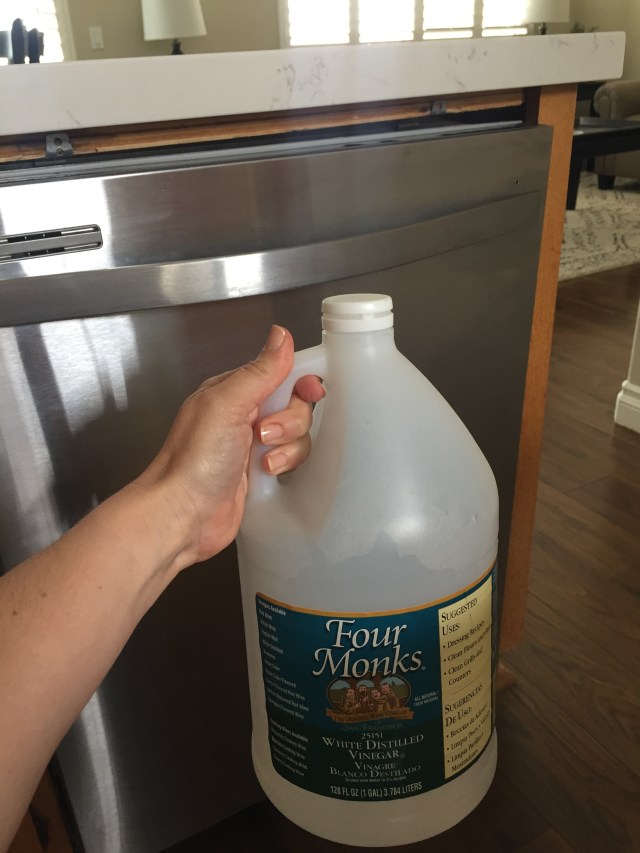
If your dishwasher isn't doing it's job, smells funny or is leaving white residue on your dishes then it's probably time for a clean. It's a good idea to run a cup of white vinegar through your dishwasher to remove build up and odors. Simply pour it in the bottom of your dishwasher (with or without dishes––it won't harm them or leave a smell) and run a regular cycle.

Melt Away Microwave Grime

Karly Wood

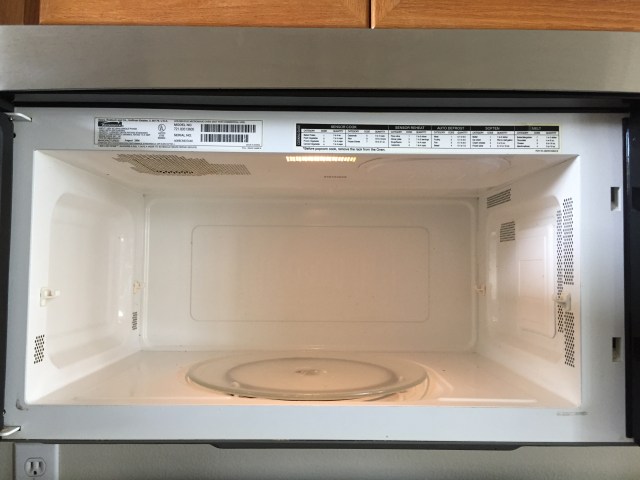
Cleaning out your microwave doesn't have to be a hassle. All you need to do is fill a bowl with one cup of vinegar and one cup of water, then microwave for roughly five minutes. When the time's up, carefully remove the bowl (it will be HOT!) then easily wipe down the mess inside that has been loosened from the vinegar and steam. No scrubbing required!

Clean Your Humidifier

Bill Smith via flickr

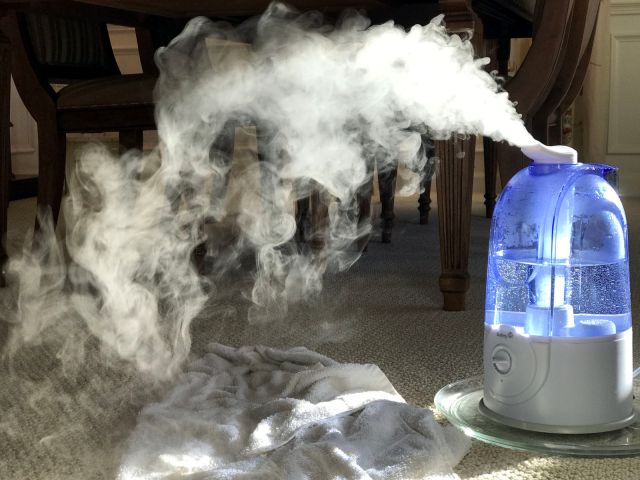
Now that flu season is waning (mostly), it's time to deep clean that humidifier that has been saving your kids' noses all winter long. Anna Mosely from Ask Anna suggests half-filling your humidifier with vinegar and running it outside (so your house doesn't smell like vinegar) for at least 45 minutes. Then, wipe it out with a sponge, fill it up with water and run it for 45 more minutes. Then, let that baby dry out, and put it away until next season. 

Tackle Your Tank Tops

According to Noelle

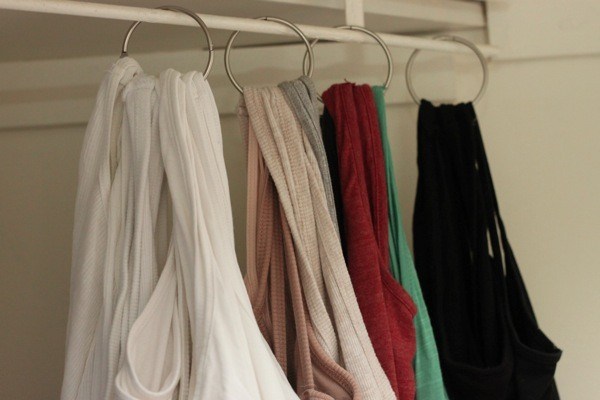
Are tank tops taking over your closet? Organize them with this genius DIY tank top hack from According to Noelle. Or, roll up your tops and slip them into a shoe organizer. Bam! Your available closet space just quadrupled!

Give Your Fridge a Makeover

Richard Kelland via flickr

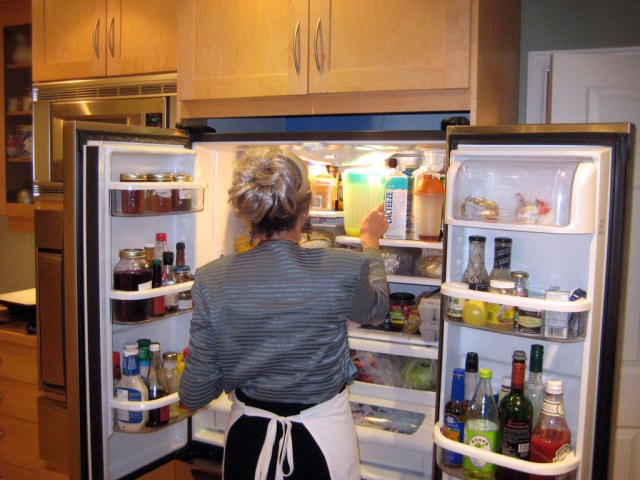
Ah, the fridge—the place we spend so much time in front of, all year long. It's time to get it back to the clean, cool space your food and drinks once knew. To do this, you'll need to remove everything (and unplug the fridge if you don't want to waste tons of electricity), and then take out the shelves and drawers and wash them thoroughly with mild dishwashing soap. Dry everything thoroughly before sliding back into place.

Use Box Lids or Inserts to Organize Inside Drawers

mgstanton via flickr

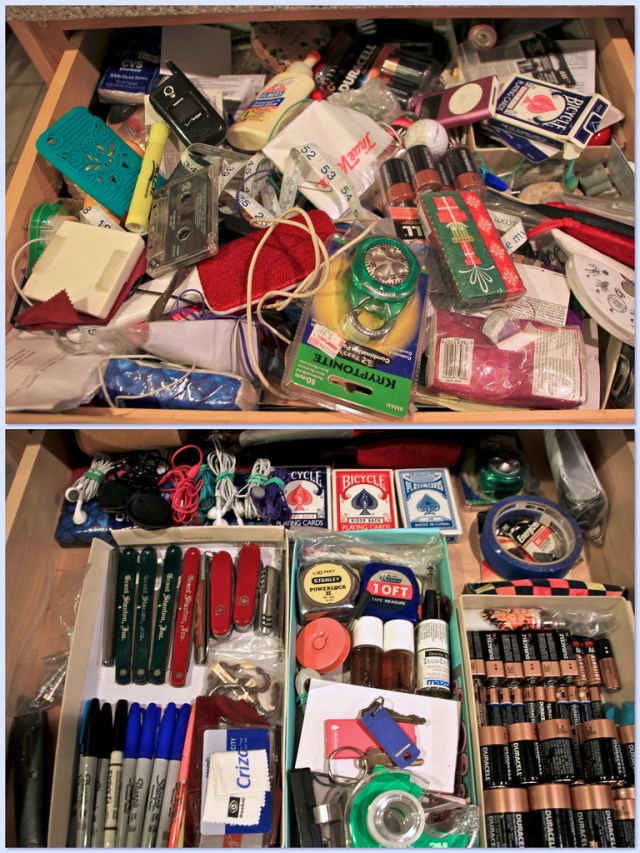
Do all of your drawers look like a free-for-all of junk? Put box lids or plastic drawer inserts into your drawers and decluttering accordingly. For more tips on organizing your drawers, head to this article from Real Simple. 

Use Binder Clips to Organize Computer Wires

Matti Mattila via flickr

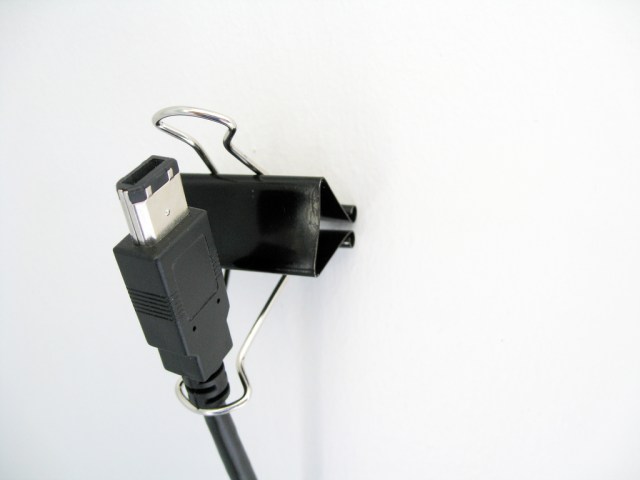
If you've got wires snaking every which way behind your computer, try this easy hack from Lifehacker that uses binder clips to keep wires attached and organized. 

Give Old Bedding and Towels to People or Animals in Need

evan p. cordes via flickr

With spring cleaning in full force, don't just toss old towels and bedding! Give them to an animal rescue organization or a homeless shelter to be re-used by someone in need. To donate to furry friends, call your local animal shelter or go here to find out how to donate to the Humane Society. To donate to people in need, call your local Salvation Army or Goodwill to see if they have any local shelters or shops in need of bedding.  

Same Goes for Old Toys

Vernon Area Public Library via flickr

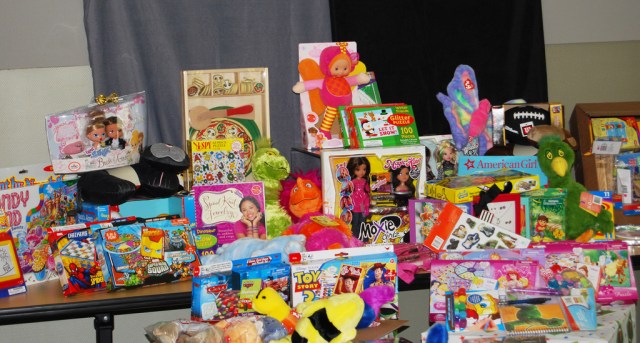
When kids toys start taking over the house, you know it's time for a clean-out. But don't toss all those old treasures in the trash—donate them to children in need! To find worthy places or organizations to take your toys (because some organizations, including hospitals, usually only take new toys), check out this great article from Money Crashers. 

Use Plastic Bins to Organize Your Laundry Room

Hey Tonya via Youtube

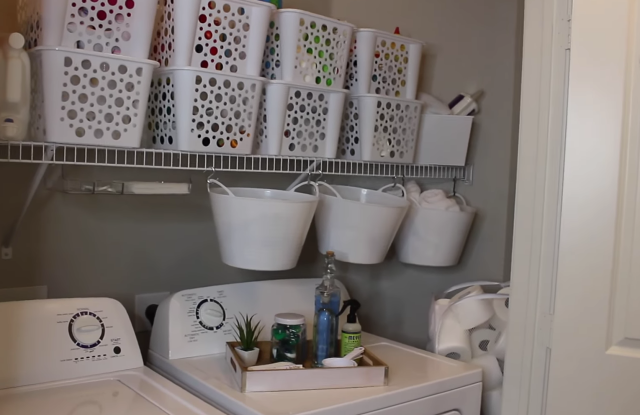
Putting all your stuff into bins is the quickest and easiest way to go from total mess to super neat! So head to Dollar Tree and get as many plastic bins as you can fit in your laundry room and use them to organize all your supplies. Get a step-by-step on how to organize a small laundry room (plus a free stain removal printable) from Hey Tonya.

Use Shoe Organizers for More Than Just Shoes

A Girl and a Glue Gun

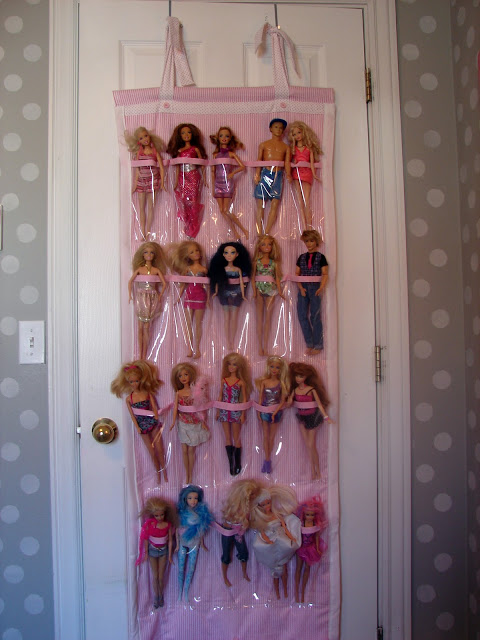
Got a zillion Barbie dolls strewn around your house? A few too many Hot Wheels? Hook a shoe organizer onto your kid's door and start popping toys in the slots. It's an easy way to organize and keep track of your little collector's stash. The organizer shown here is even customized to fit the height of each doll! Get the simple instructions at Girl and a Glue Gun

Clean the Fan Blades with a Pillowcase

Homemaker Chic

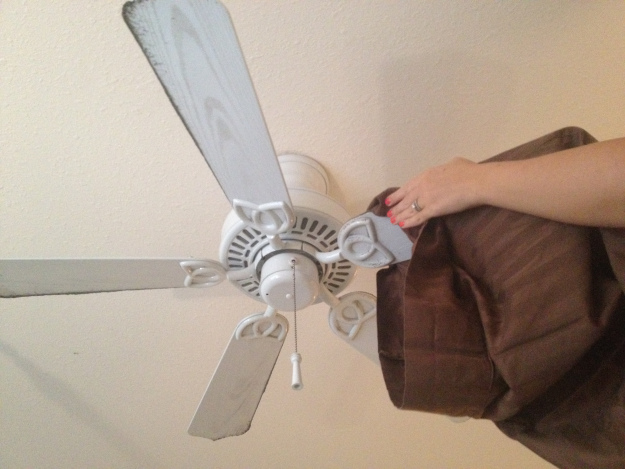
Old pillowcases work wonders at scooping up fan blade dust and keeping it contained. Get more details at Homemaker Chic.

Use Vinegar and Dish Soap On Tub Stains

Jason Gooljar via flickr

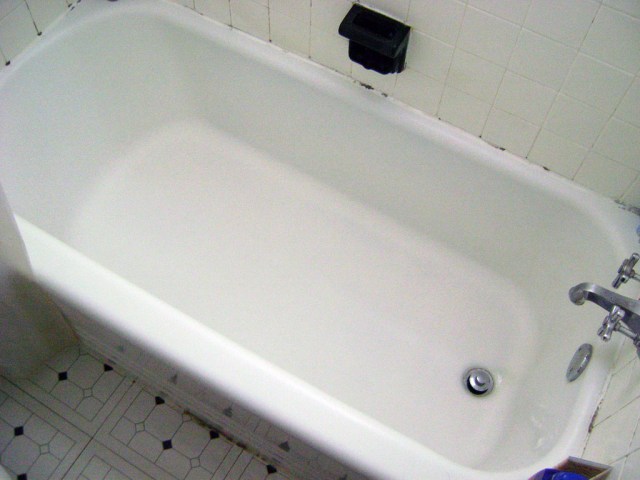
Is your tub looking more Bates Motel than Beverly Wilshire? Use a spray bottle filled half-and-half with cleaning vinegar and Dawn dishwashing liquid to scrub stains away (Hint: Some people say you should warm the vinegar in the microwave if you've got really tough stains). Your tub will be ready for a proper bath in no time. 

Psst: This cleaning solution works on toilet bowls and sinks, too!

Use Microfiber Towels and Tongs to Clean Blinds

Melissa Heckscher

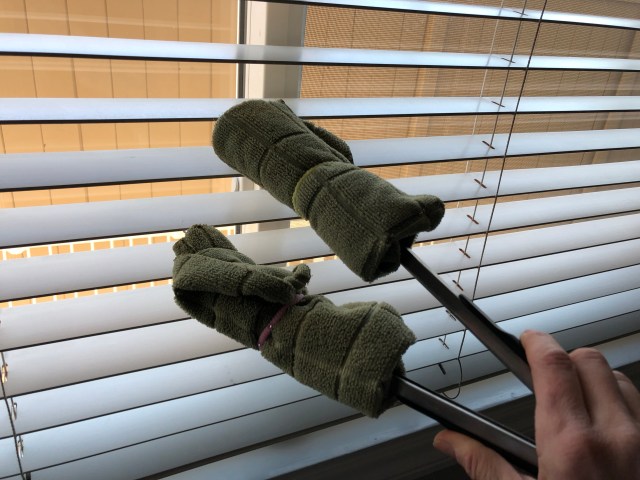
It's tough to get at the dust that inevitably collects on the length of your window blinds. To reach these hard to get slats, just wrap two microfiber towels around a set of tongs and use rubber bands to tie them in place (you can cut the towels in half if they're too big). Then, wipe away! If the dust has really settled in, spray the cloth with cleaning spray before wiping. Get pictures and details at One Crazy House.

Use Rubbing Alcohol To Clean Microfiber Sofas

Melissa Heckscher

According to this article on Herbs and Oils Remedies, rubbing alcohol is the magic potion that will tackle tough stains on your microfiber furniture. Just put it in a spray bottle and spritz the stains until they're saturated. Then scrub with a sponge until the stain disappears. When the area is dry, scrub it with a bristle brush to fluff up the fibers.  

Use Your Washing Machine to Clean Plastic Toys

Gabby Cullen

Let your washing machine do double-duty: Toss all your grimy plastic toys into a mesh bag and throw it all into the wash with some towels or blankets (to prevent the toys from banging into the washer wall). Your toy supply will be squeaky clean! 

Unclog Your Showerhead

Tom Magliery via flickr

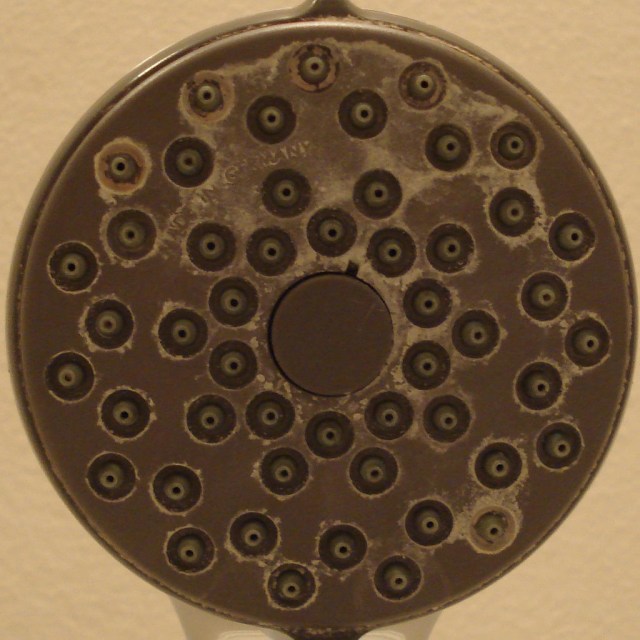
Don't go buy a new shower head when your water pressure starts to wane, or you notice a few clogged holes. Instead, head over to The Melrose Family to get the simple step-by-step instructions for how to use vinegar and lemon essential oil to get the gunk out.  

Deep Clean Your Oven

Melissa Heckscher

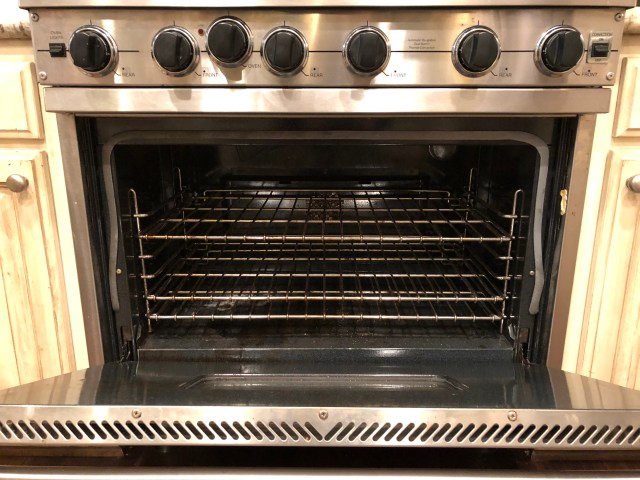
You don't really see the mess that's being made inside the oven when your casseroles are bubbling, or your baked yams are dripping, but the walls and floor of your oven certainly know what's happening. If you're like most sheet pan dinner-loving mamas, we can bet your cooker needs a good deep clean. Try this cleaning hack from Thekitchn.com, which involves coating the whole inside of the oven with a baking soda/water paste then letting it sit overnight before spraying it all down with vinegar.

Pssst: Your kids will love the way the vinegar and baking soda mixture fizz, so be sure your kids help out with this cleaning project. 

Dust, Clean & Organize Your Bookshelves

Melissa Heckscher

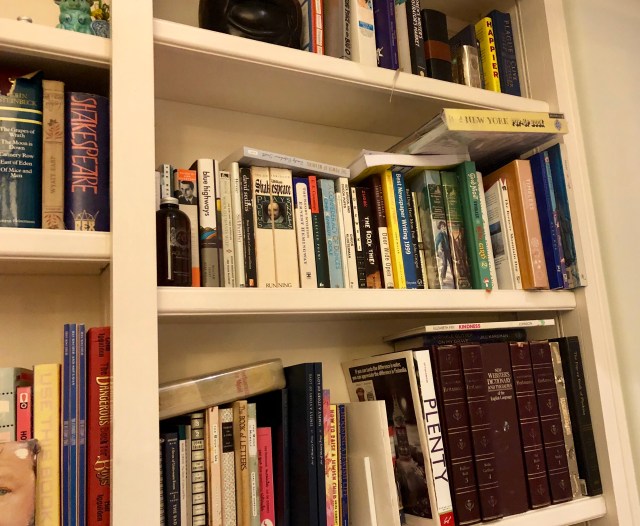
Books are notorious dust-hoarders, so now's a good time to give your bookshelves more than a simple wipe-down. You'll need to remove all of the books and wipe the tops and spines with a magnetic cloth (or a Swiffer sheet!); then wipe the shelves down with a damp microfiber cloth. While you're at it, organize your collection: Get rid of any books you don't think are worthy. Secondhand stores or local and literacy charities (like Books for Soldiers and Books for Africa) are usually happy to take your hand-me-downs. 

Clean the Front of Kitchen Cabinets

Melissa Heckscher

The knobs and doors of your kitchen cabinets are touched so frequently that they're probably covered in grime by the end of a week, let alone a year. Time to scrub the deep-rooted dirt away! Better Homes & Gardens has a great how-to video on getting the ins and outs of your cabinets squeaky clean, including using a paste of baking soda and water to scrub stains away. 


— Melissa Heckscher

Feature photo by Jason Leung on Unsplash


RELATED STORIES:

23 Life-Saving House Cleaning Hacks

This Video of Kristen Bell’s Closet Cleaning Hack Is Pure Genius

13 Non-Toxic Ways to Clean Your House


If you’re stuck with a handful of brown, mushy bananas, read on for a super easy banana bread recipe that your kids will love. Red Tricycle’s Editorial Director makes this bread quite often because it’s moist, flavorful and simple. In fact, she’s tried about a dozen recipes and this is by far the best. Read on to find out the only banana bread recipe you’ll ever need.

banana-bread

Ingredients:
2 cups unbleached all-purpose flour
¾ cup sugar
¾ teaspoon baking soda
½ teaspoon table salt
4 very ripe bananas, mashed (about 1½ cups)
¼ cup plain yogurt
2 large eggs
6 tablespoons unsalted butter, melted and cooled
1 teaspoon pure vanilla extract
1¼ cup walnuts, toasted and chopped coarse (optional)

Method:
1. Adjust a rack to the lower-middle position of the oven and heat the oven to 350 degrees. Grease and flour a 9-by-5-inch loaf pan; set aside.

2. Whisk together the flour, sugar, baking soda and salt together in a large bowl; set aside.

3. Mix the mashed bananas, yogurt, eggs (whip eggs together in a separate bowl beforehand), butter, and vanilla together with a wooden spoon in a medium bowl. Using a spatula, lightly fold the banana mixture into the dry ingredients until just combined and the batter looks thick and chunky. Fold in the walnuts if desired. Scrape the batter into the prepared loaf pan and smooth the surface with the spatula.

4. Bake until the loaf is golden brown and a toothpick inserted in the center comes out clean, about 55 minutes. Cool in the pan for 5 minutes, then transfer to a wire rack. Serve warm or at room temperature.

The recipe was originally spotted at America’s Test Kitchen.

Recipe adapted by Erin Lem, Red Tricycle’s Editorial Director who only wishes she had better photo skills to document all the fun dishes she makes when she’s not editing, writing, and uncovering family fun. 

photo: Sajia Hall via flickr

My husband didn’t believe me when I told him that there was a run on Elmer’s glue this summer because so many kids are obsessed with making slime that it was hard to buy any. Later he sheepishly texted me a picture of an empty shelf at Target emptied of all its glue.

If you haven’t done made slime with your kids, it’s pretty fun. Both of my kids have really loved it and now have quite an impressive collection of slime. In a sealed container, it has lasted for several weeks. They are as interested as ever and regularly take it out to play with it.

Why do science projects with your kids at home?

  • It teaches kids about the world around them.
  • It nurtures curiosity.
  • It allows them to use their senses and get their hands dirty.
  • It’s a fun way to engage them on days when you want an indoor activity and keeps them busy. I’m all for letting kids be bored but sometimes when your kids are picking fights just out of sheer boredom, it can help a lot to have a great project to turn to.

Here are nine very easy science activities to do at home that use common items. Pick these up on your next Target run! (Or better yet let it be an excuse to go to Target.) I’m going to stock up so they are handy and ready to go when the mood strikes and we need a project.

#1 Slime

Ingredients: Elmer’s Glue, Contact Lens Solution, Baking Soda

Okay, I talked about this already but I’m just putting it here in case you haven’t done this one already. Here is the link to the official Elmer’s slime recipe. There are many different recipes on the internet but this is a great one and works with a standard 4oz bottle of glue that is easy to find now due to back to school sales. It’s super easy and strangely addicting to make. You can add color, glitter, or combine colors to make it customized. I’ve noticed that if a little bit gets on the hardwood floors, it dries and is easy to clean up. It seems to wash off clothes. But it’s huge pain to get off upholstered furniture and I usually control the food coloring distribution. Fool me once…

#2 Edible Marshmallow Slime

Ingredients: Mini marshmallows, coconut oil, powdered sugar

You may have done glue slime but what about edible marshmallow slime? That just sounds like my sweets loving kid’s dream come true. It is really sticky so just make sure you’re working on a washable surface. Dessert with a side of weird science! Get the recipe here.

#3 Homemade Hovercraft

Ingredients: Paper plates, straw, balloon, duct tape

An extra wide straw will work well but a regular sized one is fine too. Bonus – most of these are items are probably lying around your house. Awesome project for your little one who is obsessed with moving vehicles. Check it out.

#4 Salt Crystal Leaves

Ingredients: Salt, Water, and Fall Leaves (or Pipe Cleaners)

I love this idea. It is a great way for kids to engage with fall and do something with the pretty fall leaves. I live in LA where there are no seasons so everything helps. Plus, you can’t get more simple ingredients than these. I think they would look pretty hung up for fall decorations.

#5 Spaghetti Strength Test

Ingredients: Spaghetti, Styrofoam, books

A box of spaghetti and packing material you might already have lying around your house. Until they figure out a way to recycle Styrofoam this is a good way to reuse it.

#6 Soap Clouds

Ingredients: Ivory Soap

This is an oldie but goodie. Make sure to get the original Ivory soap because there’s something unique about that and it doesn’t work unless you use that kind specifically.

# 7 Jello Scented Playdoh

Ingredients: Jello, flour, cream of tartar, salt, water

You might have made your own playdoh before which is super easy and fun. But what about Jello-scented playdoh? Lovely and delicious smelling!

#8 Color Fizz

Ingredients: Baking soda, vinegar, food coloring

Again, baking soda and vinegar is something you’ve probably done with your kids before. My friend used to keep boxes of baking soda and jugs of vinegar in her trunk just for this purpose when she took her kids to the park. But this project goes one extra step to color the baking soda first which will make it that much cooler for your kids. We have little eye droppers for the kids to use for projects like this but straws work just as well.

#9 Rubber Eggs

Ingredients: Eggs, vinegar

I remember doing this project as a kid! Such simple ingredients to make such a weird and cool experiment. I can’t wait to do this one with my kids.

Color, mess, mixing up crazy concoctions in the name of science doesn’t have to mean driving around town to get super hard-to-find ingredients. These are all awesome activities to hold your little one’s attention that they will love and that use really easy, simple, and inexpensive ingredients.

Featured Photo Courtesy: Kelly Taylor

Tracey a working mom of boys who loves to blog about that crazy journey at her site www.balanceisboring.com. She is a devotee of black coffee and list making and is an incurable loud laugher. 

Great news! Summertime’s favorite drink also comes in cupcake form. These sweet and just-a-bit tart cupcakes are perfect for summer birthdays, BBQs or any time you want to treat the littles. Garnish with lemon wedges or fresh raspberries and a tiny straw to get that uber-cute vibe right before you stuff them into your mouth. Scroll down to see our editor’s secrets to making the perfect batch.

You will need:

Your fave lemon cake recipe (see ours below)

Red food coloring or fresh (pureed raspberries)

The perfect buttercream frosting (click here) + lemon extract + zest

Garnish (lemon wedges, raspberries, sprinkles, cute straws…you decide!)

The cake:

1 1/2 cup all-purpose flour

1/2 tsp. baking powder

1/4 tsp. baking soda

1/8 tsp. salt

1/2 cup sugar

1/3 cup frozen pink lemonade concentrate

3 egg whites

1/4 cup canola or coconut oil

1-2 tsp. lemon juice

1-2 tsp. lemon zest

1/2 cup milk

3 tbsp. raspberry puree (for the coloring)*

*You can also use red food coloring, about 3 drops, but reduce flour to 1 cup only

Step 1: Preheat oven to 350 degrees.

Step 2: Grease a 12-cupcake pan (or line with cupcake liners).

Step 3: Mix together flour, baking powder, baking soda, salt and sugar. Set aside.

Step 4: Whisk together egg whites, lemonade concentrate, oil, and lemon juice. Add milk. (Adding the lemon mix to the milk may cause curdling, which is okay because most recipes call for buttermilk. Adding the milk last helps cut down on this a bit). Add lemon zest.

Step 5: In a stand mixer alternate the wet mix and dry mix until well blended. (About 1 minute on medium speed).

Step 6: Add raspberry puree and blend for 2 minutes at medium speed until batter is smooth.

Step 7: Bake at 350 for 20-25 minutes (or until cupcake tops spring back when touched lightly)

Step 8: Make the frosting while the cupcakes cool.

The frosting: 

Use the recipe found here, but add:

1 tbsp. lemon zest

1/8 tsp. lemon extract

1 tbsp. raspberry puree* or 2 drops red food coloring

*You may need to add a little bit of extra powdered sugar to thicken the frosting once you’ve added the puree.

Step 9: Once the cupcakes have cooled, frost each cupcake. If you want it to look fancy, use a piping bag or Ziplock bag to add the frosting in a spiral. Or invest in a cupcake decorating tip-set, so you can look like you know what you are doing!

Step 10: Garnish with lemon wedges, sprinkles or a single raspberry and/or a small straw (just cut a paper straw in half) to make it look more “lemonade-y.”

Step 11: Eat a cupcake! Great job!

What’s your go-to lemon cake recipe? Tell us in a comment below. 

photo: chadilaksono via flickr

We love how versatile muffins are–they’re great for breakfast, snack or even dessert. Satisfy those hungry tummies all day long by reaching for these healthy muffins that are packed with fiber. Expect about twelve muffins from this fantastically easy recipe from Susan Schuman of Our Family Eats.

Ingredients:
1/4 cup unrefined coconut oil, melted
1/2 cup milk
2 large eggs
1/2 cup light brown sugar, or palm sugar
4 ounces unsweetened applesauce
3/4 cup old fashioned oatmeal
1 1/2 cups all purpose flour (or whole wheat flour)
1 teaspoon baking soda
1/4 teaspoon salt
2 tablespoons ground flax seeds
1/2 cup chocolate chips

Method:
1. Preheat oven to 350 degrees.

2. Line a muffin pan with paper liners and set aside.

3. In a large mixing bowl stir together coconut oil, milk, eggs, sugar, and applesauce.

4. In an additional mixing bowl, stir together oatmeal, flour, baking soda, salt, and flax seeds.

5. Add flour mixture to the wet mixture and stir until just combined.

6. Fold in chocolate chips.

7. Divide mixture evenly between muffin cups, filling each about 2/3 full.

8. Bake for 20 minutes. Let cool for 5 minutes in the pan.

9. Then transfer to a wire rack to cool completely.

What’s your favorite muffin recipe? Share yours below!

Susan Schuman is a working mom with two small kids and a hungry husband. She writes Our Family Eats to share ideas for fun, wholesome meals that anyone can fit into their hectic schedule. You can connect with Susan on Twitter @ourfamilyeats.


If a lazy Sunday afternoon at your house often explodes into building volcanoes or breaking out the baking soda and vinegar to concoct a science experiment, chances are you good you have a budding scientist on your hands. Want to make the holidays extra special for your little one? Click through the slideshow for nine noteworthy San Diego shops to brighten your little inventor’s holidays.

The Idea Box Kids

Looking for simple, everyday science you can do with your kids that doesn’t involve complicated set up and isn’t limited to one experiment or kit? The Idea Box Kids, an online Etsy shop, offers creative learning fun for busy families. This innovative company, founded and run by a busy mom, sells boxes filled with wooden “coins” that give instructions for two simple, engaging activities that encourage families to play and think together.  The Science Box uses items that can be found around the house, and the activities  can easily be accomplished with little help from an adult.

The Backyard Box offers fun and unique ways for kids to explore their outdoor environment and allows parents the opportunity to talk with little scientists about the how’s and why’s of what they are observing. These science activities allow kids to be learn in the most natural way, through play. On their Etsy site you will also find many other fun themed boxes such as Winter Holidays and Family Travel. Boxes also make great gifts for teachers! The kits are perfect for ages 3-10, and cost $17.99.

Online: etsy.com/shop/theideaboxkids

Photo: Idea Box Kids

Where do you like to shop for science-type gifts?

— Cherie Gough

Forget the x-box. Everyone knows that a kid’s favorite game is the one he plays with his Mummy. This spooky season, throw some thrills into playtime with mummy-themed science experiments, story times and games that will rattle their bones. Check out the details below, because we’re certain you’ll like how we roll.

photo: S. Massey

Wrap the Mummy
We love this game by Teach Preschool for our littlest goblins, especially when they try to wrap themselves. But before the frustration levels reach an all-time high, be sure to take the roll in your own hands to finish the job. And stand back, because nothing’s more fun for kids than breaking out of that mummy costume!

photo:Andrew Gustar via flickr

Mummify an Apple
Calling all Egyptians! The Great Apple Pharaoh has died and it’s time to mummify his body using nothing but salt, baking soda, an apple and some time. This project will take a little carving skills on a peeled apple, but the patience gives great results. Pop over to Time Traveller Kids for the play-by-play and instructions.

Photo: Craftaholics Anonymous

Mummy Race
Watch your kids morph into competitive mummies (aka Tiger Mummies) as they try to make it to the finish line without losing the beanbags on the backs of their outstretched arms. Feel like getting crafty? Find instructions for making your own spooky beanbags for the game, along with other inspiration, on Craftaholics Anonymous.

Photo: A Mom with a Lesson Plan

Story Time with Mummy
Nothing gets the kiddos to snuggle up with their Mummies like a sweet story time. Check out this activity by A Mom with a Lesson Plan to bring the book Where’s My Mummy? by Carolyn Crimi to life.

photo: Kid Friendly Things to Do

Unwrap the Mummy
We love this take on the classic hot potato game by Kid Friendly Things to Do, where each unwrap of the mummy yields treats, not tricks.

photo: Organized 31

Mummy Touch and Seek
This blindfolded touch and guess game is as scary as reaching into your kiddos dirty clothes hamper in the dark! With cooked noodles for intestines and peeled grapes for eyeballs, this game by Organized 31 is a must for any gore-lover. Get the scoop on how to put it together here.

photo: Totally the Bomb

Shaving Cream Balloon Mummies
We love the idea of shaving cream filled balloons by Totally the Bomb, and think that it would be perfect for playing a round of Don’t Let the Mummy Hit the Floor. Just transform the white balloon into a mummy pre-game by glueing a few strips of toilet paper and googly eyes to it!

photo: S. Massey

Mummy Math
How’s this for a trick, Mom? Disguise math time with this awesome game by Chicken Babies! See how they unwrap a mummy with math for a prize here, and if you need to alter the ability level, just try substituting addition or subtraction or even one-to-one correlation for the multiplication used on the website.

photo: Honey and Fitz

Front Door Mummy
Go big or go home, right? This door decoration by Honey and Fitz will delight trick or treaters, and is easy enough to let your littles take the lead on. Not sure you’re up for a full-scale operation? No worries. You can apply the same concept to a poster board to hang on the front door, instead.

photo: Giggles Galore

Mummy Bowling
Add a little spooky fun to the classic at-home bowling game by turning your pins into mummies. Whether you use a pumpkin for a bowling ball or opt to cover another ball in gauze, this activity is a guaranteed afternoon strike! Find inspiration and instructions by Giggles Galore here.

What are your favorite mummy games and activities? Tell us in the comments section below!

—Shelley Massey

If your kids think that milk, butter and cheese come from the grocery store shelves, it’s time to open their eyes to everything dairy farm. Recently, Red Tricycle Seattle writer, Helen did just that. She went on a WA Dairy tour to learn how dairy products are made. Not only did she get to visit with some happy cows, but Helen also learned that Washington state produces some of the highest-quality dairy products around (bonus: all of the milk is rbST free). So, the next time you’re at the grocery store take the opportunity to educate your kids about where their food comes from and then whip up one of these dairy-friendly recipes. Flip through the gallery to get inspired.

Danish Vanilla Bean Confetti Sandwiches

You haven’t tasted a real ice cream sandwich until you’ve made one yourself. Take a peek at this delicious recipe that comes to us from Snoqualmie Ice Cream.

Yields 7-8 sandwiches

Ingredients:
2 Pints Danish Vanilla Bean Ice Cream
1 ½ Cups flour
1 tsp. baking powder
1 tsp. cream of tartar
½ tsp. baking soda
½ tsp. salt
½ Cup unsalted butter, room temperature
¾ Cup pure cane sugar
1 vanilla bean
1 large egg
1 large egg
1 tsp. vanilla extract
½ Cup sprinkles

Method:
1. In a medium bowl whisk together flour, baking powder, cream of tartar, baking soda, and salt. Set
aside.

2. In the bowl of an electric mixer with a paddle attachment, beat the butter and sugar at medium speed until light and flu y. Split the vanilla bean and scrape the seeds into the butter mixture. Add the egg and vanilla extract, and beat until combined.

3. Reduce the mixer speed to low, and slowly add the dry ingredients into the wet ingredients until just
combined. Fold in ¼ Cup of the sprinkles.

4. Place the remaining ¼ Cup of sprinkles in a bowl. Scoop about two tablespoons of dough and roll it into a ball. Roll the ball in the bowl of sprinkles to cover. Put the balls on a plate. Repeat with the
remaining dough. Chill the dough for at least two hours or over night.

5. Preheat oven to 350°F. Line two baking sheets with parchment paper.

6. Transfer the chilled dough onto the prepared baking sheets, spacing 2 inches apart.

7. Bake cookies until they are just beginning to brown around the edges, 8-10 minutes. Let the cookies
cool completely.

8. When cookies are completely cool scoop ice cream onto the bottom of half of the cookies. Place
second cookie on top and squeeze down gently. Immediately place all of the sandwiches in the freezer
for at least one hour. When ready, take sandwiches out of the freezer and serve immediately.

Recipe courtesy of Snoqualmie Ice Cream

FUN FACT: WA dairy cows can produce 144 glasses of milk.

What is your favorite dairy-friendly dessert? Which recipe will you make Tell us in the Comments below.

The Washington Dairy Products Commission celebrates the contribution of local dairy farm families. By producing wholesome and nutritious dairy products and caring for their cows and land, local dairy farm families are a key ingredient to making the northwest a great place to live. Learn more at akeyingredient.com.

The next time you’re in need of a healthy and tasty snack that can double as breakfast, dessert or between-meal bite, make these chunky apple muffins courtesy of Chef Falk of OrganicLife.

Ingredients:
½ c raw sugar
3 T canola oil
1 large egg plus 2 large egg whites
½ c buttermilk
1 tsp vanilla extract
1 c organic all-purpose flour
2 tsp baking powder
½ tsp each: baking soda, ground cinnamon
1 medium Granny Smith apple or 1 Fuji apple, cored, cut into 1/3” dice

Method:
1. Heat oven to 375 degrees. Beat sugar and oil in bowl of electric mixer until smooth. Add egg, egg whites, buttermilk, and vanilla; beat until smooth.

2. Add 1 c of flour, baking powder, baking soda, cinnamon, and salt; mix well. Toss together apples and remaining ½ c flour in medium bowl. Stir apples into batter by hand.

3. Spoon batter into paper lined or greased muffin cups, filling each about 2/3 full.

4. Bake until golden brown and make sure wooden pick inserted in center comes out clean, about 22 minutes.

5. Cool in pan on wire rack 10 minutes. Remove from pan; serve warm or at room temperature. Muffins can be frozen up to 3 months.

Chef Jonas Falk is the CEO of OrganicLife, the Midwest’s largest food service provider of healthy school lunches, serving more than 3 million students each month. Chef Falk’s mission is to revolutionize the school cafeteria by providing nutritious, fresh, and delicious meals and changing the way children both eat and think about food.

When food blogger Mary of The Cake Chica was craving winter comfort food she turned to this recipe for cream of tomato soup. Using the freshest ingredients (and organic when possible) this soup, which is guaranteed to warm you up on a winter day, takes only two steps. And, it’s made even easier with the help of a blender or food processor. Mary suggests serving with grilled cheese or a ham sandwich for a complete comfort meal.

Serves: 6

Ingredients:

Soup:
2 tablespoons unsalted butter
1 medium yellow onion, chopped
3 garlic cloves, minced
2-28 ounce canned organic whole peeled tomatoes, not drained
1/2 cup beef stock
1 teaspoon sugar
1 teaspoons kosher salt
1/4 teaspoon baking soda
1/4 teaspoon black pepper
1/4 teaspoon freshly ground nutmeg
1 1/2 cups organic heavy cream

Garnish:
1 medium tomato, cored, seeded and finely chopped
Chopped fresh parsley
Heavy cream

Method:
1. In a large saucepan, over medium heat melt the butter. Add onion and garlic and sauté for about 5 minutes or until tender. Stir in the tomatoes, beef stock, sugar, salt, baking soda, pepper and nutmeg. Bring to a boil, then reduce the heat and simmer uncovered for 10 minutes.

2. Transfer soup to a food processor or blender, cover and puree until smooth. Return the soup to the pan and stir in the cream. Cook over medium-low heat for about 5 minutes but do not boil. Ladle soup into bowls and garnish with chopped tomatoes, parsley and a swirl of cream.

We love this dish for its simplicity. Will you add this recipe to your soup rotation?

To see more great recipes that use just fresh ingredients, hop on over to Mary’s food blog, The Cake Chica, where you’ll never see any Hamburger Helper, spam or canned soup recipes.