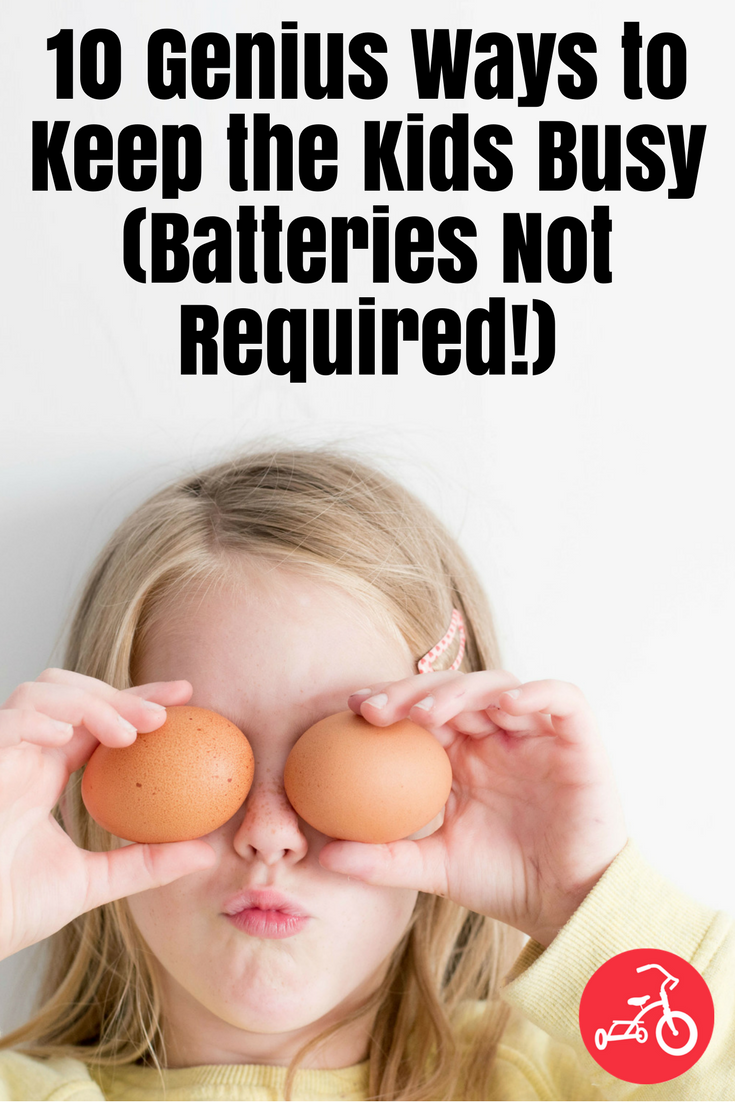
When those blustery days spent inside leave your Little itching for screen time, bust out one of these powered-down activities instead. From sporty balloon ball games to playful potions they can mix themselves, these easy activities keep kiddos busy and engaged on a cold day. Keep reading to see them all.
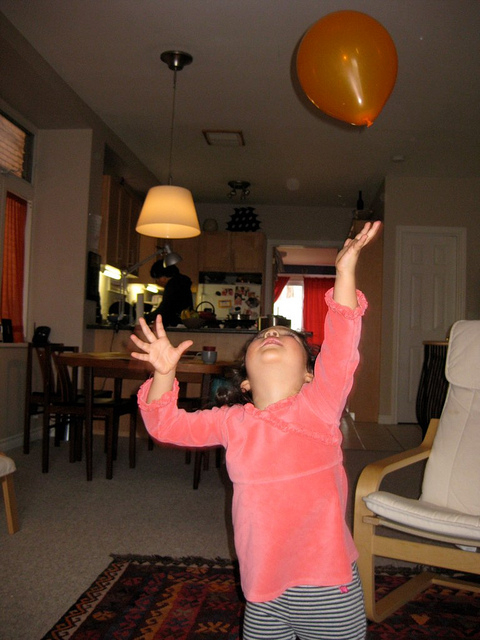
photo: Clang Boom Steam via flickr

1. Have a ball.
Break out those leftover birthday party balloons and let your little athlete play balloon ball games until she runs out of steam. Try balloon basketball (pool noodles make great hoops!). Or grab paper plates and paint sticks to DIY a simple racquet so she can play balloon tennis. We’ve also got balloon soccer (hint: use painters tape to mark the goals on the floor) and balloon baseball on our list.
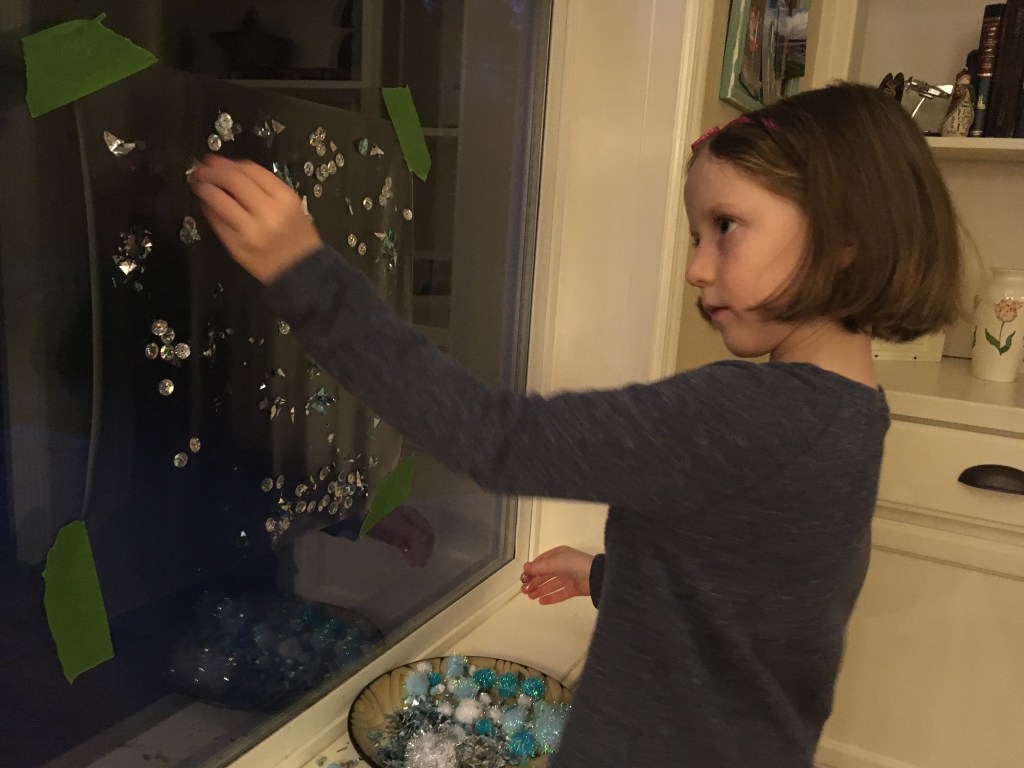
photo: Allison Sutcliffe

2. Cause a scene.
If clear contact paper isn’t one of your crafting staples yet, add it to your list. Simply mount the contact paper, sticky side facing out, using painter’s tape. Then set out a tray full of winter-themed baubles (think wintery colored sequins, pom moms, ribbon pieces and tissue paper) for your tot. He can use them to build snowmen, snow forts and glittery blizzards on the window over and over again.

photo: ikatbag

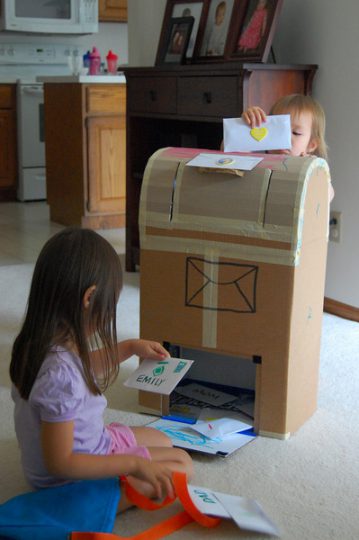
3. Deliver tons of fun.
Between all the holiday and New Year’s cards your family receives in December, your Little is all about snail mail. Let him make and send his own special messages to friends and family when you set up a play post office at home this winter. Stock it with plenty of envelopes, stationary he can customize and a DIY stamp template that he’ll need to ensure his mail makes it to its final destination.

photo: The Protagonist Studio via Flickr


4. Get moving.
Pull out that pizza box from Friday night’s casual dinner—its got a job to do! Turn it into the base for your aspiring artist’s active art station, where roll-able objects like matchbox cars and marbles create fridge-ready messy masterpieces. To let your mini-me make one, place a thick piece of paper on the bottom of your box, and have your petite Picasso dip marbles or matchbox car wheels in cups of paint. Then it’s time to let them roll—back and forth over the paper as they make their way from one wall of the box to the other, and back again.

5. Let it snow.
Cutting paper snowflakes is always a favorite winter activity for your sidekick. In fact, you’ve got a whole stack waiting to be strung up or taped to your window right now. Take your excess paper creations and use them to make a crafty snowflake wreath, designed by Erica at What Do We Do All Day. It’s the perfect craft to keep around all winter long! 

photo: Allison Sutcliffe

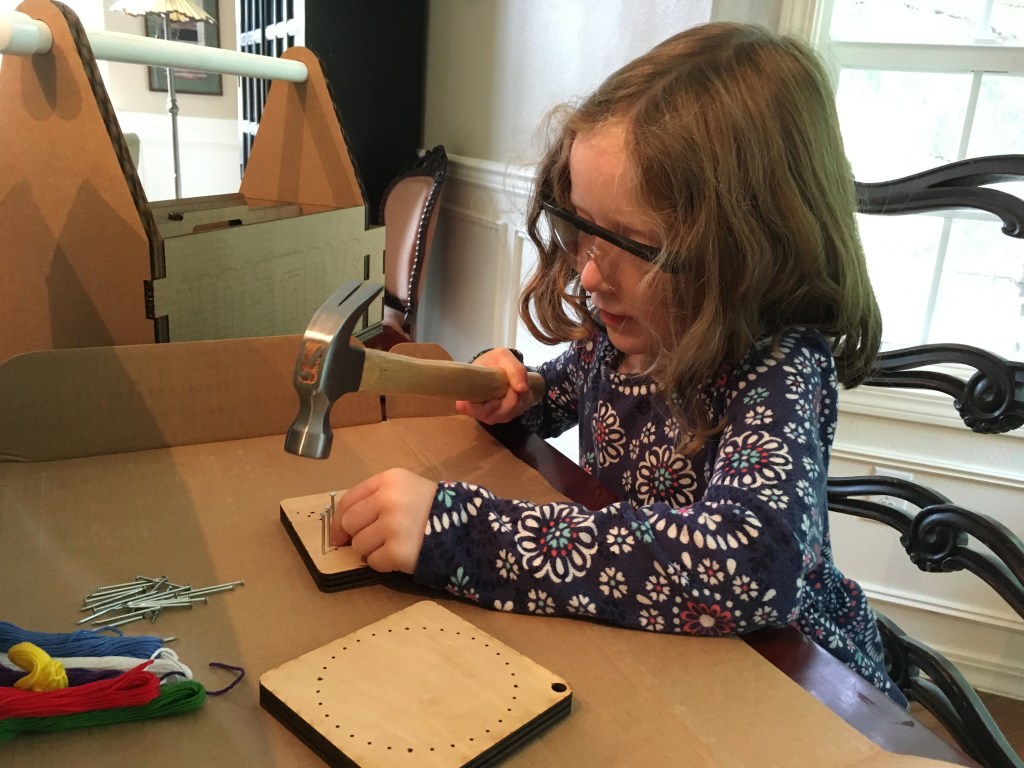
6. Hit the nail on the head.
Grab a pair of safety goggles and put your older artist to work making a string art template. You’ll need a small square of wood, a trusty hammer and a handful of nails to do this project. Then figure out how to easily transfer some of your kiddo’s favorite shapes onto the work surface. It’s okay to stick with easy-to-map-out patterns like circles, squares or triangles too; they work just as well. Then loop colorful floss around the nails making ornate patterns as you go. Creativity’s the name of the game here, and no matter which path your pattern takes, it’ll look amazing!
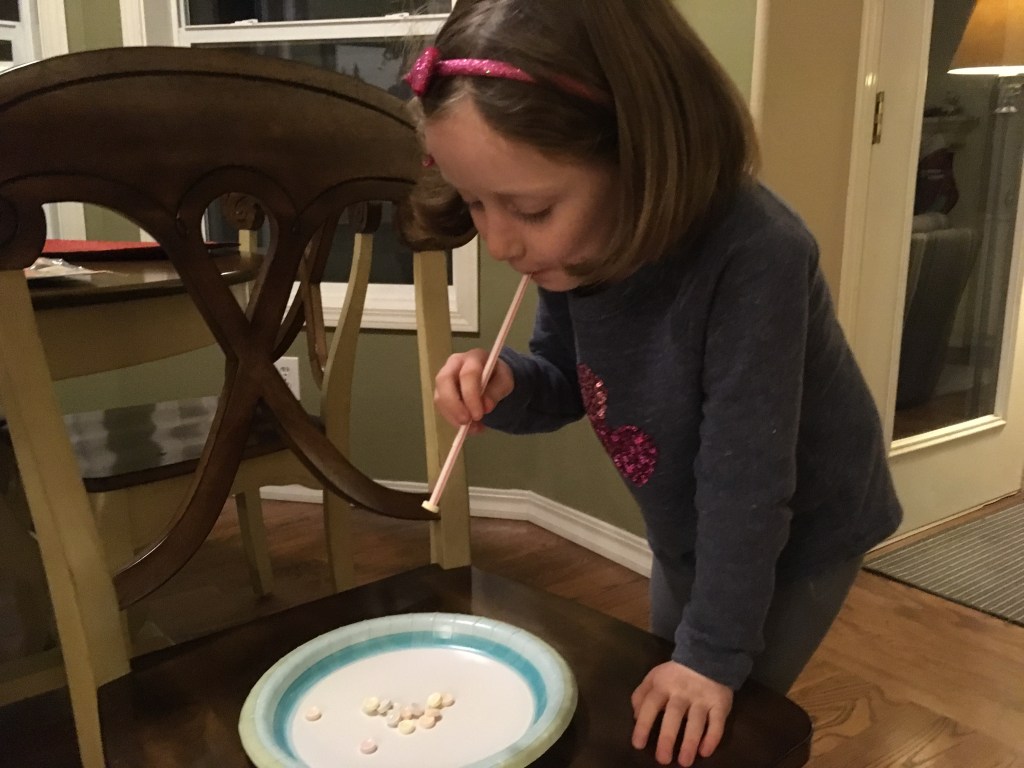
 photo: Allison Sutcliffe

7. Suck it up.
We’re crushing hard on this relay game, and know your Littles will too. All you need is a few packages of Smarties candies, paper plates, and straws. To set up the game, place the paper plates on either end of your playing field, relay-style, a pair for each person. Then empty out one package of Smarties onto the starting end plates. Using the straw and some serious suction, have kiddos transfer all the Smarties from the starting plate to the finish plate, no hands allowed. It’s serious fun that ends with a sweet treat.
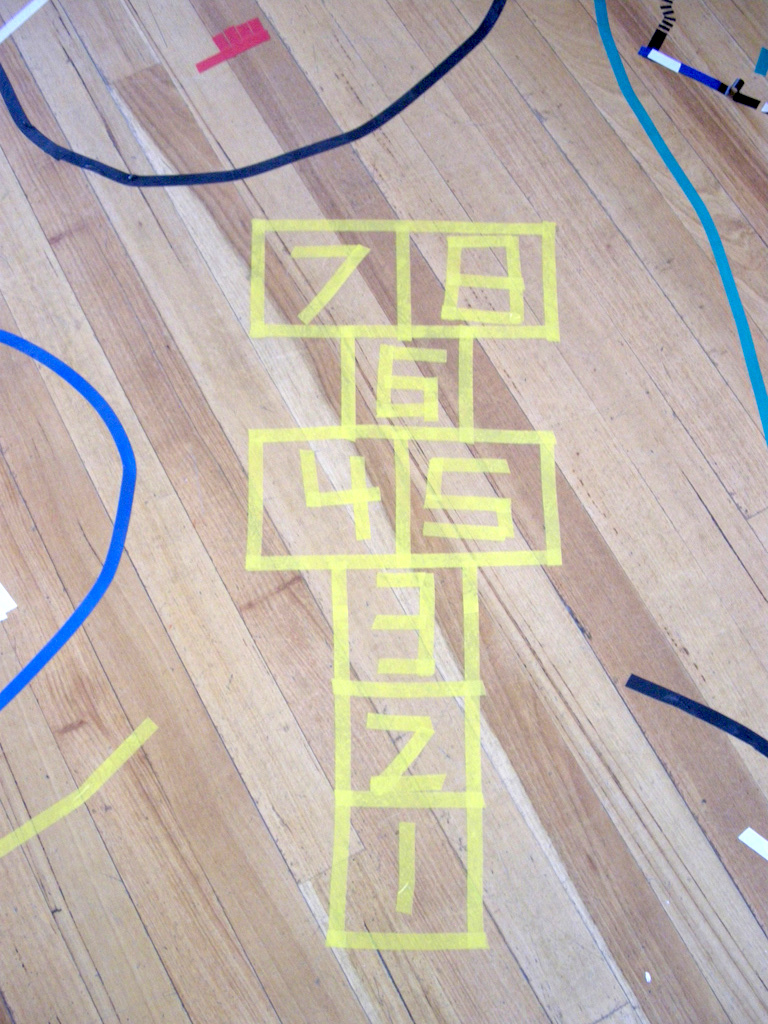
photo: Briony via Flickr

8. Hop to it.
Indoor hopscotch is just what your little monkey needs on a blustery winter day. Design a board using painter’s tape on the floor to make the squares and the numbers. Then have your mini-me toss a soft ball or crumpled paper onto a square before she hops from one end to the next. Psst … if you don’t have wood floors, use construction paper pieces to make a colorful playing board that works just as well.

9. Cut the deck.
Help your wiggle worm expend that winter energy. Grab a standard deck and pull out all the face cards, aces and jokers. Then assign a movement to each of the remaining numbers (think: 2=jumping jacks, 3=skipping, 4=touching toes, etc.). Once you’ve got the movements down, give your tot a quick workout by flipping through the deck and calling out the movements as you go. Remember to use the number on the card to let them know how many “reps” they get to do. They’ll be ready for naptime after you make it through the deck!
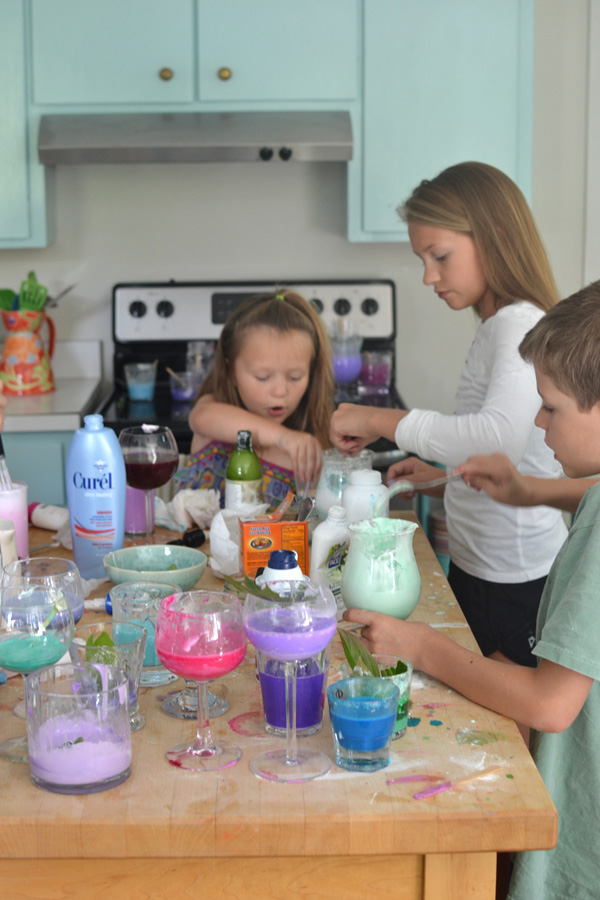
photo: Bar Rucci via ArtBar

10. Mix up magic.
Make like Snape and transform a dreary winter day into a magical one with a potions station. To set it up, gather open items from your kitchen and bathroom, like shaving cream, lotions, spices and baking soda (extra points for creativity if you label your finds as magical elements, like the eye of newt or crushed beetles). Then give your budding potions master a bowl and a spoon to mix up her wild creations. Check out our favorite pretend magical potion ideas here.

Which activity do you think your kiddo would like to do? Tell us in a Comment below. 

— Allison Sutcliffe

Feature photo by Eddie Kopp on Unsplash


keep kids busy

The distinct chill of winter (not to mention the soul-crushing snow) means your gardening dreams are a no-go. That is, unless you pick up this wildly popular pack of succulents from Costco!

Get your indoor grow on with the three-pack of plants that are not only awesomely adorable, but oh-so-inexpensive.

How much will you pay for three five-inch succulents? While prices vary somewhat by region, some Costco shoppers have scored the succulents for under $20. Instagram user Costco Deals recently posted a pic of an entire rack filled with plants, advertising the three-packs for only $19.99.

Not only do you get the three five-inch plants, but each succulent also comes in its very own white planter pot. Check with your local Costco for prices on this pint-sized trio.

—Erica Loop

Featured photo: Costco Deals via Instagram 


RELATED STORIES

Hunter Rain Boots Are Back in Stock at Costco

How to Shop at Costco Without a Membership

Costco’s Amazing Valentine’s Day Rose Sale Is Back

If your pregnancy cravings are kicking into gear or you simply love the combo of sweet and salty, then you’ll definitely want get a taste of the new Cookie Pop OREO Popcorn.

The latest in the line of candy and popcorn mash-ups, Cookie Pop OREO Popcorn swaps out the candy of the previous flavors, Candy Pop Butterfinger Popcorn and Candy Pop Twix Popcorn, in favor of cookies.

The latest popcorn concoction is made with real OREO cookies. It’s drizzled with the cream filling from the middle of the OREO and covered in crushed cookies.

The new popcorn is $5.98 for a 20 ounce bag and it’s launching exclusively at Sam’s Club on Jan. 21, just in time for National Popcorn Day. Stay tuned for more Cookie Pop flavors coming later in 2020.

—Shahrzad Warkentin

All photos: Courtesy of Snack Pop


RELATED STORIES

OREO’s Heart-Shaped Cookie Dunking Kit is Valentine’s Day Love

OREO Is Releasing a Tiramisu-Flavored Cookie & Goodbye New Year’s Resolutions

Your Kids Will Be Clamoring for Lunchables Cookie Dunkers

If you’re a fan of salty and sweet flavor combinations, then Starbucks Santa Boots Chocolate Frappuccino is a holiday wish come true.

The new Frappuccino flavor features a chocolatey base topped with whipped cream, candy-coated chocolates and crushed potato chips. Oh, and did we mention the edible cookie straw? The only downside to this unique flavor combo is that you probably won’t be able to get a taste––unless you happen to live in Japan.

The Santa Boots Chocolate Frappuccino is only available at Starbucks locations in Japan through Dec. 25 or until supplies are sold out. You can always get creative and sprinkle some potato chips on top of a good, old fashioned Peppermint Mocha!

—Shahrzad Warkentin

Featured photo: uesugi_yuji via Instagram


RELATED STORIES

Here’s How to Order a Baby Yoda Frappuccino at Starbucks

Starbucks Holiday 2019 Reusable Cup Lineup Is Finally Here

Disney Just Released New Holiday Starbucks Tumblers & Matching Ornaments

American Idol winner, The Voice coach, super-talented performer, mama. While these words all describe singer Kelly Clarkson,  there’s one way Clarkson is just like us. Sometimes she says the wrong thing at the wrong time to her kid.

When Clarkson recently explained voice-over acting to her four-year-old daughter River Rose, she may have dished too deeply. While speaking with ET’s Kevin Frazier, the Ugly Dolls star revealed how she may have accidentally crushed her kiddo’s Frozen dreams.

So what exactly did Clarkson do? When trying to compare her role in the animated Ugly Dolls movie to Frozen’s Elsa and Anna, she inadvertently told River Rose that there are actresses voicing the movie’s main characters.

Clarkson told ET, “I was explaining to her, because she was confused, and I said, ‘It’s my voice. Like, you know, like how Elsa and Anna, there’s a person that plays Elsa and Anna?’ And I didn’t get what I was doing!”

Of course the mama felt terrible for lifting the veil and exposing Anna and Elsa as animated, voiced cartoon characters. But Clarkson also noted that with River Rose, “would’ve figured it out.” Beyond consoling herself with the knowledge that her daughter is “very clever,” Clarkson also flipped her flub into something positive. “I saw her little face, and I just saw the wheels spinning, and it was like, ‘Oh no! But isn’t it exciting that you can meet the real girl that plays Elsa?”

—Erica Loop

Featured photo:


RELATED STORIES

Kelly Clarkson Sings Hoda Kotb’s Kids Book as Lullaby & Get Ready to Ugly Cry

Kelly Clarkson Keeps It 100 about Raising 4 Kids

What Is Kelly Clarkson Teaching Her 3-Year-Old?

This slow cooker recipe from The Seasoned Mom is sure to find a place in your meal rotation. There are lots of ways to remix it—serve it with pasta or rice, or make it into a cheesy sandwich. Plus, if you’re an Instant Pot fan, it can be put to use with this recipe.

Ingredients
4 boneless, skinless chicken breasts (about 24 ounces total)
1 tablespoon olive oil
2 red bell peppers, seeded and sliced
1 sweet onion, sliced
4 teaspoons minced garlic
8 ounces sliced mushrooms
1 teaspoon Italian seasoning
8 ounces crushed tomatoes
½ teaspoon crushed red pepper (add more for a spicy dish or omit entirely for a mild dish)
½ teaspoon salt
¼ teaspoon black pepper
Garnish: chopped fresh basil or fresh parsley
For serving: pasta, rice, zucchini noodles, or cauliflower rice, etc.

Method
1. Season chicken with salt and pepper on both sides.

2. If you have time to sear the chicken in a hot skillet for a few minutes per side before placing it in the slow cooker, it gives the meat great flavor.  If you don’t have time to brown the chicken first, that’s okay too!

3. Place all ingredients in a slow cooker and stir to combine.

4. Cover and cook on “LOW” setting for 3-4 hours, or until chicken is cooked through. Season with salt and pepper, to taste. Serve chicken, vegetables and sauce with a slotted spoon over pasta, rice, zucchini noodles or cauliflower rice, if desired. The meat is also great in hoagies (toasted with melted cheese on top) or as a topping on pizza or flatbread. Garnish with fresh herbs just before serving.

Alternative Instant Pot Method
1. Press “sear” or “sauté” on the pressure cooker. Add oil to the pot and brown chicken for about 2-3 minutes per side. Turn off sear function.

2. Add remaining ingredients and stir to combine. Close the top properly and select “Poultry” or “Manual” setting. Set the time to 8 minutes for fresh chicken breast, or 13 minutes for frozen chicken breast. (These times are for typical 6-8 ounce chicken breasts. If yours are larger, add a couple of minutes.)

3. When done, let the pressure naturally release for at least 5 minutes. After that, you can turn the valve to “vent” for quick release if you’re in a hurry, or continue natural release for the most tender texture.

Blair shares family-friendly recipes on her blog, The Seasoned Mom. Hop over to her website to find more kid-approved recipes that won’t take hours to make.

Who said nachos have to be bad for you? This recipe from Rani Hansen of You Totally Got This proves otherwise. They’re a great way to sneak extra veggies into your kids’ diet, but they also feel like a special treat.

Ingredients
1 1/2 cups corn chips
½ cup grated cheddar cheese
1 cup canned crushed tomatoes
1 tsp cumin
1 tsp paprika
1/2 tsp garlic powder
Pinch chili powder (or more if you like it hot)
1 small red onion
2 cups canned corn kernels
1 cup canned black beans
½ avocado
Fresh cilantro to garnish
1 long red chili to garnish (optional)
¼ cup yogurt (regular or coconut) or sour cream to serve

Method
1. Turn on your broiler.

2. Dice the avocado and red onion, and thinly slice the chili (if using). Set aside.

3. Add the crushed tomatoes, cumin, paprika, garlic powder and chili powder to a small saucepan and place on the stove over medium heat, stirring for 2 minutes or until warmed through.

4. Take the saucepan off the heat and set aside.

5. Place the corn chips in the bottom of a small shallow baking dish and sprinkle with cheese. Place under the broiler until the cheese has melted. This will only take a minute, so keep your eyes peeled.

6. Remove the tray from the grill and top the melted cheese with the nacho sauce before layering on the chopped red onion, corn and black beans. Place the tray back into the oven for 5 minutes or until the ingredients are warmed through.

7. Remove your nachos from the oven and top with avocado, cilantro and chopped chili (if using). Serve with yogurt or sour cream.

Rani Hansen shares lots more healthy recipes like this one on her blog, You Totally Got This. Head to her site to find more kid-approved meals that’ll come together in half an hour or less.

In Partnership With Eggland’s Best

Take things a bit further with your Shakshuka and add delicious vegetables!

Prep Time 10 min  Cook Time 25 min  Yield 4 servings 

You will need:

2 tbsp. extra virgin olive oil

1 medium onion, diced

3 cloves garlic, finely diced

2 tsp. paprika

1 tsp. ground cumin

½ tsp. cayenne pepper (or to taste)

½ tsp. cracked black pepper

½ tsp. turmeric

2 tbsp. tomato paste

1 small eggplant, peeled and diced

2 poblano peppers, diced

1 cup diced Portobello mushrooms

1 28 oz. can crushed tomatoes

Salt to taste

4 oz. feta cheese

5 large Eggland’s Best eggs

Directions:

Heat a large cast iron skillet on medium high.

Add the oil, then the onions, garlic, paprika, cumin, cayenne pepper, black pepper, and turmeric.

Cook just until the spices become fragrant, then add the tomato paste. Cook for about an additional 1 – 2 minutes.

Add the eggplant, poblano pepper, and mushrooms and cook until the vegetables are softened.

Add the crushed tomatoes, and salt (you may not need much as the feta is quite salty) then cook for another 4 – 5 minutes.

Add in the feta cheese in small clumps throughout the mixture. Make sure the cheese is submerged into the tomato sauce.

Create 5 wells in the pan and add the eggs into the wells.

Lightly run your spatula into the whites to break it slightly and allow it to incorporate some of the tomato. Leave the yolks whole.

Cook for about 2 – 5 minutes, depending on how hard you want the egg whites.

Cover and cook for 1 minute to lightly cook the top of the egg whites, but not much longer, or else you risk cooking the yolks.

Sprinkle a pinch of salt and pepper over the eggs and serve hot with a side of bread.

 At Eggland’s Best, their commitment is to produce a more nutritious egg, which is also the finest, freshest, and most delicious egg possible. From unique hen feed and strict quality standards to their network of USDA-inspected local farms all over the United States, you can be confident that a classic, organic, or cage-free egg with the EB stamp on the shell is a nutritionally superior egg that delivers farm-fresh taste.

RELATED STORIES

Weeknight Meal: Veggie Pasta Bake 

Open Faced Egg Sandwich with Avocado & Pesto

Quick Broccoli & Red Pepper Egg Bake

Easy Veggie Stir Fry with Sesame Scrambled Egg

Weeknight Meal: Mini Egg Pizza

Is there anything more exciting to kids than a cardboard box? Yes: a cardboard box that’s been painted and lettered to look like their own personal mailbox! Read on for the super-easy instructions that’ll get your kids going totally postal… all in good fun, of course.

What you’ll need:

Cardboard Box

Pencil

Box cutter

Acrylic paint (we used blue) and paintbrush

Packing tape

Large letter stickers

Felt, velcro stickers, glue, and scissors (optional, for making “envelopes”)

Step 1: Tape up your box on all sides
Use packing tape to tape up your empty box so that all sides are solid and sturdy. Go ahead and give your little helpers some tape, too. They may not tape it on the right place, but they’ll have fun trying (and you’re going to paint over the whole thing anyway).

Step 2: Make some cuts
Use a pencil to make lines on your box where you’d like the mail slot, package slot, and mail retrieval slot (on the back end) to be. Then, use a box cutter (way easier than scissors — we tried!) to cut your box along the lines.

Step 3: Bring on the color!
Paint your mailbox. Several coats will probably be needed to cover the cardboard as well as hide any stickers, patterns, or writing. We wanted our mailbox to look just like the one on the street corner, so we opted for a few coats of royal blue; however, there are no rules! Want to go rainbows and polka dots? Go for it! You can even sprinkle glitter on the paint while it’s still drying if you want to make a “magical” sort of box (this might be a great way for the Tooth Fairy or any other, otherworldly friends to deliver gifts and trinkets to wishful kiddos).

Step 4: Add some stickers
When the paint is completely dry, use the letter stickers to label the “Letters” and “Packages” slots on the front of your mailbox. We also spelled out “MAIL” on both sides of our mailbox. If you want to get really formal, you could instead slap on a real U.S. Postal Service logo on the sides of your mailbox. You can find a large one to print here.

Note: It helps to use a ruler when you apply the letters, just so you get them all on a straight line.


Step 5: (Optional) Make some play “mail”
After my overeager little mail-sender crushed a few too many paper envelopes trying to squish letters into the mail slot, I realized it would be better to make a pliable envelope that she could easily stuff into the slots. To do this, take a piece of felt and fold it in half with one side extending longer than the other so it can be folded over to make an envelope shape. Use a hot glue gun (if you have one) to seal the sides of the envelope together; then, cut the overhanging “lip” to make a triangle(-ish) shape. Use Velcro stickers to fasten the letters shut.

Do your kids like to send letters? Share your mail-worthy ideas with us in the comments section below! 

— All copy and photos by Melissa Heckscher

*This post was inspired by a similar mailbox craft project at Thisheartofmineblog.com.