Your pool noodle is your trusty summer sidekick, but it has far more uses than taking a dip in the pool, river, lake or ocean. Did you know it also makes a great hobbyhorse or bubble blower? We’ve rounded up some uber fun ways you can transform this dollar store classic into your tot’s favorite new toy. Keep reading to get your noodle craft on.

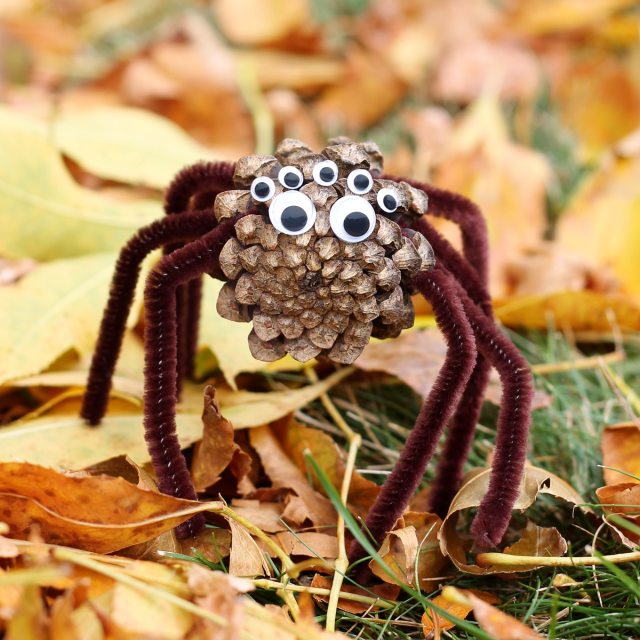
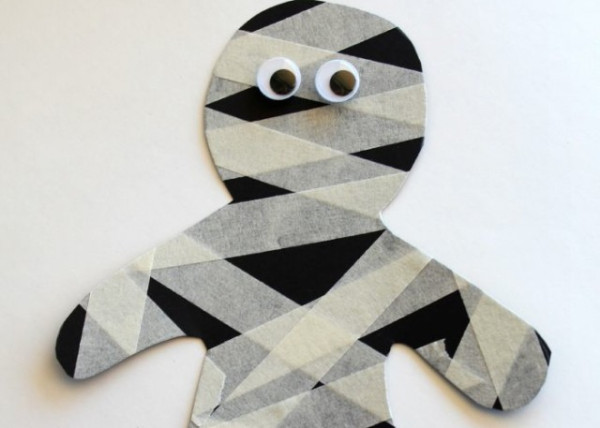
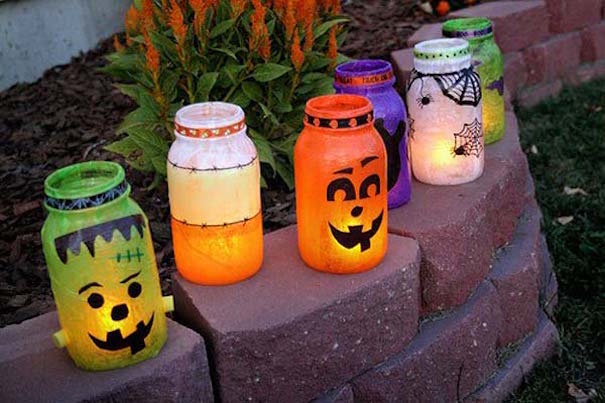
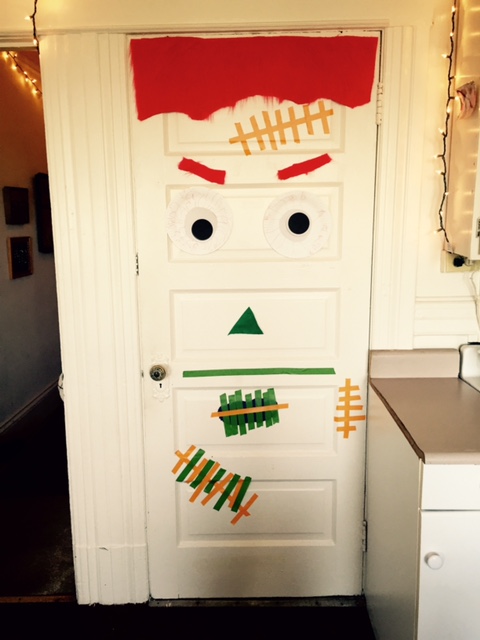
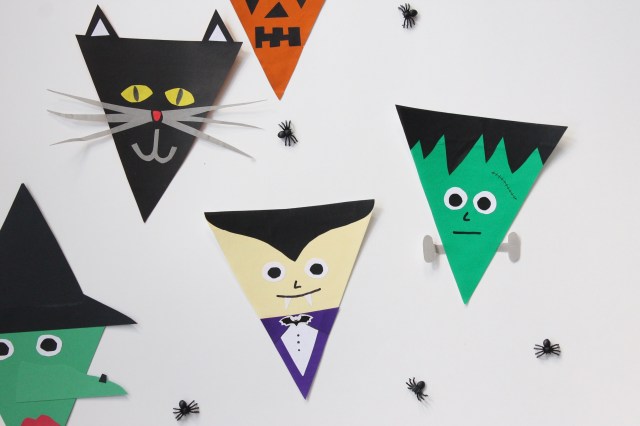
Pool Noodle Monsters

Clumsy Crafters

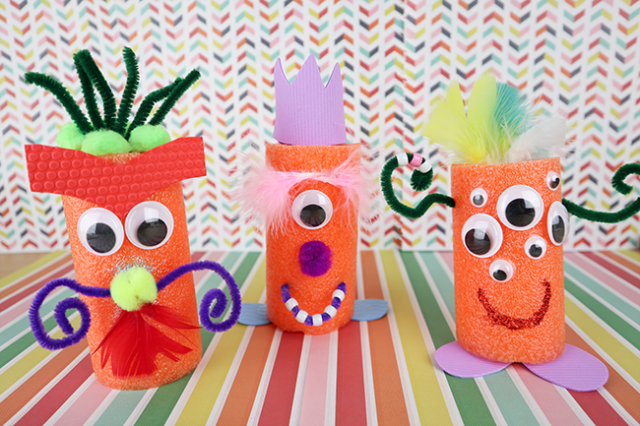
Boo! These anything-but-scary monsters are the perfect way to use up that old pool noodle. Cut into small pieces, then unleash your inner artist using googly eyes, pipe cleaners, feathers and whatever else you have stashed in your art kit. Get all the details over at Clumsy Crafter.

Abacus

Happy Hooligans

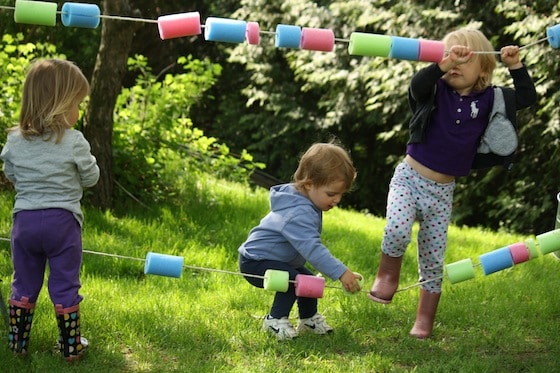
Get the littles outside and learning to count with this simple DIY pool noodle abacus. The simple to create project uses rope, pool noodles and a knife to cut, then is simply strung up in the backyard. You can find all the details over at Happy Hooligans.

Alphabet Knock Down

Toddler Approved

This activity is so fun, the littles won't even realizing their learning! Pool noodles are cut into C shapes, then a popsicle stick with a letter is added. Say the letter, roll a ball and see if you can knock it down! For all the details, be sure to head to Toddler Approved.

STEM Building Structures

Little Bins for Little Hands

Summer STEM just got a whole lot more fun. This easy to pull off activity uses an inexpensive pool noodle and toothpicks––that's it! Let your little builder develop their building, design, math, fine motor and problem-solving skills with this simple activity from Little Bins for Little Hands.

Launch Pom-Poms

Frogs and Snails and Puppy Dog Tails

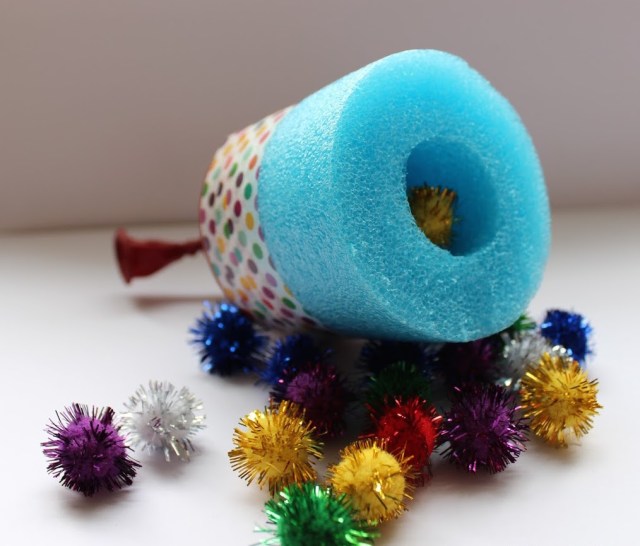
Go the distance with a pool noodle shooter. Get the need-to-know details to make your own from Jaime over at Frogs Snails and Puppy Dog Tails. Then, set up a target shooting range in the backyard for hours of outdoor play. Take aim!

Blow Bubbles

Skip to My Lou

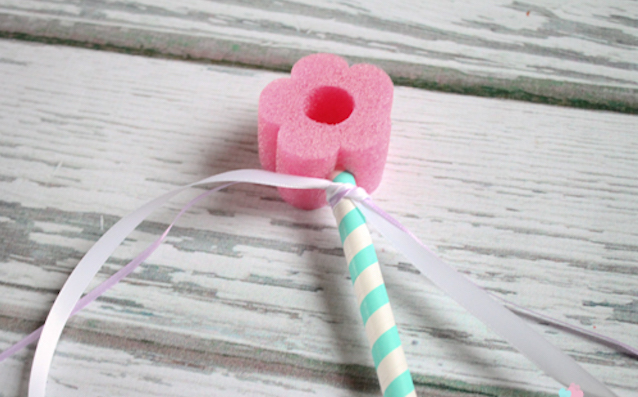
Whether you upcycle your own star or flower-shaped noodles or buy them pre-cut from the craft store, your kidlet will love blowing bubbles through them. And the best part? That you can make wands for the whole neighborhood. Skip to My Lou is where you’ll find out how to make this cute summer supply.

Make a Marble Run

mama papa bubba

The race is on down this simple marble run dreamed up by Jen over at Mama Papa Bubba. Set it up on a sunny day and kick back while your little ones play, play, play. Psst…cars race well on this track too.


Assemble a Water Wall

Casual Claire

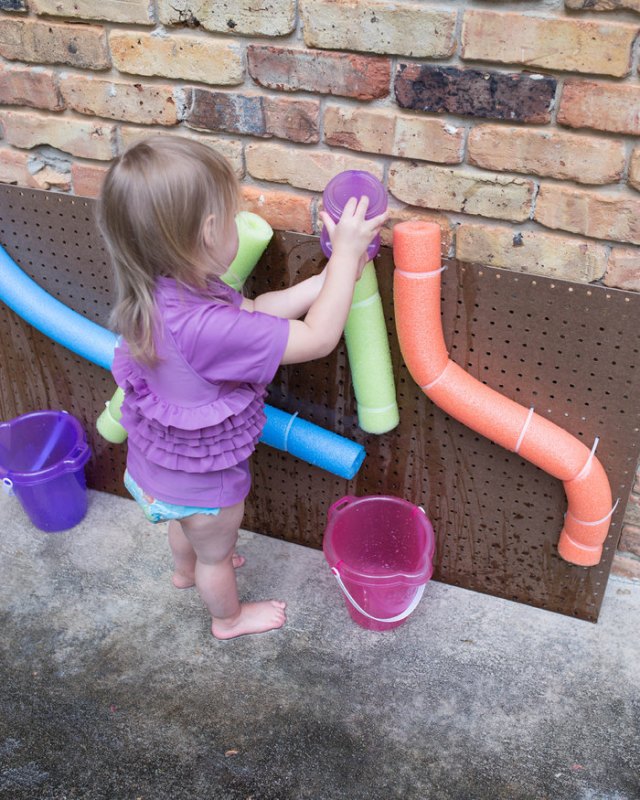
After sprinkler dashes and plenty of time wading in the kiddie pool, your mini-me can change it up but still keep cool on a sunny day playing at her pool noodle water wall. We love the idea of mounting one on a moveable pegboard like Claire from Casual Claire does. But, if you don’t have pegboard on hand a fence works just as well. Splash away, all!


Shoot Some Hoops

Ever Never Again

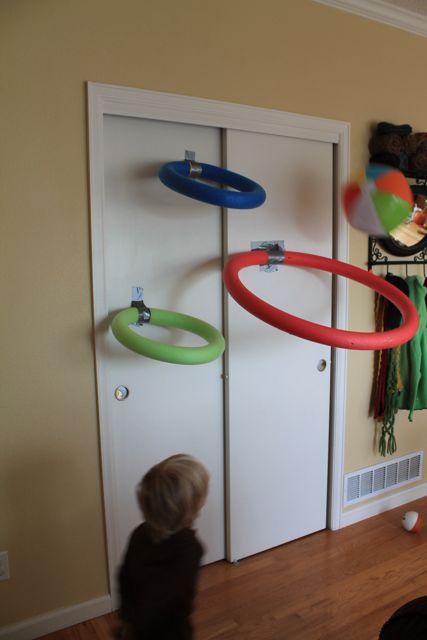
Indoors or out, these quick-to-assemble basketball hoops are just the right size for your sidekick to practice lay-ups and three-pointers, or to play a quick game of H-O-R-S-E with a sibling. Ever Never Again is where you’ll get the tips you need to set them up at your place. She shoots, she scores!
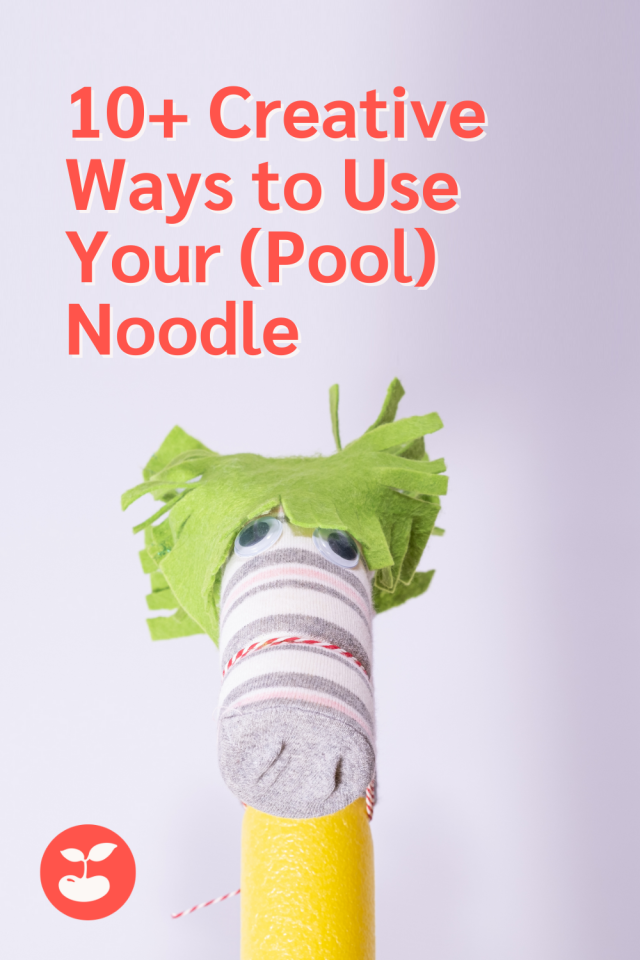
Ride a Hobbyhorse

Molly Moon Craft

Giddy-up, little pardner! Saddle up this cute hobbyhorse for hours of outdoor imaginative play. Find out how to make one yourself at Molly Moon Crafts. Trust us, it’s easier than you think! Hi ho, away!

Run Through the Sprinkler

pool party ideas
Mommy's Block Party

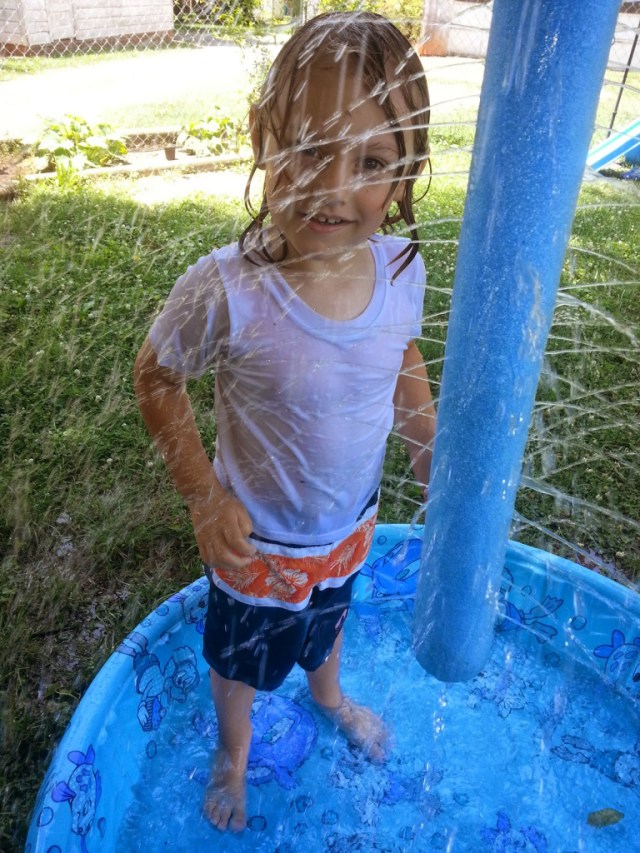
Turn your pool noodle into the best kiddie pool accessory in town, by converting it into an overhead sprinkler. Ondria at Mommy’s Block Party can walk you through the process. It’s like a trip to the splash pad, without leaving the house. Sounds like the perfect summer pace to us!

— Allison Sutcliffe


RELATED STORIES

15 Ways to Up Your Backyard Camping Game

37 Festive Crafts to Make This 4th of July

Here Are the 17 Best Bikes for Every Age & Stage

A little over six weeks have passed into our foray as chefs, cooks, and bottle washers. Life in the time of COVID-19 has forced us to multitask, and we are exhausted. Without the ability to drop the kid off at school, spend some time away from our dear spouse, and hang out with our friends, things can get overwhelming. Even the best organizers only have so much time in the day. 

So what happens? We find ourselves being less than stellar with our children, with our spouses, with our imaginary partners. Well, the world, even in the time of COVID-19 does not stop spinning. To help myself, I’ve borrowed and adapted a mantra used by many self-help groups.  

Progress, not Perfection emphasizes not letting perfection get in the way of the healthy changes you are trying to make. I’m calling my adaptation, “Parenting, not Perfection.” Certainly, that phrase has been used before; so, I’m not taking credit for inventing it. I am, however, using it as a shortcut to give you a quick pat on the back for at least trying to be a good parent and a good teacher. 

While you’re doing your best to juggle, here are some things to keep in mind. They have worked for me but your mileage may vary:

1. Set Reasonable Expectations: You cannot get as much done as a teacher would in a classroom. You cannot do it. Unless you are a teacher, you do not have the training to teach a preschooler. You probably don’t have the patience of a good preschool teacher. And this is your child—the dynamic is different. Concentrate on one or two activities and call it a day. If you expect your child to be doing “table work” for three hours, somebody needs analysis. And, it’s not the kid.    

2. Set Your Own Schedule: You are at home. There is no school “day.” There is no requirement that “lessons” be accomplished during school hours. Let your child sleep in, let them stay up later than normal. Let your family find its own rhythm. Take breaks.    

3. Do Not Buy Out the Craft Store: You need safety scissors, paper, and vodka. The Vodka is in case you can’t find rubbing alcohol. We are in the middle of a pandemic. Seriously, there is no need to raid the craft store. Is your child learning to form letters? Take every-day objects from around the house and use them to form letters. Walk your neighborhood and collect items to make different shapes. You don’t need to be fancy. You just need to inspire. Get your child involved in cooking, cleaning, gardening, laundry. Those activities teach counting, sorting, measuring, organizing—skills that are essential to their development. Are the activities going to take you more time to complete? YES. But, you are spending time with your child. Time that you would not otherwise be spending.  

4. Focus on Learning Through Play: You can learn and play? Yes. It’s fun for both you and the child. Take for instance, a simple lesson on the solar system and sorting colors. The Kid was incredibly busy playing with his toy shield. He was running around defending our house from monsters. He wanted no part of  “schoolwork.”  While he was playing, I used clay to make seven balls in different colors. I sat quietly. In a matter of seconds, I heard: “What are you doing?” “Those are asteroids,” I replied. “Asteroids smash into planets.” “Smash? Planets? He was hooked! Pretty soon, we were making planets, moons, etc. He was using his shield to defend against the attacking asteroids. “Asteroids, attack by color,” I said.  So, he had to sort them. The whole thing took about 35 minutes. And, it was fun.  

5. It Is OK to Stop and Start Again Tomorrow: If you get tired, if your child gets tired, if tempers get short, breathe. Sanity and relationships are more important than the square root of pi. Pie is more important than the square root of pi. Stop. Start again fresh. You have not failed. You just need a break.  

6. Use Online Resources: You are not alone. Most schools have provided parents with at least some resources to get them through homeschooling. If you haven’t received any, ask why. If you have and you need some backup help, ask your child’s teacher. If you still can’t find what you’re looking for, I suggest the site Teachers Pay Teachers. At the site you will find loads, I mean loads, of ready-to-go things that you can do with your child right now. And a great deal of them are free. 

7. Let the Kid Be a Kid: Your child will want to play. If your child wants to do nothing but play all day one day, become a pirate for half an hour. Become the loudest, silliest pirate you can possibly be. Chase her throughout the entire house. Make a memory. Forget about teaching a lesson.

Yes, we have been called upon to be chefs, cooks, and bottle washers. And, this is relatively new to all of us. Or is it? Is it really? As parents, we multi-task all the time. We are always parents, we are always somebody’s employee or spouse or boss or mentor, etc. The difference now is the incredible amount of stress that is imposed by a situation that is outside of our control. The difference now is that we control very little of what’s going on. The difference now is that we don’t really see an end.

I offer you this: Parenting is neither sport nor competition. Stop beating yourself up. We don’t get awards; we barely get our own individuality. After all, we are often introduced as “so and so’s Mom or Dad.” And, that’s good. It reminds us of who we are, and why we do what we do. Because parenting is not about us. We so often get wound up around the word “Parent,” as in “I am the parent” that we forget it’s not just a noun, it’s also a verb. And, if you happen to forget, just substitute the word “caregiver.” It will help steer you in the right direction. 


This post originally appeared on https://mralexbookshelf.com/.
ALEXANDER FERNÁNDEZ
Tinybeans Voices Contributor

Father, children's book critic, writer, judge, director, actor and amature photographer—together with his husband of 25 years—raising an energetic four-year old! "Parent is not just a noun, it's a verb.  If you're ever in doubt as to what to do, substitute the word caregiver.  It will steer you in the right direction."  

With more kids at home for summer, the house is bound to need a little more TLC than usual. Not only can chore charts be a great way for kids to contribute to the daily running of your home, but they are also an opportunity to teach personal responsibility and financial literacy. We’ve rounded up 14 awesome chore charts for kids that’ll help them learn the life skills they’ll need down the road. 

A Chore Chart for Financial Literacy

Boon Supply

Earning money also comes with the understanding of the importance of saving and giving. This Chore Chart from Boon Supply gives kids the opportunity to set spending goals, save for special items, and give a portion of each allowance to a person or organization in need.

Get it at Boon Supply, $28

Pretty Cool

The Crafting Chicks

Kids will love using this chore chart––it's gorgeous! The simple magnetic style is easily customizable and made using basic supplies that are inexpensive and found at your local craft store. The pre-made printables make this craft cute and exciting to use. Head to The Crafting Chicks to download for free!

Personalized Style

Pottery Barn

No one does it better than Pottery Barn when it comes to personalized kiddo gear. This acrylic board makes it easy to come up with your own chores and is easily changed when you use dry erase markers. It's the perfect companion for minimal and clean-lined decor––not to mention kids will love writing on it!

Available at Pottery Barn, $79

Let's Go Digital

parent apps
BusyKid

The app is a digital platform for chores that helps teach kids responsibility and financial literacy, with options to receive their allowance on their own VISA, give to a charitable donation or even invest in real stock! Parents can set up a chore chart and individual payouts for each type of chore. At the end of the week, kids will get their payout via direct deposit to the method of your choosing. Parents can also set a percentage to go directly to savings!

Available at BusyKid.com, $7.99 per year to use VISA pre-paid card option.

Modern Rewards

Courtney Hanson via sealedwithakissgift

This chore chart is made of painted reclaimed wood that you can personalize in any color. There are nine clips, each with an assigned chore card. Simply clip a reward to each task: You can add dollars, extra screentime minutes, a treat, etc. We love the modern design and simple organization of this chart.

Available at sealedwithakissgift at etsy.com, $44.50

Pick-a-Chore

Our Three Peas

You don’t have to be crafty to pull off this brilliant mason jar idea from Our Three Peas. Using terms like “must-do” and "can-do,” you’ll separate the things that just need to be done from the things that can be done to earn rewards. You can even pick chores based on age and season. To see what you’ll need (about five items!) and how to lay the ground rules, head over to Etsy.

Simple & Sweet

The Container Store

This square 14-inch chore chart won't take up much space and is great for the entire family. It's dry erase, magnetic surface is perfect for customization and resists staining. Each chart comes with space for up to nine family members, magnets and a place to spotlight rewards.

Find it at The Container Store, $9.99

Keep It Colorful

Mommy Moment

This delightfully bright idea comes from Mommy Moment. Instead of just giving a general chore, each paint chip strip includes several tasks for one space: the bedroom, the bathroom, the kitchen. This way, since kids can easily get overwhelmed when asked to pitch in, there’s a very specific list of things that need to be done. Best of all? You can make these handy cards for free. You can grab more details over at Mommy Moment.

What Time Is It?

Alexa Zurcher via Alexa Z Design

For some parents, bedtime is the worst time of day. If you're looking for ways to make the evenings easier for your toddler, this chore chart may save you. It was designed specifically with bedtime in mind including chores like brush teeth, bath, get dressed and read a book. The illustrations next to each chore are great for non-readers, and there's also a morning chore list! You can download from graphic designer Alexa Zurcher's store by clicking here.  Slip the checklist in a frame, grab a dry erase pen and get started.

Available at etsy.com, $5.

Magnets That Make Sense

This fully magnetic routine chart features beautifully-illustrated magnets that you can select for the day. Parents decide which tasks go where and select the magnet that corresponds to the assignment. When the "to do" is completed, kids move the magnet off the chart. What's great about this method is kids can have control over their routine. So while you decide what chores they do, they get to order the tasks for themselves. The morning and evening sets include six magnets each. There are dozens of more magnets available, too.

Available at Magnets, $15.50 for set of eight magnets and $60 for magnetic base calendar.

Change It Up

Clean Life and Home

Not all chores (and seasons) are created equal. Depending on the time of year, kids may need to help out around the house in different ways. Maybe raking leaves is on the "to do" list for fall, while cleaning up pool toys is on the summer list. Clean Life and Home created a chore chart for summer that you can download for free and customize with your kiddo's name and the items you want to be completed. When a chore is completed, you can stick a shiny star sticker in the box. Find out more here.

Say My Name

Lemo Squeezy Home

If getting crafty is your thing, you'll love this beautiful and clean DIY chore chart from Christie at Lemon Squeezy Home. On her blog, she details exactly what materials you need to make the chart and includes links to the printable chore items and a to do/done template. You can also customize the tasks based on your household chores. The simplicity of this chart is great. The two columns (to do and done) make it easy for kids to see exactly what they're responsible for each day. Find out more at Lemon Squeezy Home.

Play It By Age

The Bird's Day

Nicole from The Bird's Day came up with chore charts that include tasks geared toward the ages of each of her kids. You can download a chart for a three-year-old, five-year-old and seven-year-old. All three varieties include cute drawings that accompany the writing. There's also a "when" column to illustrate with the task needs to be completed (great idea for the weekend only chores). Take a look at the chart and see her creative chore challenge over at The Bird's Day.

Perfect Punch Card

JH Print Studio

Bring a gaming vibe to the household chores with this downloadable punch card from JH Print Studio. The idea is so simple—do 12 chores, get a surprise! And, who doesn’t love a surprise?

Available at jhprintstudio at etsy.com, $4.85.

— Gabby Cullen, Leah R. Singer & Karly Wood


RELATED STORIES

10 Ways to Reward Your Kids That Aren’t Stickers

The Secret to Getting Your Kids to Do Their Chores—Without Asking

The Best Chores for Kids (According to Age)


When it comes to Halloween costumes for kids, there’s nothing quite like the original, DIY Halloween costumes you see on the festival circuit and at your front door on the big night. So, in order to inspire major creativity in parents everywhere, we collected 33 of the most jaw-dropping homemade costume ideas that anyone—from Martha’s protege to the totally last-minute types—can tackle. Keep reading and check ’em out. 

Giraffe

Brit Co

How adorable is this giraffe costume? With a little paint, a leotard and a headpiece bought off Amazon, your little animal lover will be wildly appropriate for Halloween night in no time. Get the tutorial over at Brit + Co

DIY Strawberry

Strawberry last minute halloween costume
Pretty Life Girls

Five supplies are all you need to make this sweet strawberry from Pretty Life Girls. After a quick trip to the craft store, you can whip up this no-sew costume that is adorable, but more importantly is comfortable for kids and adults, too!

BART Train Car

Jinjer Markley via Flickr

Do you have a BART or DART or some sort of public train system in your area? Using a cardboard box, markers and pictures of your kid and her friends, you can make a wearable train car for your kid this Halloween. The trickiest part is the straps, for which you can use old suspenders, old straps off a tote bag or even fabric. 

Hula Girl Snow Globe

J Potisch via Flickr

This lucky girl had her father make a snow globe costume in just three days. With foam, lots of paint, cardboard, plastic and of course, a coconut, it’s the perfect, enlarged version of the classic travel souvenir. Check out the entire project, and see all the materials here.


Wind Up Doll

Stacy Hart via Hart and Sew

This precious wind-up doll from Hart and Sew has us in “awwww!” Quite possibly one of the easiest and cutest DIY’s we’ve seen, anyone can make a version of this genius idea. Head over to Hart and Sew to get the details.


Rubik's Cube

City of Marietta via Flickr

Figuring out how to make your own Rubik’s Cube costume will be easier than actually solving the classic brain-bending puzzle. Colored paper, electrical tape and cardboard are your main ingredients, but we think the groovy glasses and sweet hairdo add a little something extra, too.


Fantastic Mr. Fox

Cat Sets via Mom Inc. Daily

Oh, how fantastic is this little Mr. Fox? From the striped leggings to the furry tail, it’s easy to whip up your own version for Halloween, this year. Cat, of Mom Inc Daily, suggests starting with a store-bought mask and using glue, lots of glue. Find out what else you’ll need by skipping over to Mom Inc Daily.


Pac Man

Emily Morgan via The Effortless Chic

This Pac-Man costume will thrill kids of all ages! We love the pixelated fruits and sunglasses added for extra appeal. If you’re worried about having the skill set to make your own, don’t be. The hardest part of this project will be getting it off your kid at the end of Halloween night. There’s even a tutorial to make an adult-sized ghost! Find out how it’s done and what you’ll need over at The Effortless Chic.


The Day the Crayons Quit

Brittany Jepson via The House That Lars Built

The crayons may have quit on you, but Brittany from The House that Lars Built sure hasn’t. This adorable and easy-to-replicate tribute to the popular picture book is fun and perfect for a group of friends or a family. Find out what you’ll need to make it happen over at The House that Lars Built.


Medusa

Evan Long via Flickr

If you’ve got a white sheet, rubber snakes, and a wig, you’ll probably have everything you need to make your own version of this mythical Medusa costume. A beginner set of sewing skills could be handy for the toga (sheet) and a cape but the snakes are what makes this stare-worthy costume shine.


Hipster DJ

Eduard Bonnin/Stocksy United via A Subtle Revelry

It seems as though hipsters have taken over the world—why not Halloween, too? This adorable idea is super simple because you’ll only need to make the cardboard boombox. There’s even an option for adding a tape player, which, of course, is hipster approved. Bonus points for funny little mustaches! Find out more by visiting A Subtle Revelry.


The Man with the Yellow Hat

courtesy Haute Apple Pie

If there’s a little kid who hasn’t been obsessed with Curious George at some point, we haven’t met him yet. Indulge your kiddo's love of the classic literary figure and create a Man with the Yellow Hat outfit. We love this no-sew version spotted over at Haute Apple Pie because while you might need to spend time collecting the gear, you won’t be sweating over stitches at the final hour. Find out what you’ll need to make your own version here.


Bird Costume

Merilee Liddiard via MerMag

If not the colors, then the simplicity of this gorgeous bird costume from Mer Mag will have you in awe. The handmade bird legs are especially awesome. Fly over to over at Mer Mag for more info.


Vector

Small Fry Blog

This idea from Small Fry Blog has both direction and magnitude. It’s also hilarious and easy to whip up on your own. Plus, if you’ve got a minion-loving tyke at home, it’s the perfect Halloween combo. Find out what pieces make this look come together over at Small Fry Blog.


Vending Machine

Christy Palmer via Thrifty and Thriving

This is an easy, and great idea for using up all those boxes from Amazon! Just be warned— this cool costume could have other trick or treaters trying to get the candy to dispense. A Slinky, paint and a few other items are all you’ll need to make your own version of this tasty get-up. Head over to Thrifty and Thriving to get the entire tutorial.


Needle and Thread

Amy Johnson via Maker Mama 

It’s sew simple to make your own version of this clever costume. The hardest part might be finding the right lampshade to shape the spool. Wondering what else you’ll need? Head over to Maker Mama for the complete tutorial.


Dutch Doll

Sara Rivka via Creative Jewish Mom

She’ll be as darling as the Delft milkmaids themselves, with a bright and cheery costume like this one from Creative Jewish Mom. Mom Sara found everything she needed from around the house and provides the tutorial for making the crochet wig, here. If you don’t have the skills (or time) to whip up a wig of your own, consider a grabbing one from the local costume store, instead.


Simple Spider

Leslie Manlapig via Pink Stripey Socks

Leslie of Pink Stripey Socks is at it again, and this time she’s come up with a seriously simple spider costume perfect for Halloween. Inspired by the book, Scaredy-Cat Splat, this adorable outfit can be made in a single afternoon. Gather your materials, which include black stockings, yarn, and sharpie markers, and head over to Pink Stripey Socks to find out how it’s done.


Pack of Play-Doh

Melinda Beth via Melinda Beth Blog

Whether you need one costume or many, like Melinda from Melinda Beth, a can of Play-Doh is a clever and creative idea for little trick-or-treaters. We love the upcycling concept of this idea, as well as the basic material list (poster board, hot glue, spray paint, bucket lids). Get the entire tutorial over at Melinda Beth.


Bacon and Egg

Bacon and egg—the classic combo. This quick costume (about two hours from start to finish) is a fun idea for siblings! Find out how to duct-tape your way to costume bliss by watching the YouTube tutorial here.

Stylish Superhero

courtesy Brit Co

Mini fashionista by day, sweet superhero by night—your tot wants to play the hero without giving up her sense of style. This adorable DIY from Brit + Co will give her a little bit of both. While this one does require a bit of stitching, the easy-to-follow tutorial means you can handle it in one afternoon. Grab the details here.


Ninjago

Delia Randall via Delia Creates

If your kids are anything like ours then Ninjago rules. Your spinjitzu master can pick his favorite student (Lloyd, Kai, Cole?) and you can go from there. Finding all matching colors for each suit is easy, but the small touches like shoulder gear and certain weapons give each costume a unique look. Delia of Delia Creates shows us how it’s done, so hop on over for the low-down.


Llama, Llama

Merilee Liddiard via Mer Mag

We love this creative llama costume from Mer Mag. With just a few items on the supply list, the hardest part about this project might be procuring the poncho and hitching a ride to Peru! Find out what you’ll need over at Mer Mag.


Cute Clown

Classy Clutter

If your kiddo wants to run away and join the circus, indulge her fantasy by whipping up a version of this whimsical clown costume we spotted over at Classy Clutter. From the cheery colors to the fact that this DIY starts with a leotard, we think your little ringmaster will love life under the big top. Find out how to get started by clicking here.


Goldfish

Dana Hillard via Made Everyday

Here’s one that’ll stand out in a crowd of costume-adorned kiddos. Dana of Made Everyday starts with an orange t-shirt and shorts and adds felt, hot glue, some stitching to make something truly unique. You can get the details over at Made Everyday.  


Flower Pot

Bobby Bryd via Clumsy Crafter

How creative and easy is this flower pot costume? The perfect size for your toddler, he or she can even pick out the type of flowers that'll adorn the pot! Find out how to make your own over at Clumsy Crafter.


Robot

Sara Dahan via Creative Jewish Mom

You don’t usually hear “robot costume” and “easy” in the same sentence. We love this version from Creative Jewish Mom; not only is it designed for all-day wear (your kid can actually sit down!), but you don’t have to collect boxes for a year to make it happen. Head over to Creative Jewish Mom to see how it’s done.


Carrie Lindsay via Carrie Elle

Everyone's favorite elven warrior from the ‘80s is back, and we couldn’t be more thrilled. For your little Legend of Zelda fans, this adorable Link costume from Carrie Elle is the perfect fit. And, the best part? You won’t need to sew a thing! Find out what you’ll need to get started over at Carrie Elle.


The Rat Race

Kathleen Ballos via Handmade Charlotte

Parents, if you’ve ever had to commute and from the office, then you’ll appreciate this creative take on “the rat race.” It’ll take some coordinating to make it happen, but the results are guaranteed to see a few chuckles when your crew knocks on doors come Halloween night. Take a closer look over at Handmade Charlotte.


A Piece of Flair

Erin Holland via ©A Subtle Revelry

Adorning jackets, bags, shoes and just about everything else with flair has made a comeback in a big way. This adorable idea from A Subtle Revelry is super-easy to replicate (only six supplies needed!), and totally on trend. Find the tutorial over at A Subtle Revelry.


Easy Bee

Courtesy fiskars.com

For a last-minute costume that couldn’t be cuter, why not go for a buzzing bumble bee? If you have a headband and black ruffle ribbon already stored away in your house, then you’re halfway there!

Edward Scissorhands

courtesy Cara Slifka via Instructables

Belts—lots and lots of belts. That’s the key to re-creating the classic Tim Burton character. Oh, and an incredibly patient parent, too. Dressing up like the sweet and just-a-little-spooky Edward Scissorhands is gonna take some time. Want to dive in? Check out the DIY info at Instructables.

Peter Pan's Shadow

Nikki Wills via Tikkido

Instead of dressing up like Disney’s favorite flyer, why not embody his mischievous doppelgänger instead? A unique twist on a classic childhood tale, the hardest part about this cool costume is the hat. FYI: Your kiddo will totally be able to breathe, says DIY blogger mama Nicole of Tikkido.


When you become a mom, so many things change, including your place in the world. You’re suddenly faced with an entirely different perspective and whole new way of looking at pretty much everything. It’s like being handed an endless maze which is constantly changing, no matter which path you take. On top of that, you are immediately put in a “Mom” category, which carries all sorts of connotations with it, which might, or might not, apply to you.

When I had my kids, I did have some playdates where I hung out with other moms. It helped to have them around just to vent, and to learn the hundreds of things you are supposed to know when you first have a kid, but I never really felt “mom-enough.” I didn’t add sweet notes to their lunches, take pictures of them in matching outfits, or sing them to sleep. That last one was particularly unsettling as I realized I didn’t know any lullabies because clearly my parents just shut the door and told me to “go to sleep!” In this social media frenzy of the cool mom, wine mom, yoga pants mom, crafty mom, healthy chef mom, and of course, the mom who is trying really hard to look like they are not trying at all, I never really felt like I fit in.

During this time with young kids, I started going to the local gym where the owner was an incredibly intimidating strong female who would yell across the room to me in spin class “Liza! Pick it up! You out late last night or something??!!” (My name is Lisa but there were already enough Lisa’s at the gym, so it stuck—my gym name became Liza, which I embraced whole-heartedly.) This gym was full of amazing women who accepted me for who I was, and I quickly realized I was just being myself when I was there because I felt comfortable in that environment—no mom act, no trying to fit in. I thrived on being pushed to do my best and started going every day. Some days the woman next to me would plunk her Dunkin Donuts iced coffee into the bike’s water bottle cage, look at me and ask, “How are you doing Liza??” And she meant it. And other days the owner would bring me her turkey chili recipe, and invite me to Friday wine night with the ladies. I finally felt like I fit in somewhere, and just having that, made me feel better as a mom.

I realized I didn’t fit into any of these other mom groups because I wasn’t being myself around them. I was just acting the way I thought moms should act—whatever that is—I am not sure anyone really knows. I took a step back from the whole mom label that is applied the minute you pop those kids out, and just tried to be myself and to do what I enjoyed, and that was working out, something I have always considered important and enjoyable. (I know many moms who would think I was crazy.) Turns out, that was my community and I just hadn’t realized it.

So if I had one piece of advice for moms out there searching for their community, it would be—just be yourself, don’t try to keep up with anyone, and see what happens. If you feel most comfortable going to the craft store and creating amazing pieces of art, then go for it. If you feel more comfortable hiking a trail and planning your next backpacking adventure, I guarantee there is a community out there for you too. If there is one thing I have learned, it is you are not alone in your interests and needs as a mom—there is a group of people out there just like you. Be yourself, and the community will find you.


I am a mom, a film/tv editor, potato chip lover, and former New England girl turned Southern California resident. Interests include trail running, hiking, snowboarding, and photography. I have two boys who keep me young, and motivated to do well in this world.

Hosting a crew of ghosts, witches, and goblins this October? Get ready for a spooky good time with these easy, affordable Halloween decorations. Many can be made with things you already have around the house, like glass jars and construction paper, and a few of the options are perfect for crafty kids ready to help deck your soon-to-be haunted halls. Happy haunting!

Halloween Terrarium

Today's Creative Life

It's super easy to make an eerie centerpiece with twigs and rocks, glass jars and a few Halloween goodies from your fave craft store. You can use skulls and crows, or put a few mini pumpkins under the jars to turn down the scare factor. Using scrubbed-out jelly jars makes this decoration affordable, and you can put it together in less time than it takes to say hocus-pocus. Head on over to Today's Creative Life for the step-by-step instructions to make your Halloween terrarium.

Pine Cone Spiders

Fireflies Mudpies

If you live near evergreen trees, this one is for you. First, send your kids outdoors to gather up the key supply: pine cones. Add brown pipe cleaners and googly eyes, and you'll be hanging up your own web spinners in no time. Plus, check out Fireflies + Mudpies blogger Melissa's affordable tip for making webs to go along with the eight-legged creations. Click here to learn how to make these pine cone spiders.

Crow Door

Idlewife

A flock of ominous birds will descend on your door with no more than a pack of black paper and a pair of scissors. This Halloween decoration costs less than a pumpkin spice latte and, as a bonus, it's easy to put up and take down. Peek at the detailed instructions on Idlewife to make your own nest of crows.

Spirit Jugs

Jen Sedillo via Eighteen 25

Create a ghostly trail leading party guests to your front door with spooky spirit jugs. This easy project makes use of milk jugs (starting saving now or ask friends!), meaning it can be made on the cheap. Crafty kids can help make these eerie, party-perfect outdoor Halloween decorations. Find out how at Eighteen 25

Candy Corn Wreath

Jellybean Junkyard

Pick up a bag of candy corn to make a wreath that's all treats, and no tricks. It's a simple DIY project that, when hanging from your front door, will announce that the party's inside. Jellybean Junkyard can show you how.

Melted Crayon Pumpkins

Katie Freedman

Wondering what to do with broken crayon bits? Gather them up to create bright, festive pumpkins perfect for any Halloween party. Use craft pumpkins if you'd like Halloween decorations that won't decay before it's time to trick-or-treat. Follow Katie Friedman's how-to here.

Halloween Window Monster Decorations

The Ledford Life

Save your Amazon boxes and use them to make creatures of all shapes and sizes to watch over your house from every window. Artsy kids can imagine and design monsters, and you can safely cut out the scary shape with an X-Acto knife. Creep over to The Ledford Life to learn how to create these affordable Halloween monsters. 

Masking Tape Mummy

Eighteen 25

Deck your walls with a crowd of mummies for extra Halloween fun. This simple tape-and-construction paper project doubles as a fun kid craft and an affordable Halloween decoration. Eighteen 25 has the easy-peasy how-to.

Ghoulish Lanterns

Nicole via Life's a Batch

Gather up a few mason jars to create an eerie glow with spooky lanterns. You can make a handful of different creepy creatures, from Frankenstein's monster to a purple-and-black ghost. These glowing ghouls can be pulled out for Halloween parties year after year. Life's a Batch shows you how to make your own.

Twine Pumpkin Luminary

http://alishagratehouse.com/twine-pumpkin-luminary/

A glowing pumpkin luminary will add a lovely, warm touch to your Halloween party decorations. Bonus: add a few gourds and keep this harvest decoration around all the way to Thanksgiving. Round up twine, glue and a strand of Christmas lights, then skip on over to Flourish to make your own.

Door Monster

Amber Guetebier

Create a boo-tiful door monster, either inside or outside of your house. This is one Halloween decoration that you can put together with goodies from craft supplies you probably have on hand already. Amber's post tells you how to make your own fiendishly fun monster.

Halloween Bunting Flags

We're Going to Make It

If your monster tastes run more cute and cuddly than bloodthirsty and bump-in-the-night, this wall hanging will be perfect. Make your own Halloween bunting with supplies you probably have at home (think construction paper and string). Find out how over at We're Going To Make It

DIY Light Up Haunted House

The Crafty Gentleman

Shock your party guests with this awesome DIY haunted house party decoration. You'll need heavy black cardstock, battery-operated tea lights and cardboard or wood for the base. Note that this project is best for folks with Cricut machines, but it can also be created with a good pair of scissors, a craft knife and a little more time. For the step-by-step instructions to create a spooky manor of your own, visit The Crafty Gentleman.


RELATED STORIES
57 Halloween Decorations You Can Easily Make at Home\
14 Halloween Decor Ideas You Can Easily Pull Off
Target’s Spooky New Halloween Decor Is Getting Us Excited for Fall
Creepy-Cool Luminaries to Make This Halloween

It takes more than, “I think I can” to make your little believers fly; they’re also going to need a little pixie dust. But where to get it? Follow this simple step-by-step DIY pixie dust recipe and your kids will be Neverland-bound in no time.  

pixiedust-supplies

What You’ll Need

Glitter (at least two different kinds)

Mixing bowl

Spoon for mixing

Vials for holding pixie dust (available here, or at your local craft store)

Labels

Baby powder, if you plan on sprinkling your dust outside (see last step)

Step 1: Pour in the sparkles

Let your little Peter Pans or Wendys pick and pour their glitter into a medium to large-sized bowl (bigger bowl = less mess). Fine glitter works best for pixie dust, but you can toss in different grains to add dimension (and sparkle!) to your finished product. Note: Keep your glitter away from carpets or furniture; it takes some real magic to get sparkles out of fabrics.  


pixiedustbottle-step1
pixiedustbottle-step2

 Step 2: Spoon Into Vials

What vials, you ask? Amazon and Etsy sell multitudes of magical-looking tiny glass bottles (some even have attached loops to turn your vials into necklaces!) perfect for pixie dust. If this is a last-minute sort of project and you don’t have time to order in advance, look in the jewelry section of your local craft store to find small bead containers. Even better? Just look around your house: Old salt and pepper shakers work great — just dab some glue over the holes if you don’t want glitter all over everything, or tell your tiny Tinkerbell to keep her sparkle-spreading strictly outside.

pixiedustbottle-step4

Step 3: Slap a Label on It!

Once your jar is filled and closed, let your kids make a special label for it. Don’t skip this step: This is what turns a simple jar of glitter into a magical vessel of super-special fairy dust.

pixiedust-label

Step 4: Enjoy!

Let your kiddos keep their pixie dust in a special place — or make it into a necklace by twisting tiny eye screws into your bottle corks.


pixie dust label

Step 5: Want Something Flashier? 

If your spell-casters want to throw their pixie dust instead of bottling it up, simply add equal amounts of baby powder to glitter — then take it outside and toss it by the handful. Kids will love seeing their pixie dust go POOF as the glitter falls to the ground. (Note: This version doesn’t look as pretty in a bottle, so it’s best to keep it for tossing.)

pixiedust-step3


All photos: Melissa Heckscher


RELATED STORIES
12 Creative Toilet Paper Roll Crafts
15 Indoor Forts Perfect for Sticky Summer Days
16 Cardboard Box Crafts That’ll Keep the Kids Busy

diy pixie dust


Looking for a fun, inexpensive robot craft, no-batteries-required? We’ve got three! You don’t need to be a master coder or electronics guru to pull off these no-tech robots for kids of all ages. Just scroll down to build a robot. Or, beep boop, beep, beep, boop!

1. Paper Robot Glider

Former elementary school teacher and mom of two Chelsey—who blogs at Buggy and Buddy—posted a neat paper robot glider that’s super-easy and fun to make. She even included a free, printable robot template, but you can easily create your own robot design to suit your tastes.

What you’ll need:

  • A basic robot design printed on heavy card stock
  • String (we used parachute cord that was purchased from a craft store)
  • Pony beads
  • Drinking straw
  • Scotch tape
  • Markers and/or crayons

Have your mini-robotics expert color and design her robot on the paper template.

Cut out the robot design.

Cut the drinking straw into approximately one-and-a-half inch lengths, then tape the straw pieces to the back of the paper robot.

Hang the cord over a door knob, then thread both ends through the straws. Secure the ends of the cord with a pony bead so the paper robot doesn’t slide all the way through.

Hold the ends of the cord in each hand, pull the cord, then voilà! The paper robot glides up and down.

2. Button Robot Hangers

Whether your kiddo use these button robot hangers on their backpacks or as ornaments, they are cute and easy to make.

What you’ll need:

  • Assorted buttons
  • Pipe cleaners
  • Googly eyes
  • Glue

Select buttons that can serve as a robot’s head, body, arms and feet, then arranged the pieces to see what they might look like.

Thread a pipe cleaner through the button holes, starting with the head, then moving down to the body, then finishing with the robot’s feet.

Add another pipe cleaner for the robot’s arms, then thread the pipe cleaner through the button holes of the arms.

Glue on googly eyes, position your robot’s arms and legs, then your button robot is complete!

3. Robot Self Portrait

What you’ll need:

  • Perler bead kit
  • Mini-canvas
  • Paint
  • Glue

Have your robot designer create a robot self-portrait using Perler beads, then fuse the beads with an iron per the instructions provided by Perler.

Paint the mini-canvas, then glue the completed, fused robot portrait to the mini-canvas.

Display your robot designer’s robot self-portrait!

What are your favorite robot projects? Tell us in the comments below!

—Kipp Jarecke-Cheng

Pixabay

Kids are always coming up with creative ways to express themselves: it’s why they can play dress-up and make believe all day long. They also love to latch onto their favorite things, like foods or colors. Unicorns are a popular animal for kids to idolize because not only are they majestic and pretty, but they also represent fun and magic. Don’t let your kids get bored this weekend. Check out some easy DIY unicorn crafts that’ll keep them entertained all day long.

Unicorn String Art

For those who want to craft but are on a budget, making some string art is the perfect way to create something you’ll put on the wall and keep forever. Search around the house for some colorful or cute pins, then give each kid a piece of corkboard or cardboard. They can decorate the board material however they like, and then you can help them arrange the pins to create the outline of a unicorn.

Use the string around the pins to create a visible outline, then wrap around pins in random order to crisscross the string and fill in the middle. Stop whenever your kids feel their unicorn is done, and then hang the art where you can show it off. Don’t forget to let them sign their art!

Unicorn-aments

The holiday season may have just past, but that doesn’t mean you can’t still hang up ornaments. Head to the craft store and get some glue, paint, a paint brush and some magic clay. Swipe glue on the ornament and cover in glitter so it dries and becomes the mane. Decorate with eyes and a horn and you’ve got easy and quick unicorn ornaments.

Fun Unicorn Wreath

This is a great craft for kids who are a little bit older, since it involves a glue gun. Buy some fake flowers in the color scheme of your choice, then glue them to a wreath ring. Make the unicorn horn out of felt and stuffing—and maybe a little glitter—and glue it where you like. It’s easy to make a unicorn wreath, plus you can easily adjust it to match any room design.

Playful Unicorn Headband

By getting some cheap plastic headbands, fleece and ribbons, you’ll be able to don your unicorn headband in no time. Wrap fleece around the headband and secure a fleece horn with a glue gun. Glue on ribbons that are curled to any length you like to create the mane. Try to make a rainbow mane with pastel colors. If one of your kids has a birthday coming up, these would make fantastic party favors for a dreamy and magical themed birthday party.

Unicorn Cake

Who says you need a special occasion to make a cake? If you’re finding your family needing a little more unicorn in your lives, test out your baking skills with a unicorn cake. Step one: Watch lots of cake baking shows to get inspired. Step two: Go out and get your cake decorating supplies. Step three: Bake and design the unicorn cake of your dreams, then eat it and enjoy! Who can say no to a cute cake?

Unicorn Dress Up

Sometimes you can find a craft that lets everyone jump in together, and dressing up as a unicorn is definitely one of them. Check out an easy DIY dress-up guide so you can get the kids together and have everyone make their own costumes. Soon, you’ll all be prancing around the house like the beautiful, majestic beings you are!

Make Your Own Unicorn Plushie

Kids and stuffed animals go together like peanut butter and jelly. There’s no end to the games they can create with them, and the stuffed animals will last through their entire childhood. Before beginning, take a second to watch a unicorn plushie tutorial. Talk with your kids about what size they want their unicorn to be and let them choose the colors and fabrics. The personalization of this craft is sure to please any child.

Unicorn Utensils

What kid doesn’t spend time pretending to cook with plastic pots and pans? Creating a make-believe world in their own kitchen is something lots of kids do, so why not bring the fun into your real kitchen? Get the right supplies and a wooden utensil set for each kid and create unicorn utensils in just minutes. Because they’re made of wood, they’ll last for a long time and can even be used for make-believe since they won’t be sharp enough to hurt anyone.

Personalized Unicorn Necklace

Making your own jewelry is a lot easier than you might think. When you’re making jewelry with kids, it can actually be a super fun activity to do together. You can print and shrink unicorn necklace designs and create as many as you like. Let your kids make some for themselves or their friends. They’ll quickly be wearing their own jewelry and showing it off to everyone they know.

Unicorn Nail Art

Decorate an easily-cleaned place like the kitchen table to make it feel like a private spa. Invite your kids to sit down and then let them have fun pampering themselves by painting unicorn designs on their nails. Get nail art pens and they’ll have a great time drawing horns, hoofs and unicorn profiles on their fingertips. When they’re done, have them sit back and watch their favorite movie while their nails dry.

It’s no secret that kids love to have fun, and when it comes to kids who love unicorns, they want their favorite animal to be a big part of that fun. Sit down with your kids this weekend and have them do some unicorn crafts to keep them happy and having fun throughout the day. Whether they’re making headbands or painting their nails, if they’re creating something that has to do with unicorns, everyone’s going to have a blast.

Jennifer Landis is a mom, wife, freelance writer, and blogger. She enjoys long naps on the couch, sneaking spoonfuls of peanut butter when her kid's not looking, and binge watching Doctor Who while her kid's asleep.  She really does like her kid, though, she promises. Find her on Twitter @JenniferELandis.

Thick layered paint, rich blended colors, heavy brush strokes: we’re not talking about your two-year-old’s latest creation. We’re paying homage to one of the greatest artists in history, Vincent van Gogh, and offering your itty-bitty impressionists some ideas to recreate his masterpiece, The Starry Night, in style. So no matter your kiddos age, read on for ways to make sure this work really leaves an impression.

Start with the Art

Before you dive into any of these projects, learn about the man behind the painting, van Gogh himself, through books. For the toddler crowd, we suggest In the Garden with Van Gogh, a chunky board book with bright pictures and playful rhymes. Older kids will love Camille and the Sunflowers, based on the story of Camille, who befriends Van Gogh when he moves into town. Another winner is Katie and the Starry Night. Not only is it a fun read, but it’s a great intro to the painting they’ll be working with. Now you’ve got the story, let the mess-terpiece begin!

photo: Allison Sutcliffe 

For the Tot Lot
When it comes to this age group, two words are all you need: Finger. Paints. Because let’s be honest, there’s no way to go wrong with this messy medium. And lucky for your aspiring artist, finger paints lend themselves oddly well to van Gogh’s dynamic, thick brushstroke style. Work with your little to find colors in her finger paint collection that match the ones in Starry Night. Then let her swish and swirl out sweeping clouds, windy gusts and twinkling stars until her heart’s content. Or use your paint choices to try this intriguing layered finger paint project from The Imagination Tree. It adds another dimension to the basic dip and swirl technique with framable results. Look out art corner, here comes another masterpiece!

Tip: To keep the moon and stars from becoming brown globs, try working on multiple versions at once to keep the little hands busy while you’re letting the layers dry just a bit. 

photo: In the Playroom

For Preschool Painters

Sponge painting is always a blast for preschoolers. And this Starry Night project developed by Anna at In the Playroom is no exception. To make this mess-terpiece, couple your sponge-worthy art supplies (think: rollers and cut up sponges) with the free printable on the blog and then get creative with colors and textures, just like van Gogh!

Another easy favorite for this age group is crayon resist painting. Pairing these two classics leads to a lovely work of art, worthy of the starring spot on your fridge. It’s probably best to have mom or dad use a crayon to copy out some swirls, treetops and the glowing moon from the original painting onto paper. Or let your kidlet try her hand drawing out some of these key elements herself. Then break out the watercolors, brushes and bowl because it’s time to make this painting come to life. Using the original as a template, brush the vibrant watercolors over the crayon elements for an effect that’s almost as stunning as Van Gogh’s.

photo: Sawyer Pangborn via flickr

For Grade School Artists

Take your cue from Melissa and Doug and create your own sticker mosaic Starry Night with your school-aged munchkin. Start by having your petite painter draw out his own version of this stellar painting. Nothing too fancy. A focus on the simple shapes in the sky and that magnificent tree that really catches your eye in the foreground will do just fine. Then use the pre-cut foam stickers you can find at your local craft store to patch together the colorful patters van Gogh’s pronounced brushstrokes make in the glittery heavens. Voila!

When 8 1/2 x 11 is just too small, go big on the sidewalk. Use sidewalk chalk to blend or create own sidewalk chalk paint like this one from Mommy’s Kitchen. Use white chalk to sketch some of the basic outlines of the painting’s composition: tree, stars, moon, steeple, etc. Work together to mix up the colors you’ll need for the painting. Look closely: there’s more than one shade of yellow, and shadows are more green than black.

Do you plan to try one of these crafts? Tell us how it goes in a comment. 

—Allison Sutcliffe