The Menorasaurus is our favorite DIY menorah idea!

Want to jazz up your Hanukkah with a homemade menorah that your kids will love? It’s easy! The secret ingredient to your hip homemade Chanukkiah is the 3/8″ hex nut—these little metal bolts are perfect for holding Hanukkah candles. Basically, if you’ve got something that can hold nine hex nuts, you’ve got yourself a menorah. Want to get started? We’ve got three easy tutorials for DIY menorahs, and when you’re done, be sure to check out our other favorite Hannukah crafts for kids.

Editor’s Note: Be sure to place all menorahs on a level, non-flammable surface away from drapes, decorations, and fabrics. Keep them out of reach of children, and never leave a lit menorah unattended. To be extra careful, we recommend menorahs not made out of metal be coated with a fire-retardant spray (like this one) before use to reduce the risk of fire.

The Menorah of Misfit Toys

DIY menorah for kids

If your junk drawer is anything like ours, it's probably full of left-behind kid stuff you wish you had the heart to throw away. Don't toss those treasures; use them for this menorah that will make your kids love their misfit toys all over again.

What you'll need:
-Nine small toys or figurines (think Barbie heads, Happy Meal toys, lone blocks, etc.)
-Nine hex nuts
-Wooden plank (or a few simple wooden blocks glued together to make a platform)
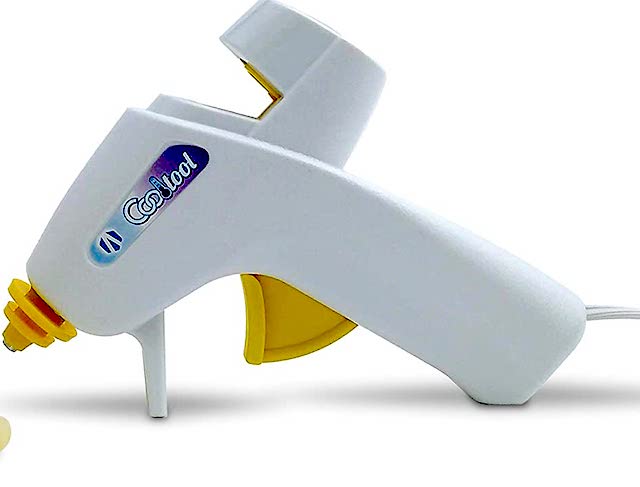
-Hot glue gun

What you'll do:
Have your kids dig through their toy boxes (and your junk drawers) and pick out nine small toys to use as candle holders. Be sure they find one that's a little taller that can serve as the shamash. You can also place the shamash toy onto a block to set it higher than the others, as shown above.

Glue hex nuts onto the top of all the toys, and be sure to cut off any hair or string that poses a fire risk when candles are lit. Let your kids decide which toy will go where and then glue them all onto the platform.

Related: All-New Hanukkah Books Your Littles Will Love

The Menorasaurus

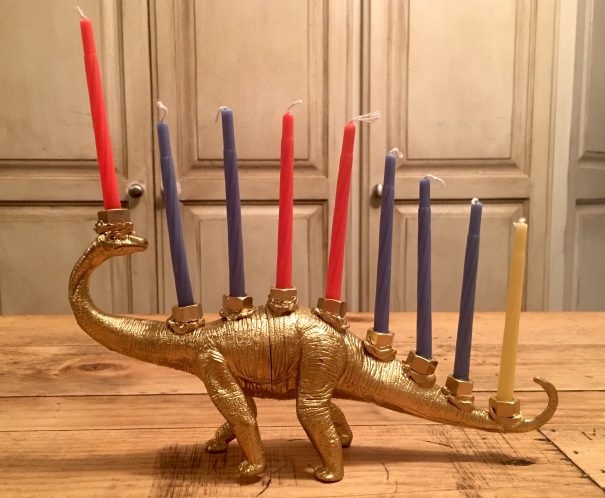
Go ahead: Type it into Pinterest and you'll see the whole kingdom of prehistoric menorahs for sale. Why not make your own? It's super-easy, and takes less than an hour to make!

Good to know: This menorah doesn't leave much for the kids to do (hot glue guns and spray paint aren't exactly child-friendly), but your kiddos will love seeing their dinosaur transformed into an instant Hanukkah heirloom.

What you'll need:
- Plastic dinosaur
- Nine hex nuts
- Metallic gold spray paint
- Clay (for leveling the hex nuts)
- Hot glue gun

What you'll do:
Let your kids pick out their dinosaur (Hello, Dollar Store!).

Using a hot glue gun, glue eight hex nuts onto the back of the dinosaur and another atop the head for the shamash. To make sure all the candles will stick up straight, squish a little clay onto the bottom of the hex nuts before gluing them onto the dinosaur (it helps to also dab some glue onto the bottom of the hex nut themselves so they really stick into the clay)

Spray the whole thing with metallic gold spray paint and you're done!


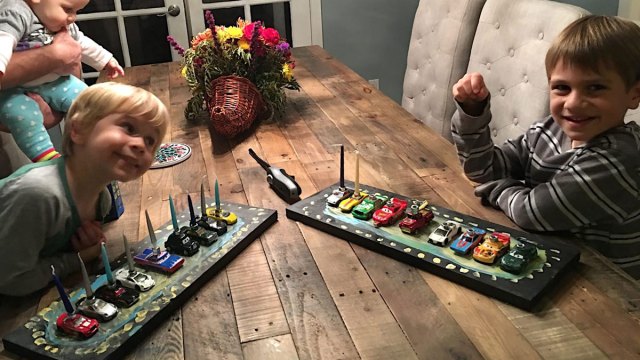
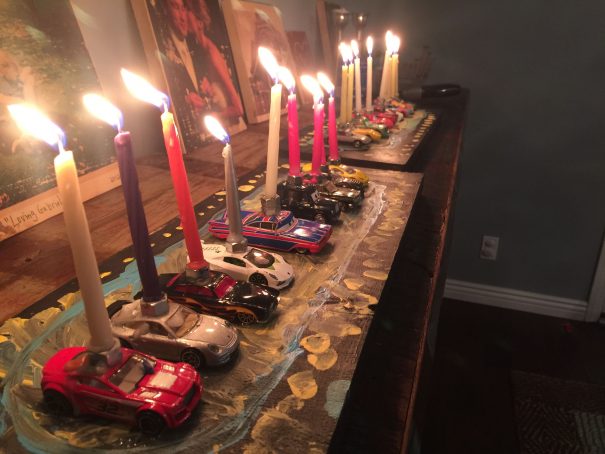
Hot Lights (or, the Hot Wheels Menorah)

What you'll need:
-Nine Hot Wheels cars (with flat tops)
-Nine hex nuts (or 10 if you want to raise the shamash candle a little higher)
-Wooden plank
-Paint
-Hot glue gun

What you'll do:
Have your kids pick out nine cars and paint or decorate a plank of wood however they wish. While the paint is drying, glue the hex nuts atop the cars as shown. For the shamash (middle) candle, use a taller car or glue two hex nuts atop so it stands higher than the others.

Let your young assistants help you arrange the cars in whatever order they want. Then, glue the cars onto the plank.


Gingerbread houses. Kids love them, but unless you’re a master confectioner, sometimes this “delightful” holiday tradition can lead to frustration. This is why we’ve found game-changing gingerbread house ideas to make your task an easy one. From buying a gingerbread house kit to making a LEGO gingerbread house, these tips and tricks will help you make a gingerbread house. Keep reading to learn more. 

1. Design It First

Phillip Goldsberry via Unsplash

Any architect will tell you it’s a good idea to first lay out the design of your house. Kids can decide what candy they want to use, and where, which will help prevent running short on supplies mid-project. Psst! This is a great way to indulge in your Pinterest habit!

2. Use Graham Crackers or Cookies in Place of Gingerbread

using graham crackers instead of gingerbread is a good gingerbread house idea
Nathan Dumlao via Unsplash

We know, you're a traditionalist. But trust us, using graham crackers is a lot less expensive, and it's a great way to practice your skills before you move on to the "real deal." 

3. Make Something Else

Sommy Rhee

You don't have to stick with the house theme: get creative and consider something like a train or a plane, a grocery store or firehouse or even furniture! Gingerbread couch, anyone? 

4. Use Up Other Supplies

Randalyn Hill via Unsplash

If you are still trying to get rid of the Halloween stash, this is as good as time as any. Twizzlers, Tootsie Rolls, Banana Laffy Taffy, Twix (wait, you have Twix left?) and other trick-or-treat classics all work well. Clean out your cupboards and use up pretzels, marshmallows, cinnamon sticks, cereal and any other food item you think could fit the bill. 

Insider Tip: Pull out the peanut M&Ms and the Mike & Ikes in order to make a string of lights or two. Hungry Happenings will show you how to make it happen.

5. Buy a Kit

This might not seem like a big "hack" to you, but if you've ever been crazy enough to try to make gingerbread walls from scratch, you know you wish someone would have just told you to get the kit first. You don't have to stick to the kit-provided decor (see above re: Halloween candy), but having some basics and step-by-step instructions never hurt anyone. For something a little different this year, check out this amazing Oreo cookie house kit

Related: 17 Amazing Gingerbread Houses You Have to See to Believe

6. Use Hot Glue Instead of Icing

Amazon

You will need that royal icing to make snowy rooftops and general designs, but relying on it to hold everything together can create a little mayhem. Try using a hot glue gun to make the key elements stick. We like this low-temp glue gun that is great for kids. As an added bonus, it dries way faster than the royal icing.

Still need convincing? Head over to My Little Poppies for details.

7. Use Something for the Structure

iStock

Here's a secret you might not realize: some of those elaborate gingerbread palaces have cardboard or styrofoam supports inside! Use empty cereal or tissue boxes and the hot glue trick above to ensure your base is the strongest it can be.

8. Use Fruit Roll-Ups for Stained Glass Windows

a good gingerbread house idea is to use fruit roll-ups for windows
Walmart

This is a great trick for giving a stained-glass window effect, and it's easy, too! Just cut the roll-ups to slightly larger than the window and use icing-glue or hot glue to hold them in place (before assembling). This will also hide that interior "structure" box we mentioned above. 

We love these tie-dye style Fruit Roll-Ups for that easy stained glass look! 

9. Be a Minimalist

Ksenia Yakovleva via Unsplash

Yes, you can cover your creations in all manner of goodies and gumdrops. But sometimes simple white piping and a few pieces of well-placed candy give the perfect "snow-covered cottage" look. 

10. Go Small

tiny gingerbread houses
Erica Marsland Huynh via Unsplash

No one said a gingerbread house has to be huge to be amazing. A smaller house requires fewer supplies and is easier to hold together, which also means less frustration. You can make multiple small houses out of cookie bases, and line them up on a sideboard in the middle of a table for a festive centerpiece. 

11. Use Ice Cream Cones As Trees

using ice cream cones for trees is a great gingerbread house idea
Mae Mu via Unsplash

File this under “why didn’t we think of that?” Turn a classic sugar cone point side up, coat it in green frosting, and even dust it with powdered sugar “snow” for a woodsy outdoor scene.

12. Have your kids make a LEGO gingerbread house

bricks
Kelly Sikkema via Unsplash

If you don't want the sticky mess that a gingerbread house sometimes makes, why not make one out of LEGO? Using bricks you already have at home, use this how-to video from YouTube to make a gingerbread house that won't go bad. 

Related: DIY Gingerbread Playdough

13. Personalize your house with a photo.

Kate Loweth

Print out a mini-snap of your kids and make it so they are peeking out the window of your gingerbread house. Adds a fun personalized element and is super easy to execute. 

14. Be Patient

little girl using gingerbread house ideas
Allison Sutcliffe

You can build your house in a day, but you won't be able to do it in 20 minutes. Make sure you allow for the time the glued pieces need to try: to each other and/or to the base structure. With royal icing, you need at least 30 minutes to be sure the glue has really set. Going too fast results in sliding sides and cracked walls, especially when you start adding the weight of the candy decorations too soon. But hopefully, with the hacks above, you'll find a workaround for any of your common gingerbread house-making problems. 


Looking for good New Year’s party ideas? Ring in 2023 with a festive craft for kids that’s as easy as it is fun. Using basic art supplies (and leftover holiday trimmings), you can help your little party people pop it like it’s hot when it’s time for the 10…9…8…! Find out exactly what you’ll need to create confetti poppers for kids at home, and then plan your menu from our favorite easy appetizers

Supplies for confetti popper for kids

confetti poppers for kids

Paper Rolls (toilet or towel, whichever you have on hand)

Construction Paper and/or wrapping paper in festive colors

Balloons

Ribbon (regular and curling)

Markers

Scissors

Hole Punch (if you don’t have one handy, just cut up the paper)

Scotch Tape

Hot Glue or Elmer’s Glue

Jewels (optional)

Related: 16 Easy Ideas to Help You Celebrate New Year’s Eve at Home

Step One: Create Confetti

confetti poppers for kids

Using the hole punch (or scissors) create paper confetti using construction paper and leftover holiday wrapping paper in festive colors.


Step Two: Decorate the Popper

Using markers, have your handy helpers decorate their roll. Little doodlers can go festive with stars and fireworks, write fun New Year’s Eve-themed words, or even draw pictures. It's all about creativity!

Related: 22 Super-Easy Appetizers That Just Look Fancy

Step Three: Cut the Balloon

Tie a knot in the balloon, in the same spot you would if it was full of air. Then, using the scissors, carefully cut off the top of the balloon. Note: If you cut the balloon too close to the knot, there’s won’t be enough at the bottom to lay over the end of the paper roll.

Step Four: Create the Popper

Place the cut balloon on one end of the decorated roll and secure, using the tape. Cut lengths of regular ribbon, and using either hot glue or Elmer’s glue (if using Elmer’s, you’ll have to wait until it’s dry to continue) line the popper where the tape and balloon meet the roll. Once this is complete, cut pieces of curling ribbon and tie them around the knot of the balloon.

Optional Step: Fasten jewels to the thick piece of ribbon using glue. Hot or regular glue will do the trick.

Related: How to Make a Vision Board with Kids

Step Five: Pop the Confetti Poppers!

confetti poppers for kids

After all the crafty work, let your party people do some popping. Fill the open end of the tube with the confetti, pull down on the balloon knot and release! The confetti will explode everywhere, so be prepared for giggles. You can refill over and over for more New Year’s Eve fun.


Grab a stack of origami paper and get ready to do some folding, because we’ve discovered your next crafting obsession. With a few cuts and folds, you can create owls, flowers, cranes and frogs—these paper crafts will blow your mind. Keep reading to get the scoop on simple origami for kids that is easy enough for beginners but cool enough to impress your friends.

Origami Heart Garland

simple origami for kids, heart garland origami
Mama.Papa.Bubba.

This Origami heart garland from Mama.Papa.Bubba. is an adorable way to decorate your house or just spread some love! And it's such a fun craft to make.

Origami Flowers

origami flowers
Dream A Little Bigger

These Origami flowers from Dream A Little Bigger are a beautiful and fun project. If you want, you can follow the instructions to connect the flowers into a Kusudama ball.

Origami Bookmarks

simple origami for kids are origami bookmarks
Easy Peasy and Fun

If you’ve got a budding bookworm in your family, you’ve got to make this adorable project from Easy Peasy and Fun. There’s lots of room for creativity with these since you can add eyes, teeth, horns...the sky’s the limit.

Origami Bracelets

Origami bracelets are simple origami for kids
Paper Kawaii

File this under “coolest idea ever”: origami you can wear! These modular bracelets from Paper Kawaii are so much fun to make and can be made in any color combination or size your little ones desire.

Origami Frogs

It’s Always Autumn

Take inspiration from It’s Always Autumn to make a batch of colorful frogs. Once you’ve made them, you can get a competition going to see who can make them fly the furthest.

Origami Pencil Holders

Origami pencil holders are simple origami for kids
Gathering Beauty

These pencil holders from Gathering Beauty are a perfect project for origami newbies. They’re super easy to put together with a few folds and a dab or two of glue.

Origami Teddy Bear

Christal Yuen

We can hardly bear how cute this origami craft is, and it’s easy to make too. Kids will get to finish off their masterpiece by drawing on eyes and a mouth.

Origami Cootie Catcher

Easy Peasy and Fun

Cootie catchers just got way cooler, thanks to this awesome craft from Easy Peasy and Fun. If you made these yourself as a kid, it’ll be fun to pass on the tradition on to your kids.

Origami Faces

Pink Stripey Socks

How cute are these origami faces from Pink Stripey Socks? Kids will love putting them together and customizing each one with colorful hair, jewelry and freckles.

Origami Ninja Start

What Do We Do All Day?

This might be our favorite simple origami for kids. We’re obsessed with these transforming ninja stars from What Do We Do All Day?, and chances are your kids will feel the same way. You’ll first make eight parallelograms into a wheel, then push and pull on the sides to turn it into a star.

Origami School Bus

Moms & Crafters

You’ll have the perfect new prop for your “Wheels on the Bus” sing-alongs thanks to this DIY from Moms & Crafters. It’s super easy for beginners, and kids can decorate it with markers, buttons or whatever else you have on hand.

Origami Mermaid

This origami mermaid is simple origami for kids
Pink Stripey Socks

If your kids are fans of The Little Mermaid, they’ll have a blast making this adorable origami from Pink Stripey Socks. Pop the movie on in the background while you make them, and you’ve got a great afternoon in store.

—Taylor Clifton & Susie Foresman


RELATED STORIES:

20 Perfect Paper Crafts for Kids

Mother’s Day Paper Crafts for Kids

Easter Paper Crafts for Kids

5 Super Simple Paper Bag Crafts to Bust Out Today

Social distancing is good for our health, but not getting as many hugs is hard on everyone! Whether your loved ones live across the country or across the street, this easy card will brighten someone’s day. Read on for the simple tutorial.

What you’ll need:


White card stock paper

Construction paper, various colors

Printer to print picture*

Glue or tape

Markers

Scissors

*Don’t have a printer — or want a more traditional hug card? Check out this adorable and simple “Hug In An Envelope” project from MummyDeals.com

Step 1: Trace those hugging arms

Have your kids put both hands (and as much of the arms as can fit) onto a piece of colored construction paper. Trace, then cut out along the lines.

Tip: Want to make a few cards at once? Just stack a few sheets together and cut them all simultaneously.


Step 2: Strike a pose… then cut it out 

Get those adorable huggers against a wall and tell them to "Say cheese!" with great, big, outstretched arms. Then, print out your photo and cut out your little person's picture.


Step 3: Glue picture onto the card

Fold a piece of card stock paper in half to make an instant-card. Then, glue your child's picture onto the inside so that your kiddo's outstretched arms fit onto the page (if one or both arms goes over the edge of the paper a little, it's OK to cut off the overhang — you'll be glueing paper arms on top in the next step anyway).

Note: You could end the project here and you’ve got a pretty awesome card to personalize and send to the grandparents. But if you want something that gets you one step closer to a real, live hug, move onto the next step… 

Step 4: Give your card some arms

Glue your child's traced arms onto the inside of your card so that they cover the arms on your child’s picture. Then, wherever the arms reach the paper's edge, fold inward so that they stay inside when the card is closed.


Step 5: Get ready for some serious “Awwwwws.” 

Have your young scribes decorate the front of the card and write a fitting note to go with their hug. Then, find an oversized envelope that will hold your custom-made greeting and send it to anyone who needs an instant pick-me-up.


— All photos and copy by Melissa Heckscher

RELATED STORIES 

Ways to Connect with the Grandparents from a Distance 

A Letter to Our Teachers: Thank You for Keeping Us Going

Random Acts of Kindness for Kids & Their Grown-Ups 


Ah, the holidays! It’s time to get into the mood, and this year, instead of buying bags upon bags of ready-made holiday décor, why not let the kids DIY it? That’s right—it’s time to spread some cheer with crafts for kids, and these holiday garlands are the perfect way to get started! Scroll down to see them all.

Woven Paper Stars

My Poppet

Looking to get rid of all those old magazines lying around? Then, this woven star garland from My Poppet is just the ticket. Stunning, and not to hard to do, this one can be left up after the holiday season! Click here to see what else you'll need to get started. 

Printable Banner Garland

Courtesy Brit Co

Do you have a printer? Do you have string, tape and scissors? Then you have what it takes to make this printable banner garland from Brit + Co. They provide the template, all you have to do is click here for the tutorial

Sparkly with Straws

Projects with Kids

Give your holiday décor that special sparkle with this completely creative DIY garland. Seriously. The glitz and glam that this craft gives will light up your home—minus the actual lights. Learn how to make this Christmas craft from Projects with Kids.

Coffee Filter Festivities

Hands On As We Grow

Coffee filters aren’t just for your morning cup of "wake me up, please." No way. They’re also a super science supply and more than a little bit artsy. Check out how Hands On As We Grow turns regular coffee filters into a gorgeous garland.

Santa Stars

Red Ted Art

Okay, okay, we all already know that Santa is kind of the star of the show when it comes to Christmas. Well, this artsy activity literally makes Santa into a star. A star shape that is. Get the full garland how-to from Red Ted Art.

Happy Herbs

The Sweetest Occasion

Oh, sweet smelling and pretty? Yes, please! These mini rosemary wreaths from The Sweetest Occasion pull double duty. Not only do they string together into a rad little garland, but they also give your home a fresh holiday scent too.

Snowy String

Art Bar Blog

You’ve seen them all over Pinterest. They’re 3D paper snowflakes, and they sorta look like you need Martha Stewart-level skills to make them. At least, to make them in a way that you’d actually want to display. Well, don’t fear—a totally easy, kid-friendly version is here. Check out Art Bar Blog’s tutorial for a full how-to.

Pieced Together

Raising Whasians

You have no less than a zillion puzzle pieces floating around your playroom. And none of them go to the same puzzle. Recycle and reuse them, turning those random pieces into this adorable garland from Raising Whasians.

Bright Lights

Stubbornly Crafty

When it comes to twinkle lights, sometimes the real deal just won’t do. You have too much plugged into the outlet already, you don’t want your tot anywhere near a tangle of wires, or you just want to save a few dollars on electricity costs. Whatever the reason is, you can still hang light—the faux kind. This paper light Christmas garland from Stubbornly Crafty is bold, bright and fun to make.

Classic Creation

Mama Papa Bubba

Go old school this holiday season and try out this classic cranberry and popcorn garland. This fab foodie fun project, from Mama Papa Bubba, may not be anything that the family should eat. But, after the holiday fun is over, you can dismantle the cran-corn mantle decorator and feed it to the birds.

Felt Candy Fun

Growing Up Gabel

Are your crafting skills totally Pinteresting or Insta-worthy? If so, this is for you. Help your crafty kid create this absolutely adorable felt candy garland from Growing Up Gabel.

Picture Perfect

Cupcakes and Cutlery

How many pics of the kids do you take? Um, probably plenty. Instead of keeping them on your phone or storing them in some cloud somewhere, print them out and create this festive holiday garland from Cupcakes and Cutlery.

Chip Off the Color Block

A Girls and a Glue Gun

The stack of paint chips that the kids stashed in your purse at the home improvement store doesn't have to end up in the trash. No way. Turn them into this cute craft from A Girl and a Glue Gun.

Trim the Tree

It’s Always Autumn

If you have felt and glue, you have the makings of this adorable garland from It’s Always Autumn. The kids can get as creative as they want, crafting trees with stars, polka dots, hearts, stripes or anything else they can dream up.

Gingerbread Cuties

What Can We Do With Paper and Glue

These gingerbread people don’t go in the oven, and they have no calories. How could that be? They’re purely paper! Your little artist can decorate their gingerbread people with sweet smiles, pretty bows, and cute clothes.  Get the full how-to from What Can We Do With Paper and Glue.

Star of the Show

MerMag

This glowing garland by Mer Mag uses LED lights, cardboard, and Perler beads to create colorful décor that you’ll definitely want to leave up through the New Year. Now that’s a bright idea! Find the materials and how-to over at Julep.


DIY Lyric Garland

Squirrelly Minds

This next garland from Squirrelly Minds has us ready to get crafty. Pick out your favorite song lyrics that capture the magic of the holiday season, and you're halfway to having a personalized garland to give as gifts or to decorate your home. Check out all the details, including what you'll need, here.


RELATED STORIES
11 Holiday Paper Crafts You Can Do This Afternoon
22 Handmade Christmas Ornaments Anyone Can Make
20 DIY Wreaths to Bring Cheer This Holiday Season


Photo: Lindsey Rowe Parker

Have you ever felt the need for a wiggle, stomp, or squeeze? Wanted to zoom around the room, or have you seen a friend that loves to spin and twirl? These actions are your body looking for sensory input!

We all know the 5 senses: touch, sight, hearing, smell, and taste. Did you know there are 3 more? Vestibular, Proprioception, and Interoception.

These sound like challenging concepts, but actually, you feel them every day! Vestibular is balance and movement. Think of the feeling you get when you spin in a circle. Proprioception is awareness of where your body is in space, wave your hands around in the air or give yourself a big bear hug squeeze. And Interoception is your feelings inside your body, like hunger, thirst, or having to use the restroom!

October is Sensory Awareness Month, and 1 in 6 children struggles daily with sensory processing challenges. You probably know one or two! Maybe that is even you? Sensory processing refers to the mechanisms of how we feel. It is how we use what we sense to make sense of the world around us through our 8 senses.

Picture books are a great way to introduce concepts to kids and adults alike, to make them feel seen, and create empathy for those with different lived experiences!

Here are 10+ books about sensory differences to add to your inclusive library or classroom!  

Wiggles, Stomps, and Squeezes Calm my Jitters Down by neurodivergent author Lindsey Rowe Parker’s and autistic illustrator Rebecca Burgess. The vibration when she runs, the tap-tap-tap of her spoon on the table at mealtime, the trickle of cool water running over her hands—these are the things that calm her jitters down. The book is also available in Spanish, entitled Meneos, Pistones, Y Apretones Para Calmar Mi Cosquilleo.

Too Sticky! Sensory Issues with Autism: Holly loves doing experiments and learning new things in science class! But when she finds out the next experiment is making slime, she’s worried. Slime is made with glue, and glue is sticky. Holly has sensory issues because of her autism and doesn’t like anything sticky! With help from family and her teacher, Holly receives the accommodations and encouragement she needs to give slime a try. By Jen Malia, Illustrated by Joanne Lew-Vriethoff.

Rosalee The Seeker: Rosalee is a LITTLE sensory seeker with a BIG spirit, a BIG imagination, and an even BIGGER heart… and this is her story. Written & illustrated by Nicole Filippone.

Alexander the Avoider: Written to explain SPD from a child’s perspective… to validate and empower them… to give them words to explain their needs… and to help adults better understand and support the children in their lives who struggle because of their SPD. Written & illustrated by Nicole Filippone.

Come Meet Drayden: Drayden’s siblings will be sharing what a typical day with Drayden is like. Drayden has Autism and is completely awesome! A book celebrating diversity & inclusion. By Dana Young-Askew and illustrated by Cameron Wilson.  

Come On Calm: A whimsical children’s book encouraging readers of all abilities to self-regulate through sensory and breathing tasks. From author Kelsey Brown and illustrator Joseph Wrightson.

Sensory Seeking Sebastian: Sensory Seeking Sebastian is a book that empowers sensory seekers with strategies that help with self-regulation. This book is perfect for families who want to equip their sensory seeker to navigate the challenges of ADHD, Autism, and SPD. By Christia DeShields and illustrated by Marissa Nelson.

When Things Get Too Loud: When Things Get Too Loud is a story about sensory overload, how it feels, what can trigger it, and what may help. The Feel-O-Meter provides the child and parents with a visual guide through emotions and the book comes with ideas to cope with overwhelming situations. Written by Anne Alcott.

Juan Has the Jitters: Juan claps his hands to get his Jitters out. They make his tummy swoosh and swirl. His Jitters happen when there are too many people, too much noise, or too many changes to his day. Juan doesn’t like surprises. By Aneta Cruz, illustrated by Miki Yamamo

My Whirling, Twirling Motor: Charlie feels like he has a whirling, twirling motor running inside him all the time, and sometimes he just can’t settle. When his mom wants to talk to him, he figures he’s in trouble…but she has a surprise for him instead! By Merriam Sarcia Saunders, Illustrated by Tammie Lyon.

This Beach Is Loud!: Going to the beach is exciting. But it can also be busy. And loud. Sand can feel hot or itchy or sticky…and it gets everywhere! Written and Illustrated by Samantha Cotterill.

STAR Institute Sensory Stories *digital format: Five real-life stories from the STAR Institute highlighting the incredible importance of sensory integration and processing for health and well-being. By Virginia Spielmann, illustrated by Jacinta Read.

  How can you participate in Sensory Awareness Month? Easy!

  1. Add inclusive books like the ones on this list to your library, share with your school, or gift them to a local organization.
  2. Share #sensorystories with your social media followers, or add your voice to the conversation of why sharing these stories is important. Share books that you love that we missed!
  3. Follow neurodivergent, autistic, and other advocates that have the lived experience of sensory differences, and learn from them.
  4. Learn how to provide accommodations and support for children and adults with sensory differences through organizations like the STAR Institute: Sensory Processing.
  5. Hug an OT! Thank your educators, therapists, and advocates that are actively seeking to make spaces and experiences more friendly to those with sensory differences.

**10+ books just not enough for you? Check out 100ish Books on Autism and Neurodiversity


This post originally appeared on Wiggles, Stomps and Squeezes Blog.
Lindsey Rowe Parker
Tinybeans Voices Contributor

Lindsey Rowe Parker is a mom of sensory kids, embracing the next phase of parenting while learning to navigate & advocate for her autistic daughter.  With an adult diagnosis of ADHD and a deeper understanding of her own sensory experiences, she is learning all she can from neurodivergent voices.

This Halloween, forget store-bought decorations. Instead, get crafty with the kids and make seasonally inspired artwork featuring fall’s favorite gourd. From smiling jack-o-lantern sun catchers to pumpkin crafts for toddlers, these pumpkin crafts for kids are the perfect way to get your home ready for All Hallows Eve.

bargain-briana-pumpkin-puzzle
photo: Bargain Briana

Puzzled Pumpkin
Put all those puzzles with missing pieces to good use. This pumpkin shaped decoration is easy enough for crafters of any age to assemble. Check out the how-to over at Bargain Briana.

glue-sticks-gum-drops-beaded-pumpkin
photo: Glue Sticks & Gum Drops

Bibbity, Bobbity, Beads! 
Pipe cleaners and pony beads are all you’ll need to create this autumn craft. Great for exercising fine motor skills, check out the step-by-step instructions over at Glue Sticks & Gum Drops.

crafts-on-sea-stained-glass-pumpkin
photo: Crafts on Sea

Pumpkin in the Sun
There’s no need to wait until nightfall to watch this jack-o-lantern glow. Made to look like stained glass, you’ll find the how-to at Crafts on Sea.

mom-to-2-posh-lil-divas-pasta-pumpkin
photo: Mom to 2 Posh Lil Divas

Oodles of Noodles
Mom to 2 Posh Lil Divas added food coloring to pasta pinwheels and macaroni elbows, transforming the classic crafting medium in the materials her girls needed to make pasta pumpkins. Find out how to color your own pasta here.

pumpkin-apple-stamps
photo: Frugal Mom Eh!

Squash Stamps
Using apples, another favorite fall produce, this easy art project from Frugal Mom Eh! definitely gets our stamp of approval. Perfect for making classic pumpkins, you can add faces to create jack-o-lanterns!

the-simple-parent-pumpkin-paper-plate
photo: The Simple Parent

Classic Plate Pumpkin
No scissors or glue means minimal cleanup for this super easy pumpkin project from The Simple Parent. Great for crafters of all ages, find all the materials you’ll need here.

this-girls-life-popsicle-stick-pumpkin
photo: This Girl’s Life Blog

Stick It to ‘Em
This festive magnet doubles as festive refrigerator decor. Easy to make, the kids will love using it display all their fall artwork. Part of a set that includes a wickedly cute witch and adorable scarecrow, check out the how-to at This Girl’s Life Blog.

buggy-and-buddy-toilet-paper-roll-pumpkins
photo: Buggy and Buddy

Green Pumpkins
This great upcycled craft from Buggy and Buddy puts empty toilet paper rolls to good use. Filled with stickers or sweet treats, they also double as seasonal table decor.

Glittery-Halloween-Pumpkin-Jars (2)
photo: Life is a Lullaby

Glittery Gourds
We love how Life is a Lullaby transformed tiny mason jars into whimsical, shimmering jack-o-lanterns that double as candy holders and decor. The kids will love crafting their own too\thy grins.  Find the how-to and materials here.

the-benson-street-pumpkin-magnets
photo: The Benson Street

Marvelous Magnets
Emily at The Benson Street knows that the refrigerator isn’t the only place to display magnets. These adorable pumpkins and jack-o-lanterns add a festive flair to any magnetic service. Check out the how-to here.

Which craft will you and your little pumpkins make this year? Share with us in the comments. 

— Lauren Hill


Uncertainty. Will the kids actually go back to school? Once they are back, will they be able to stay in school? What will the flu season look like? Will working from home become our new normal? 

These questions and so many more have become a drumbeat in our lives–a constant thump that never really leaves us. We, adults, have all learned to live with it, perhaps normalizing or quieting it with the hectic balance of home-school, work, household, and community obligations.  But, for our small people, whose ears are more sensitive than ours, this drumbeat of uncertainty may feel like the whole percussion section.

So, what’s a parent to do? There really is no end in sight right now, and our kids need to silence those cymbals so that they can learn, grow, and thrive. I know for my family, when the pandemic hit, we suddenly had more screen time enter our lives than ever before. I’m pretty sure we’re not alone in that. And now, eight months into this crisis, I’d really like to return to a more normal balance, but my energy is fast becoming depleted.  

I don’t know any parent right now who has the bandwidth for a multi-day project recreating the Jurassic period by turning our bedroom into a prehistoric jungle-scape using all recycled and eco-friendly materials. But we can focus on what I like to think of as micro-moments of creativity—small engagements, maybe just once a day, that give us all a moment of connection and joy. Maybe we can sit with our kids for five minutes to glue some colored tissue paper into a lively collage. Maybe we can use breakfast time to make up a story together based on one of our favorite animals. Perhaps we can grab flashlights and have a mini-living room dance party for just one song per evening?

If we shift our focus from overwhelmed to just one micro-moment per day, how will that change our perspective? Our kids will have that moment of connection that grounds them. We will escape from the anxious buzz in our brains by focusing entirely on something different. And, hopefully, we will all fight uncertainty by bringing a tiny bit more laughter and imagination into our daily lives. 


This post originally appeared on Piedmont Post.

Nina Meehan is CEO and Founder Bay Area Children's Theatre and the host of the Creative Parenting Podcast. An internationally recognized expert in youth development through the arts, Nina nurtures innovation by fostering creative thinking. She is mom to Toby (13), Robby (10) and Meadow (5).  


So, for my little monster’s second birthday she got a MONSTER (shocking) pajama party.  Complete with monster paper dolls, sock monster favors, and, of course, a monster cake!  It couldn’t be a monster party without a monster cake.

What you will need to create your own monster cake:

  • a round cake pan
  • a cake mix or a homemade one frosting, dyed to your desired color
  • sixlets, in your chosen color/s
  • paper eyeballs
  • wooden skewers
  • hot glue gun & glue stick

For my eyeballs, I used Photoshop Elements to create what I was looking for.  I created one orange and one pink, those were our party colors.  I went with only two eyeballs for my monster; but you could definitely add or subtract from this, there are no rules when it comes to monsters!

Once I was done I printed them out, glued them to some grey cardstock to make them sturdier, and then hot glued them to two wooden skewers.  With them attached to the skewers, I can just poke them into the finished cake wherever and however I choose.

I used a 7 inch round cake pan, you can use whatever size or shape suits you and your monster needs.  As I said with the eyeballs, there are no rules when it comes to monsters!

I used box cakes and store bought frosting because baking is not always my strong suit, and, honestly, it is just simpler.  I first dyed my frosting a light pink so that the bits that could be seen would match. Then I baked, I cooled, I frosted, I stacked, I frosted the rest and then the real fun began.

I got out my massive amount of orange and pink sixlets and started covering the cake.  I started in the middle of the top and worked my way out and then down the sides.  I picked the two colors at random, just reached in and pulled out.  You could easily make a pattern out of it if that’s what you want.

It was tedious; but, eventually, the cake was covered in the sixlets and looking like a scaly, bumpy, pink, and orange monster.  I situated it on the platter, poked the eyes into place, and voila!

There was singing, wish-making followed by cake slicing and eating!

I also made cupcakes, as the cake was not very big, and I always love to make too much.  I made smaller eyeballs and hot glued them to toothpicks for the cupcakes.  The cake ones would have been oddly huge on the cupcakes.


I'm a stay-at-home mother of three amazing kids.  My days are filled with bus stops, cleaning food off the walls, changing diapers and tackling the perpetual mountain of laundry.  And I wouldn't trade it for anything!