As modern parents, every day we face the delicate balance of keeping our kids informed and feeding their curiosity, and keeping them safe. Finding age-appropriate websites, apps, and shows is a struggle—and finding quality news that isn’t full of adds or terrifying words and photos, is nearly impossible. That is, until now. Thanks to Xyza: News for Kidsyou’ll find news by and for kids, in both online, app and paper form. Read on to learn more about this exceptional new publication and how your kids can get involved.
News You Can Use
Xyza: News for Kids believes the world of news is fascinating. And that reading the news is an important habit for parents and kids alike. Every month, Xyza publishes a newspaperjust for kids between the ages of 7 and 14. A real, print newspaper!! And every week, they e-pubish news stories from around the world for the website and the app. You can subscribe to one, both, or all three!
Dream Team
Founded by two awesome moms, Joann Suen and Sapna Satagopan, their vision is that Xyza fosters a child’s love of the world around and genuine thirst for knowledge in the world, all without graphic images and terms your kids don’t need to learn until they are in their twenties (or, maybe never.)
By and For Kids
Want to read a kid’s point of view? Xyza Junior Reporter program offers just that! A kid’s eye view of current affairs. And if your kids want to get involved they can become a news reporter, too. Curious kids, events you’re attending, photos you’ve snapped of the world—all these can be contributed by kids to the Junior Reporter Program. Audio interviews, videos, written accounts, all can be part of the experience.
Psst: Summer Photo Contest Is On! Xyza’s Summer Photography Contest is happening right now! Just enter a photo taken by your kiddo by September 1. The photo should tell an interesting story about your child’s summer. Read up on contest deets here.
Subscriptions run in 3, 6, or 12 month durations, at about $4.16/month. You can subscribe to print only, web online or both! Read up on Xyza News for Kids online and subscribe at xyzanews.com
We love LEGO bricks, they love LEGO bricks, but sometimes you want your budding builders to try something new. Getting creative with at-home or easy-to-find materials can be just as easy as LEGO and we promise, just as fun. So ditch the blocks, just for the day, and get busy with marshmallows, cardboard and more. Read on for our 9 favorite ways think outside the blocks.
1. Use Your Extra Newspapers
Got a stack of newspapers lying around, ready to be recycled? Don’t toss them yet! This genius idea from Modern Parents Messy Kids uses rolled-up newspaper to create geometric forts. Drape a blanket over the top and it’s an instant hideout. Get the super-easy instructions here.
2. Graham Cracker Houses
It’s the holiday season, which means gingerbread houses are in abundance. Break out the graham crackers and let your little architects have a yummy good time with this adorable (and delicious!) idea, courtesy of Hungry Happenings.
3. Shoebox Blocks
Here’s a great excuse to buy more shoes: Turns out, shoeboxes make great DIY jumbo building blocks! All you need is a little wrapping paper, tape, and a big batch of boxes. Get the details from the stay-at-home-mom survival guide.
4. Build a Log Cabin…without the Logs
Lincoln Logs are great and all, but it would take a whole lot of them to make something big enough to climb inside and get cozy. Why not jumbo-size your logs with this project, courtesy of Bob Scroggins at Instructables. Note: Mom and Dad are going to have to get in on the building; these giant cardboard logs (made from old carpet tubes) require a few hours of prep time—and a saw—to make.
5. One Man’s Trash Is a Little Builder’s Treasures
Turn your boxes, toilet paper rolls, and cans into building blocks— then recycle them when your kids are done building. Get the scoop from B-Inspired Mama.
photo: Melissa Heckscher
6. Cardboard Cut-Out Construction
Love cardboard box projects but don’t love the space the boxes take up in your house/yard/ garage? This project from Inner Child Fun uses only the flat sides of boxes to let your kids create three dimensional structures. That means, when all is said and built, you can stow all your building materials easily in a closet. Get the details here.
7. Toothpick Towers
Got a box of toothpicks? Stick them into a marshmallow or gum drop, or cheese cube—you get the idea—and get ready to make skyscrapers. Get some inspiration from artist and author Jean Van’t Hul at The Artful Parent.
Parental note: If your tots are too small for toothpicks, you can do the same thing with pretzel sticks. Get some examples here.
photo: Melissa Hecksher
8. Sponge It Up
Who says your little builders have to give it a rest when they’re in the tub? A few packs of colorful sponges and your kids have a new set of water-friendly blocks. Whether in the bath or out — these super-soft shapes are especially good for little ones who love to throw their stuff at unsuspecting siblings. Mother-of-two, Valerie Deneen, shares some tips at Inner Child Fun.
9. Cardboard, Cardboard, Cardboard!
What’s better than a cardboard box? A cardboard rocketship! Or elevator car! Or stuffed animal hotel (see the super-cool building featured above, with the kitty)! Get your boxes together and find all the ambitious building plans here.
Will you try any of these creative building materials? Share in a comment below.
Our kids may have the technology we didn’t, but if we’re being honest, our childhoods were pretty rad. Read on for 15 awesome throwbacks that defined and made our childhoods truly one-of-a-kind.
1. Watching a video literally meant watching a video on a Video Home System (VHS).
2. You had to wait up to two weeks to get your film developed at “photo centers” and there was a good chance half your prints were blurry or too dark. Remember 1 Hour Photo? What a leap in technology!
3. You’d need to print out a hard copy of directions so you’d know how to get from Point A to Point B. And, the entire first page was just to get you out of your own damn neighborhood.
4. To rent a film, you had to physically go to a Blockbuster or Hollywood Video and “Be Kind Rewind” before you brought the tape back. Also, why were the film covers only used for display and not printed on the case? What’s up with that!?
5. You’d have to wait a good five minutes for your computer to dial-up to access the internet. Not to mention you’d have to log off the Internet in order for mom to make a phone call.
7. If you lived in California or certain states, you’d dial “popcorn” when you needed to set your watch (or if the power went out) because otherwise you had no idea what time it was.
8. If you were lucky, you had your own landline phone in your bedroom. If you were really lucky, your phone looked like this:
They’ve revved their engines and raced around the track. What’s next for those toy cars? A new home, of course! Read on for an easy-peasy DIY toy garage tutorial that’ll really get your kiddo’s creative engines running.
You’ll Need:
a box
paint
paint brush
scissors
sharpie pen
Hot Wheels® cars
Instructions:
1. Choose what color you want to paint your toy car garage. We chose blue for the outside and grey for the inside.
2. This step might get messy so you’ll want to lay out some newspaper or scrap paper to place underneath your box as you paint it.
3. Once your garage has dried, cut off the box’s flaps. Mom and Dad might need to help with this step.
4. Choose what cars you want to put in the garage.
5. Using your sharpie pen, create parking spaces for each car.
6. Use your scissors to cut a flap so your cars have an entrance and an exit.
We love how easy and entertaining this project is! Have you ever made a toy car garage? Are your kids into Hot Wheels? Share your creations with us on social media by tagging #RedTricycle and we’ll repost our favorites!
photos by Christal Yuen; copy by Erin Lem; and a special thanks to Momtastic for the inspo
Cheese niblets! Our favorite whiskered newspaper editor hits the stage for the Oregon Children’s Theatre world premiere of Geronimo Stilton: Mouse in Space. Whether or not you’ve read book #52 by the same title, you and your theater-loving littles will be pulling for this reluctant hero and his crime-fighting friends. Mark your calendars with the show dates and read on for the inside scoop on this brand-new show.
photo: Owen Carey
The Story The play is based on one of many wonderful stories in the Geronimo Stilton series. New Mouse City is being threatened by a sneaky villain and Geronimo is determined to get to the bottom of a series of crimes. He finds himself being sent on a top-secret mission in outer space, and he and his friends set out to solve the mystery once and for all.
This production is recommended for ages 4 and up. It’s not a musical and even though the storyline had us on the edge of our seats, it’s definitely a longer play at 1 hour and 10 minutes with no intermission. There are a few moments of darkness in the theater during transitions but nothing too alarming for the 4 and up crowd.
photo: Marianne Walters
Before & After Make sure to arrive at least a half hour early to take advantage of Art a la Carte, which provides an art project an hour before showtime. Just head up the stairs to the second floor and you’ll be welcomed to the tables to participate for free. After the show, the characters sit at a long table to sign autographs. Even if the line is long, it moves quickly as people bounce from one character to the next. (We got through the line in less than 10 minutes, so it’s worth it if your tykes can wait.)
You can make the most out of your day by making plans before or after the play. Head to the Multnomah Library’s Central location (801 SW 10th) to check out some Geronimo Stilton books for bedtime reading, or burn off some energy while running around the South Park Blocks behind the Newmark, between SW Park and 9th avenues. The theater also has a list of nearby activities and restaurants. Click here to see it.
photo: Marianne Walters
Eat, Drink & Go Potty The Newmark has a concession stand that is open before, during and after the show in case of a snack emergency among your crowd (think chocolate chip cookies and bags of chips). If you’re thinking of having lunch before or after the show, hit up 21st Century Pizza (1221 SW Jefferson) for slices. Make sure that your entire crew visits the restroom before the show since there is no intermission, and stop by the coat check for a booster seat for $1. It’s worth it for the youngest theater-goers, especially if they have a grown-up sitting in front of them. Finally, only closed containers are allowed in the theater so feel free to bring your bottled water in but finish everything else out in the lobby.
The play is one of the OCT’s Ticket to Read performances, which is a program designed to get low-income students excited about reading by linking literacy with live theater. Students enrolled in the program get a free theater ticket and a copy of the Geronimo Stilton book upon which the play was based. Want to know more about it? Click here.
photo: Marianne Walters
Getting There Arrive at least 15 minutes to secure a parking spot. Street parking can be found in the area, but make sure you can stay there for at least 90 minutes. For peace of mind, you might choose to park in the nearest lot two blocks away at the Fox Tower (775 SW Taylor), or Smart Park (123 SW Jefferson).
There’s a set of elevators and ADA restrooms making the Newmark Theater accessible for wheelchairs, as well as strollers.
When: Showing now through Feb. 14th Cost: ranges from $14-$32. Where: Newmark Theatre
Antoinnette Hatfield Hall
1111 SW Broadway
503-228-9571 Ages: 4 & up Online:octc.org
How excited are you for this world premiere showing of Geronimo Stilton? Let us know in the comments below!
NORAD’s Santa Tracker app has been updating children on Santa’s location since 1955. But did you know NORAD actually stands for U.S.-Canada North American Aerospace Defense Command? So how did a military agency get involved with making kids happy each December? Read on to discover the holiday story.
All Because of a Misprinted Number During Christmas, a Sears department store put in a newspaper ad urging kids to call Santa for a one-on-one conversation. The actual ad said,”Hey, Kiddies! Call me direct … Call me on my private phone and I will talk to you personally any time day or night.” Somehow that number was misprinted, and a child ended up calling U.S. Air Force Col. Harry Shoup, the director of operations at CONAD.
Shoup’s daughter remembers the story with a bit more detail, saying that her father first barked into the phone, demanding to know who was calling, which made sense as the hotline was for military emergencies only. More specifically, the landline was only meant to ring if Russians were attacking, so you can imagine the surprise on Col. Harry Shoup’s face when a crying voice asked if he was Santa’s elf!
Fortunately, not to ruin the holiday spirit, Col. Harry Shoup played along and even appointed a staff member to provide updates on Santa’s whereabouts on all future calls. Since then NORAD has relied on volunteers to help kids track Santa for 60 years from December 1st to the 25th. Visit the site to learn more! App: Free on GooglePlay and iTunes Online: noradsanta.org
Have you used a Santa Tracker before? Let us know how it went in the Comments below!
Now that the school year is underway you’re looking for hacks and shortcuts to help your family get back to your school year routine. In honor of #LazyMomsDay, scroll down for ideas that will save you time and headaches.
1. Hang a shoe storage unit on the back of your pantry door to organize snacks for the next week or two.
3. Speaking of bath time, use your laundry basket for something different than dirty clothes. Place your babe in the basket during bath time to ensure his toys don’t float away.
4. The new school year will inevitably bring new colds and sniffles. When those noses start running use a rubber band to tie together two tissue boxes. Use the empty one as a trash can.
7. Use a LEGO guy to hold up your phone charging cord to keep it from sliding off the desk. Your little helper will be holding the cord ready and waiting for your next charge. (Bonus, it’s totally cute!)
spotted at our editor’s home, photo by Amber Guetebier
8. Use a rubberband on your bathroom doors to prevent little ones from getting locked in.
9. Create a template for the babysitter and put it in a glass frame. Use a dry-erase marker to update it for each new babysitter and/or babysitting scenario.
10. Use a disposable coffee lid or a paper cupcake sleeve to prevent popsicle messes.
Head to the Presidio Officers’ Club for an emotional tribute to the children airlifted out of war-torn Vietnam to the US in 1975, as well as those who pulled it off. Operation Babylift: Perspectives and Legacies is part of the seasonally changing exhibits hosted in the Presidio Heritage Hall. This exhibit runs through the end of 2015 and will be especially poignant to families, and will surely spark conversation and questions for those old enough to grasp the larger concepts.
Photo Credit: Charity Vargas for the Presidio Trust
A Calming VIbe
A mellow soundtrack plays as you enter the exhibition, and it seemed to have a calming effect on even the most boisterous child. In the far corner a video shows moving interviews with people involved in the Presidio’s history. The combination of music and conversation seems to slow the kids down—we even saw some curled up on the plush seating watching the video about the area’s unique history. Next, meander between the partition walls and discover the extraordinary story of Operation Babylift. The exhibition coincides with the 40th anniversary of a dramatic airlift that removed more than 2,000 Vietnamese children from their war-torn country to be adopted by American families as Saigon fell. Foreign-run orphanages and adoption agencies spurred these efforts, with hundreds of children passing through the Presidio on their journey to new lives in the US.
Photo Credit: Charity Vargas for the Presidio Trus
Unanswered Questions
The exhibition doesn’t shy away from the controversy of the airlifts. One wall is dedicated to a timeline of events, including images of the war and newspaper articles raising questions about whether Operation Babylift was ethical or even legal. Was it a political ploy to ease the guilt of what had happened in Vietnam or an act of philanthropy when faced with children in crisis? These are the questions raised. The exhibition doesn’t promise answers but asks how dialogue might deepen our common understanding of events, of history and of each other.
Photo Credit: Charity Vargas for the Presidio Trus
Start a Conversation
With dialogue the theme, it makes sense that a central display is dedicated to conversations between some of the Vietnamese adoptees and the volunteers who got them out, gave medical aid or processed them to new homes. Five thousand volunteers helped with the operation, some risking their careers to be involved. Handheld audio sets (always a winner with the kids) give access to these moving conversations, touching on larger issues of history, identity and parental love.
Photo Credit: Charity Vargas for the Presidio Trus
Good to Know While some of this might be a bit much for the little ones, combine it with a Sunday picnic at Off The Grid or some Mexican fare at newly opened Arguello for a well-rounded day out. Even better, drop in for imaginative (and free) craft-making offered every weekend just down the corridor and tag team to get a look at this exhibition—it will not disappoint.
Date/Time
Tuesdays through Sundays, 10 a.m. to 6 p.m., through Dec. 31. Closed Mondays
Cost
Free
Location
Presidio Officers’ Club
50 Moraga Ave.
San Francisco, Ca
415-561-4400
Online: presidioofficersclub.com
Getting there
Paid parking is available. Or take the free PresidiGo Downtown Shuttle to the Presidio.
It runs 7 days a week with regular pick ups from the Transbay Terminal, Embarcadero BART, and Van Ness/Union.
Do you have a perspective on Operation Babylift? Let us know in the comments below.
You’ve got your taco bar all set up and the fiesta is imminent but there’s one key ingredient you still need to guarantee an awesome party: the piñata. Save a few pesos and follow the steps below to make your own with paper mache and a balloon. It’s almost as much fun making it as whacking it to pieces.
What You’ll Need
Balloon
Newspaper: cut in 1-2 inch wide x 6 inch long strips
No-Cook Paper Mache Paste: 2 cups flour, 1 ½ – 2 cups water, 1 TBSP salt (to prevent molding)
Non-toxic tempera paint
Tissue Paper: cut in 1 inch wide x 6 inch long fringe strips
Glue
Ribbon
Scissors
Hole Punch
Candy
A few piñata loving kiddos
Making the Piñata
Step 1
Blow up a balloon as big as you can manage; the round shape will serve are the base of your piñata, and the form will harden after applying the paper mache and newspaper strips.
Step 2
Mix up the paper mache (more water = thinner paste). Grab a handful of newspaper strips; start dipping and pasting over the balloon in a criss cross pattern. Heads up parents! Try not to let the kids get too dip-happy. This step takes time and it’s messy—you’ll need several layers, and you must let the piñata dry in between layers so make sure the littles go easy on the paste.
Psst! Be sure to leave the knot at the end of the balloon free and clear. When you are done decorating, this is where the candy will find it’s way into the piñata.
Decorating the Piñata
Step 3
Check to be sure your party piñata is totally dry: follow up with a few layers of paint. If your kiddos know the color they want to pick for decorating, think about using a matching color!
Step 4
After the paint dries, start gluing the tissue paper to the shape. Insider Tip: Cut thinner strips to glue on the top of the balloon. Let the kids get creative with strips of fringe, googly eyes, jewels or whatever else they want to add to the mix.
Filling the Piñata
Step 5
Find the knot and snip it to open a hole into the piñata—be sure to pull out the rubber pieces of the balloon. If you need to make the hole bigger, use your scissors.
Step 6
Punch two tiny holes (or use scissors if you don’t have a hole punch handy) across the big hole, use ribbon to make a hanging hook. Insider Tip: Wait until your piñata is TOTALLY dry before punching holes. The ribbon will rip through if the form is soft or wet.
Step 7
Fill your piñata with candy, then create a tissue paper top for the hole and loop another ribbon through the first for easy hanging.
Grab sticks and get to whacking!
Will you make your own piñata for Cinco de Mayo? Let us know in the comments below!
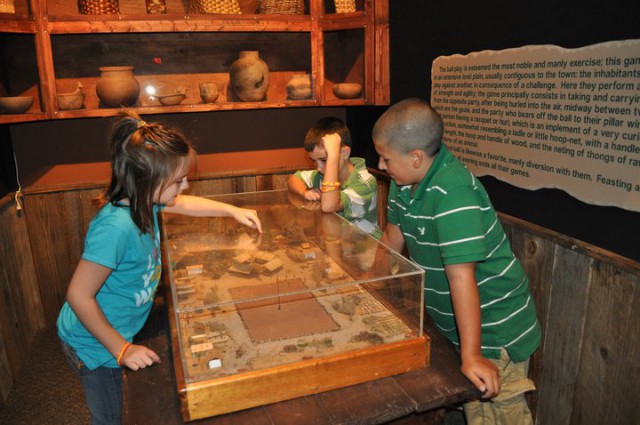
In today’s modern city sprawl, it’s easy to forget that the Atlanta area was once Cherokee country. In particular, Northwest Georgia’s red clay hillsides, river banks and grassy meadows were once home to Cherokee and Creek Indian villages, ceremonial sites and even plantations owned by powerful Cherokee leaders. If you have a budding archeologist or maybe an aspiring arrowhead collector, then it’s time to head to the hills and take your tribe to get more acquainted with Georgia’s Native American past.
Etowah Indian Mounds Historic Site Soaring to 63 feet, you’re sure to feel a sense of awe as you climb to the top of these curiously constructed earthen mounds. The 54-acre historic site preserves six mounds and a village site and is one of the most intact Mississippian Culture sites in the Southeast. Native Americans lived here from 1000 CE to 1550 CE and built the mounds for ceremonies, defense and burials. The chief-priest likely lived on the tallest mound overlooking the village. Kids will get a kick climbing the stairs to the top of the mounds and walking along the riverfront trail where you can view a v-shaped fish trap demonstrating how Native Americans ingeniously caught fish. There’s also a museum on site where you can view a replica of what the village may have looked like along with artifacts excavated from the site. Check out their website or call before you go to see if any special programs are being offered on the day of your visit. Park rangers frequently offer demonstrations and special nighttime tours (even a hayride) on the weekends.
Details: 813 Indian Mounds Rd., S.W., Cartersville, Ga, 770-387-3747, gastateparks.org/EtowahMounds. Open Wed.-Sat. $6 adults, $4 youth, $2 children under 6.
Funk Heritage Center One of the most comprehensive museums on Native American cultures in the United States is located near Canton, on the campus of Reinhardt College. The museum provides a great introduction to the indigenous cultures of the Southeast with its extensive collection of art and artifacts that span more than 100 centuries. Artifact displays and interactive exhibits (including a kids’ area) show what daily life was like for Southeastern Native Americans and early Appalachian settlers. Be sure to check out the award-winning short film, “The Southeastern Indians” and the outdoor Appalachian Settlement designed to interpret the pioneer experience with authentic log cabins, a blacksmith shop and other farm buildings. There is also a walking trail and a Native Garden where the littles can get out any restless energy.
New Echota State Historic Site One of the most significant Cherokee Indian sites in the nation is only an hour’s drive from Atlanta. New Echota, established in 1825, was the capital of the Cherokee Nation. It was the site of the first Indian language newspaper and the meeting place where tribal leaders gathered to sign the Treaty of New Echota which led to the tragic Trail of Tears. After the forced removal of the Cherokee in the 1830s, New Echota was left to return to farm land. Today, visitors can get a glimpse of what New Echota looked like when it was a thriving Cherokee settlement. Kids will enjoy getting to go inside the site’s 12 original and reconstructed buildings, including the Council House, Court House, Print Shop, a missionary’s home, an 1805 store, as well as outbuildings such as smoke houses, corn cribs and barns. There’s also an interpretive center with a film and exhibits about New Echota and the Cherokee. With the site’s nature trails, you could easily spend half a day here exploring.
Details: 1211 Chatsworth Hwy, N.E., Calhoun, Ga, 706-624-1321, gastateparks.org/NewEchota. Open Thurs.-Sat. $7 adults, $5.50 Children 6-11, Free for kids under 6.
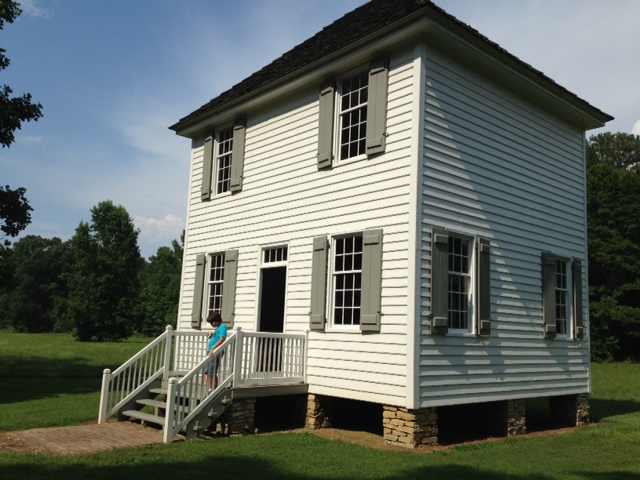
Chief Vann House Called the “Showplace of the Cherokee Nation,” this impressive 1812 brick mansion was home to Chief James Vann and later his son, Joseph Vann. While a historic home tour may not be at the top of every kid’s to-do list, you can make it interesting by pointing out some of the unusual features and folklore – like the original hand carved woodwork and “floating staircase” crafted by Moravian missionaries and the children’s bedroom demonstrating what life was like for a 19th century kid. It’s also rumored that President James Madison slept there in 1819. The site is significant for many reasons, but perhaps most for the way it demonstrates the interaction between the Cherokee and other cultures – from outside missionaries to white settlers and enslaved African-Americans. It may be surprising to some that Cherokee Indians, like the Vanns, ran prosperous plantations and owned slaves. The visitor center next door offers exhibits and a film about the Vanns and life on the Cherokee plantation.
Details: 82 Ga. Highway 225 N, Chatsworth, Ga, 706-695-2598, gastateparks.org/ChiefVannHouse. Open Thurs.-Sat. $6 adults, $4 Children 6-17, Free for kids under 6.
Looking to learn more about Native American history? Be sure to check out the Atlanta History Center’s exhibit Native Lands: Indians and Georgia open now through October 12th.